DCNM Integration with ServiceNow
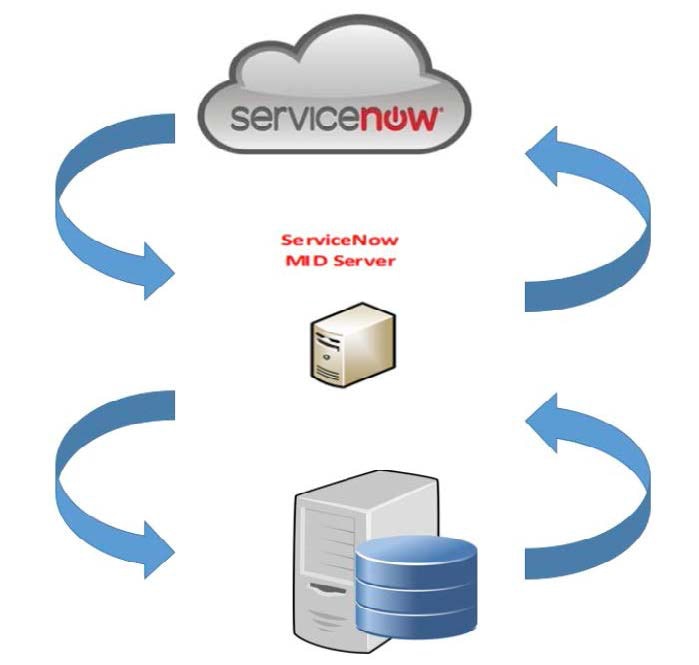
ServiceNow offers applications for IT Service Management (ITSM) and IT Operations Management (ITOM). There are four primary modules - inventory discovery, incident management, event management & change management workflows. Starting from Cisco DCNM Release 11.3(1), we provide Cisco DCNM integration with ServiceNow. This enables you to integrate end-user IT data with the ServiceNow platform. The integration provides a default set of ServiceNow custom tables which are populated with configuration data.
To utilize this functionality, install the DCNM application in the ServiceNow customer instance and provide the DCNM mid-server details. Information or data regarding switch details, port details, and alarms, is retrieved to the ServiceNow Configuration Management Database (CMDB) tables. By default, data is retrieved every 15 minutes and displayed.
Details about the switches and ports of each switch are collected from the DCNM inventory. The alarms are collected by polling DCNM. Alarms are then filtered and categorized based on their type, such as, CPU, MEMORY, POWER, LINKSTATE, EXTERNAL, ICMP, SNMP, and SSH. The alarms are then stored in an Events table. These events are then used to generate incidents for the CPU, MEMORY, SNMP, and SSH categories. The source, description, severity and category of each alarm is stored. However, when an alarm ceases to exist in DCNM, the incident that was raised for it is not updated or cleared on the DCNM ServiceNow application. When polling of alarms is initiated for the first time, the alarms that were raised in the last seven days are pulled in from DCNM.
The DCNM application on ServiceNow runs scheduled scripts and connects with the mid-server which in turn connects with DCNM to retrieve data. DCNM sends the requested data to the mid-server which then passes on the data to the DCNM application on ServiceNow. The tables in the DCNM instance on ServiceNow are then populated with this retrieved data.
Guidelines and Limitations of DCNM Integration with ServiceNow
-
In the ServiceNow Cisco DCNM Application version 1.0, details about only one MID server can be added in the Cisco DCNM>Properties table. Starting from Cisco DCNM Application version 1.1, multiple MID servers can be added in the Cisco DCNM>Properties table. This means that data can be retrieved from multiple DCNM setups at the same time. In the ServiceNow GUI, data from each DCNM is distinguished by the DCNM IP address.

-
Scheduled scripts to retrieve data are run only after insertion of a server record in the Cisco DCNM>Properties table.
-
In case the mid-server IP Address and credentials in the Cisco DCNM>Properties table are changed, the data that was imported using the previous mid-server is deleted from the application scope tables. However, data that was imported to the ServiceNow CMDB (global scope) remains and is not deleted.
-
To ensure optimal performance in the ServiceNow database, each entry is matched with the switch database ID and IP Address ensuring that there is no duplication of entries.
-
Entries in the cmdb_ci_ip_switch table have to be manually deleted in case a new server is added in the Cisco DCNM>Properties table.
Installing and Configuring the Cisco DCNM Application on ServiceNow
Procedure
| Step 1 |
Log in to https://dcnm1.service-now.com. Select System Applications > Applications. Install the Cisco DCNM Application from the All Apps tab. 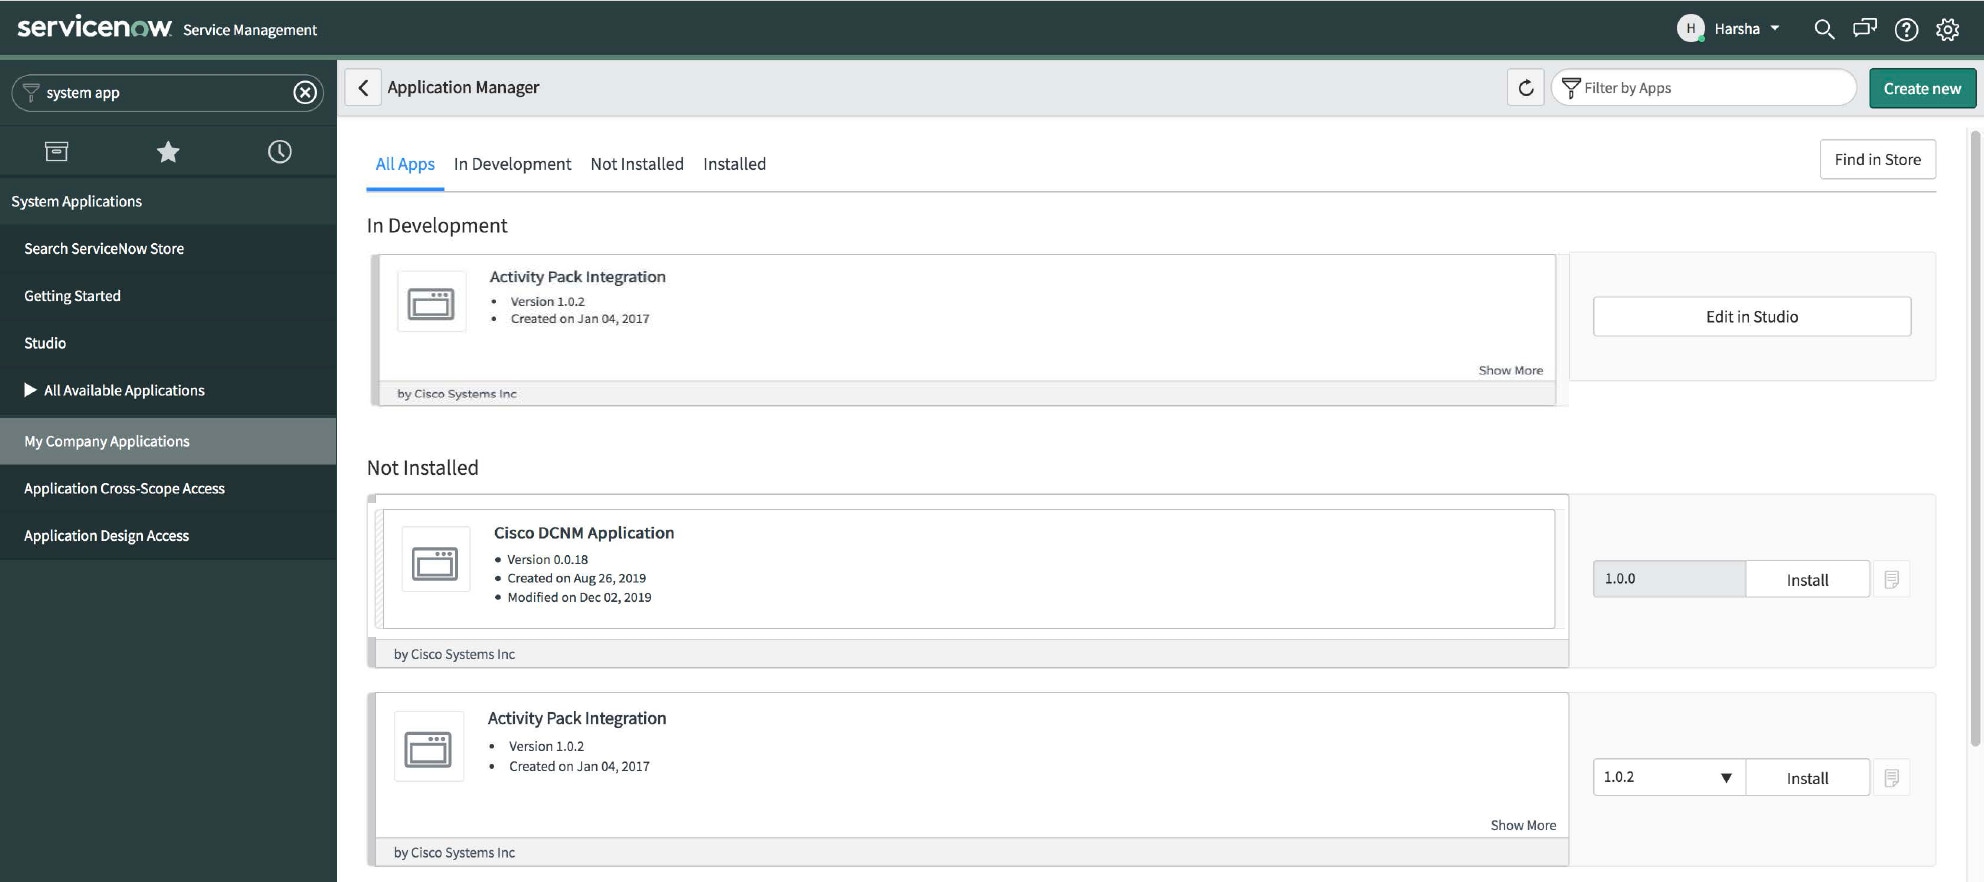 |
||||||||||||||||||||||||||||||||||||||||||
| Step 2 |
After installation is complete, verify that the Cisco DCNM Properties and Dashboard tabs are appearing in the application. 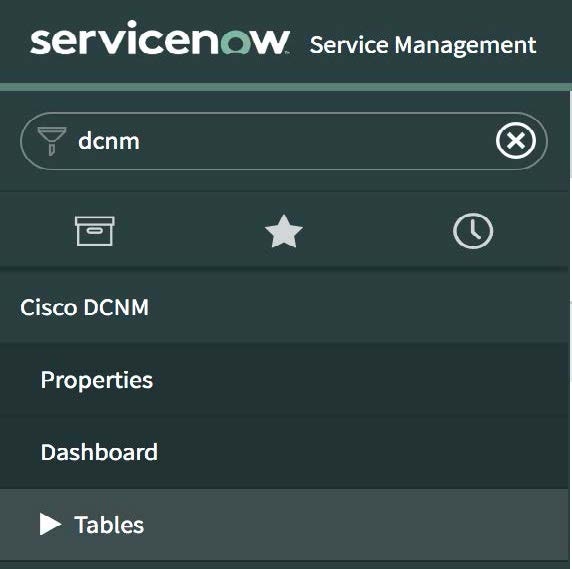 |
||||||||||||||||||||||||||||||||||||||||||
| Step 3 |
Choose MID Servers and click the MID Server that is used for DCNM integration.  |
||||||||||||||||||||||||||||||||||||||||||
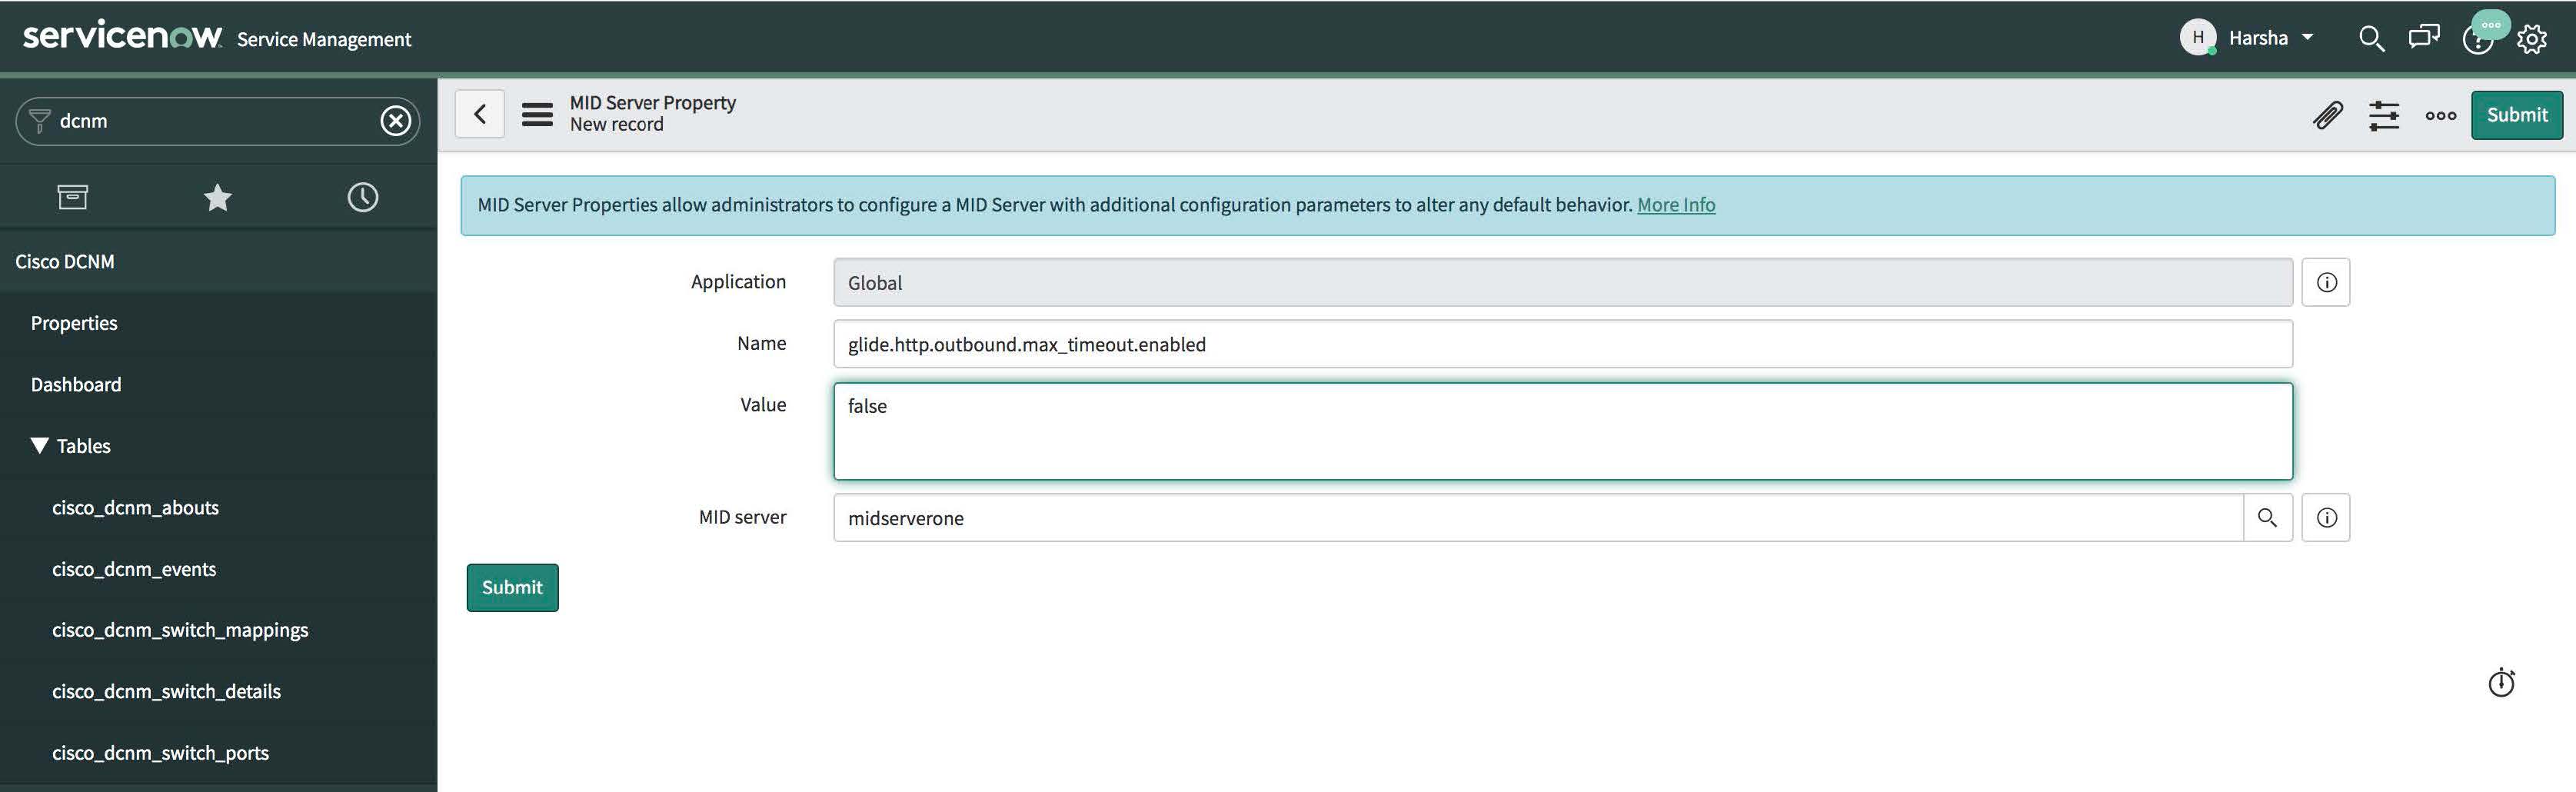
| Step 4 |
Scroll down and click the Properties tab. Click New and add the property given below in the MID Server Property New record window. Click Submit.
 |
||||||||||||||||||||||||||||||||||||||||||
| Step 5 |
Now, select the Configuration Parameters tab.  |
||||||||||||||||||||||||||||||||||||||||||
| Step 6 |
In the Configuration Parameters tab, click New. Enter the required details in the fields. 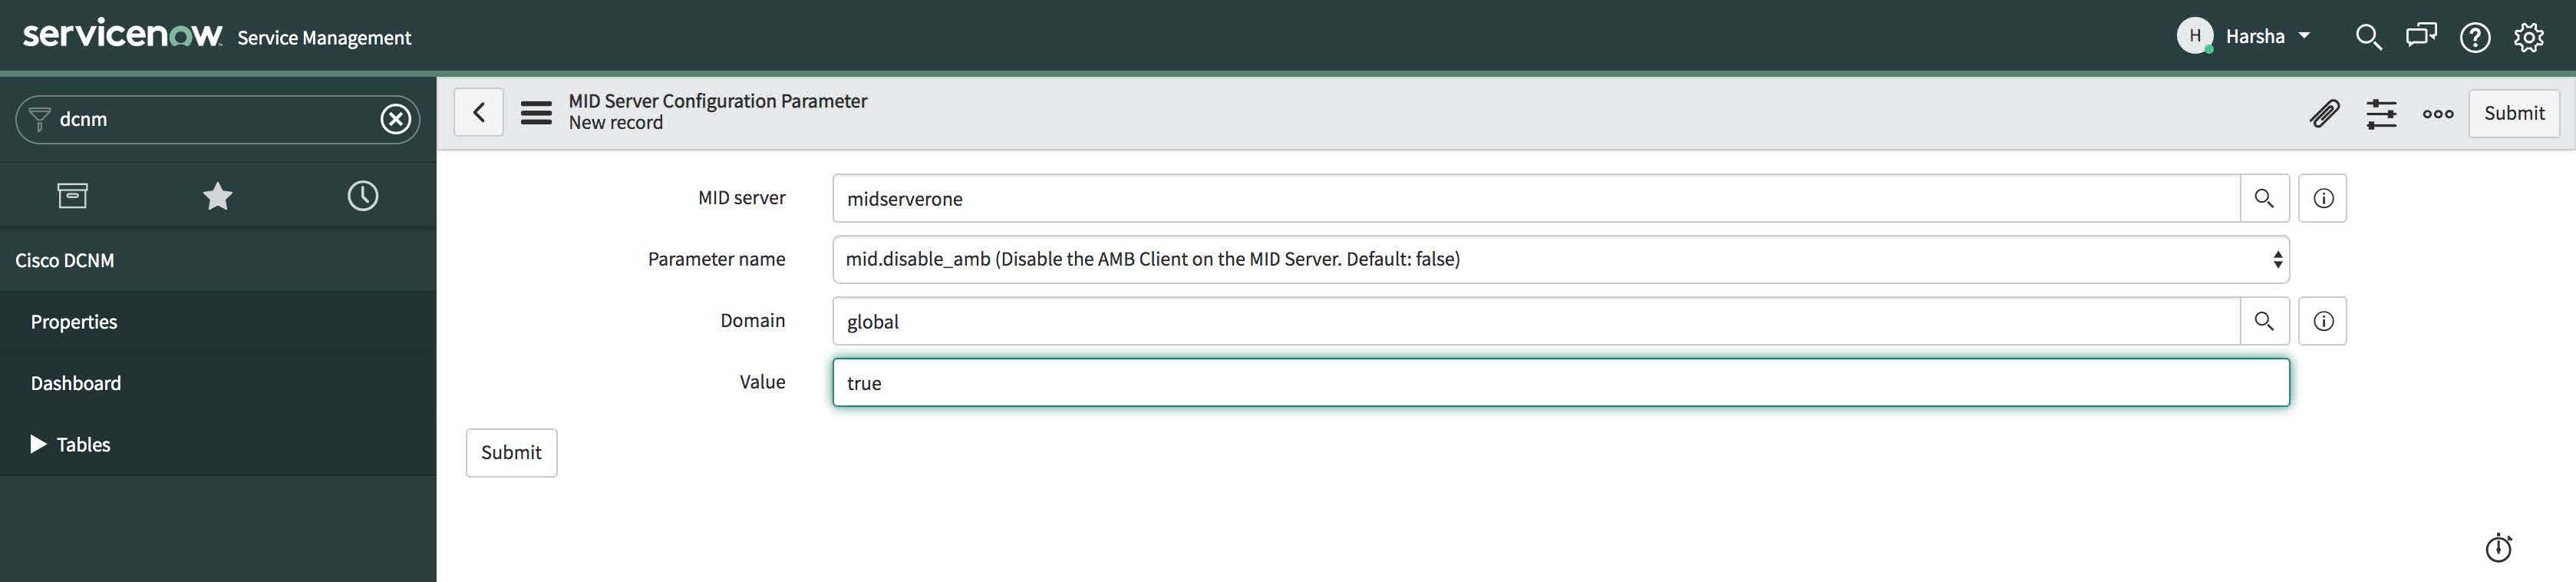 |
||||||||||||||||||||||||||||||||||||||||||
| Step 7 |
Click Submit to set up the MID Server. |
||||||||||||||||||||||||||||||||||||||||||
| Step 8 |
Choose Cisco DCNM > Properties. Click New Server. Enter the required parameters. 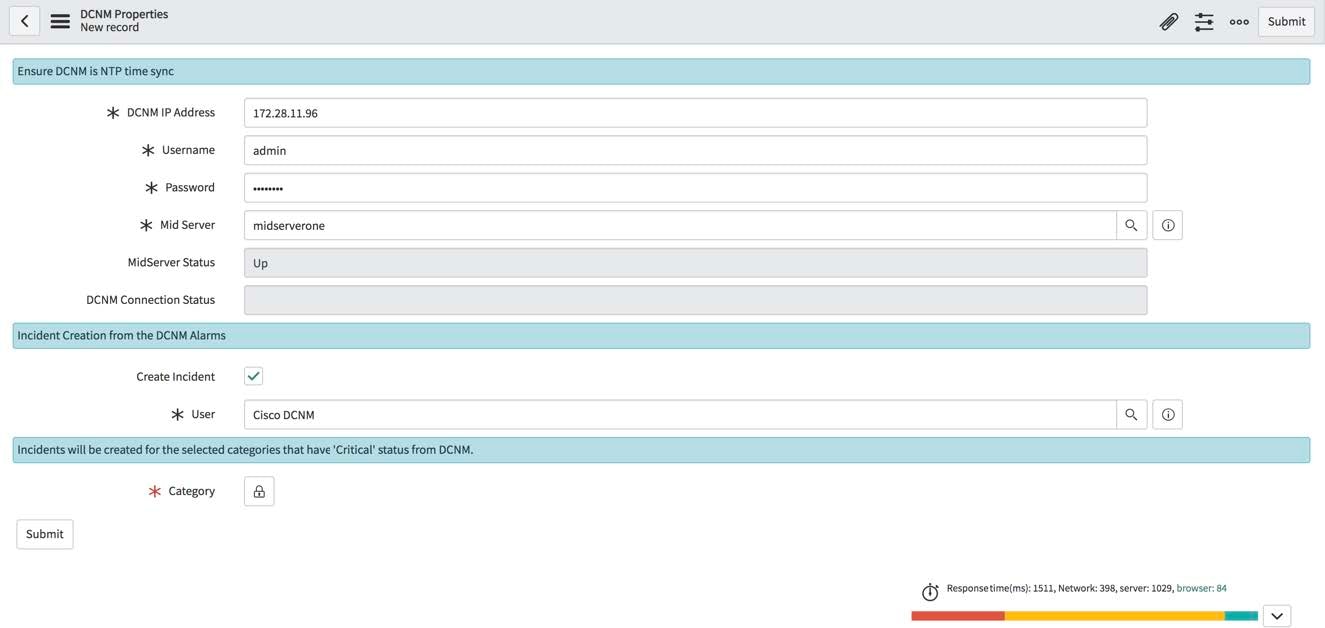 DCNM IP Address - IP Address of the DCNM. Username - Enter the username used to log in to DCNM. Password - Enter the password used to log in to DCNM.
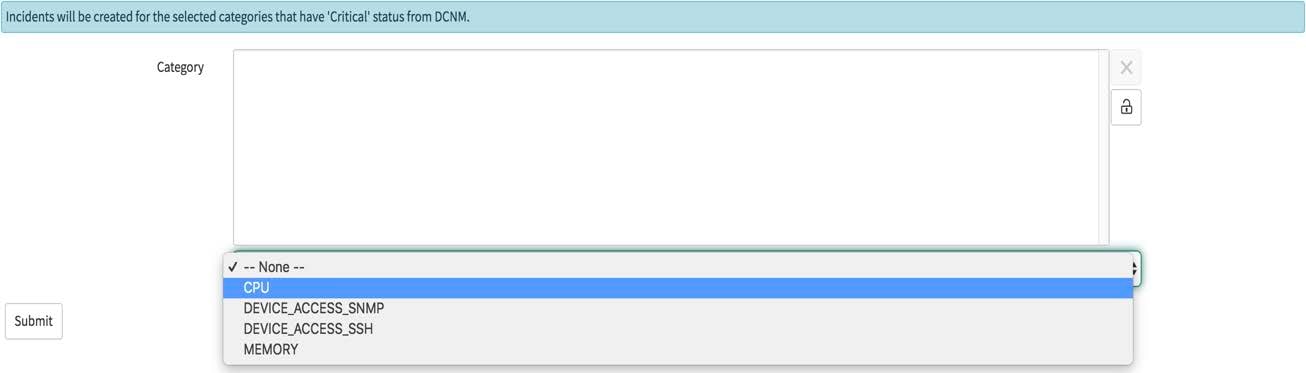
Mid server - Specify the name of the mid server to be used. The name is auto-populated as you type. You can also click the search icon next to this field to bring the MID Servers window. You can then select a MID Server from the list that is displayed. MidServer Status - Indicates whether the MID server is up or down. DCNM Connection Status - Indicates whether the DCNM IP address that has been provided is reachable or not to retrieve data. This status field is populated when you click Submit after you have entered the required information. Reachable is displayed on successful communication with DCNM, and Unreachable, in case the connection is unsuccessful. Create Incident - Select this checkbox in case you need incidents to be raised automatically for alarm events. User - Create a new user and add the user name in this field. The Caller field in the incidents that are created is populated with this user name. This field is auto-populated as you type. You can also click the search icon next to this field to bring the Users window. You can then select a user from the list that is displayed. Category - Click the lock icon  Select the required category for which incidents have to be created from the drop-down list below the Category window. The available categories for creation of incidents are CPU, DEVICE_ACCESS_SNMP,DEVICE_ACCESS_SSH, and MEMORY. Refer the following table for more information on this.
  Now, click Submit. |
Viewing the Dashboard
Choose Cisco DCNM>Dashboard to display the dashboard. The DCNM IP Address, the DCNM Connection Status and the MidServer Status are displayed at the top of the dashboard.
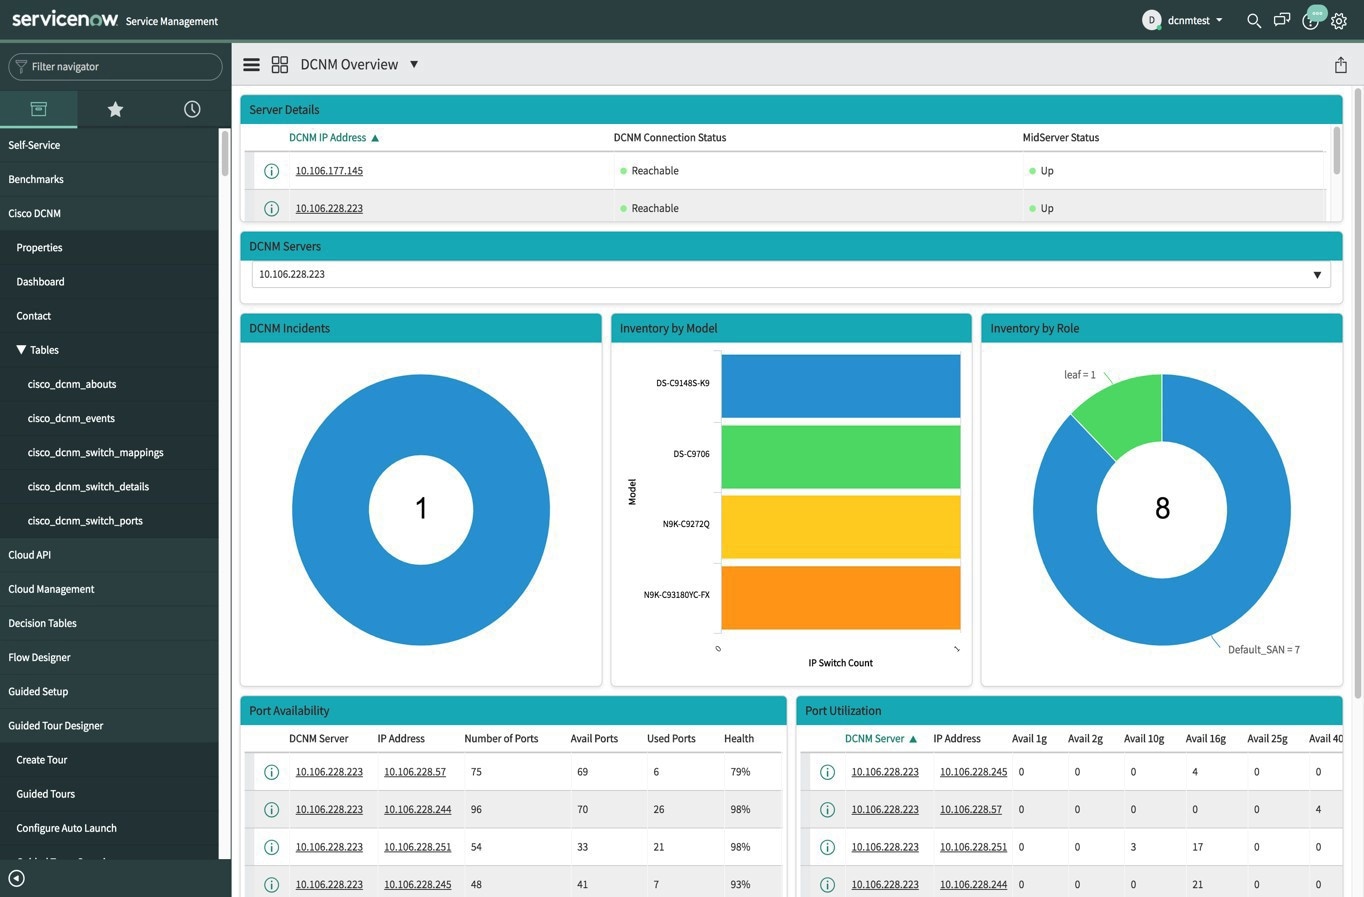
The DCNM Servers section displays the IP address of the DCNM server from which the data is being retrieved and displayed. Click the dropdown list to select any other DCNM server as per your requirement.

Click All to retrieve and display data from all the DCNM Servers that are displayed in the dropdown list. When the All option is selected, the number of incidents that are displayed in the DCNM Incidents donut are color-coded and displayed based on the different DCNM server IP addresses. The Inventory by Model and Inventory by Role donuts also display data from all the DCNM servers. The Port Availability and Port Utilization donuts display data along with the DCNM Server that each IP address belongs to.

DCNM Incidents - This displays the number of incidents that have been raised based on the alarms retrieved from DCNM. Click the donut for
more details about the incidents.
Inventory by Model - This displays the number and type of switches present in DCNM. Each band represents a device model. Click a band for more
information.
Inventory by Role - This displays the number and types of switch roles present in DCNM. Click the required section to display the number of roles that are operational and click on that pictorial representation to display more details about the roles.
 Note |
The number that is displayed in the Inventory by Role donut does not change in case switches are removed from DCNM. The switches that are removed are displayed as Non Operational and there is no change in the number that is displayed in the donut. |

Port Availability - This displays information about port availability. The DCNM server and IP address along with the total number of ports, available ports, used ports and health of the switch is displayed. Click
an IP address to display more information.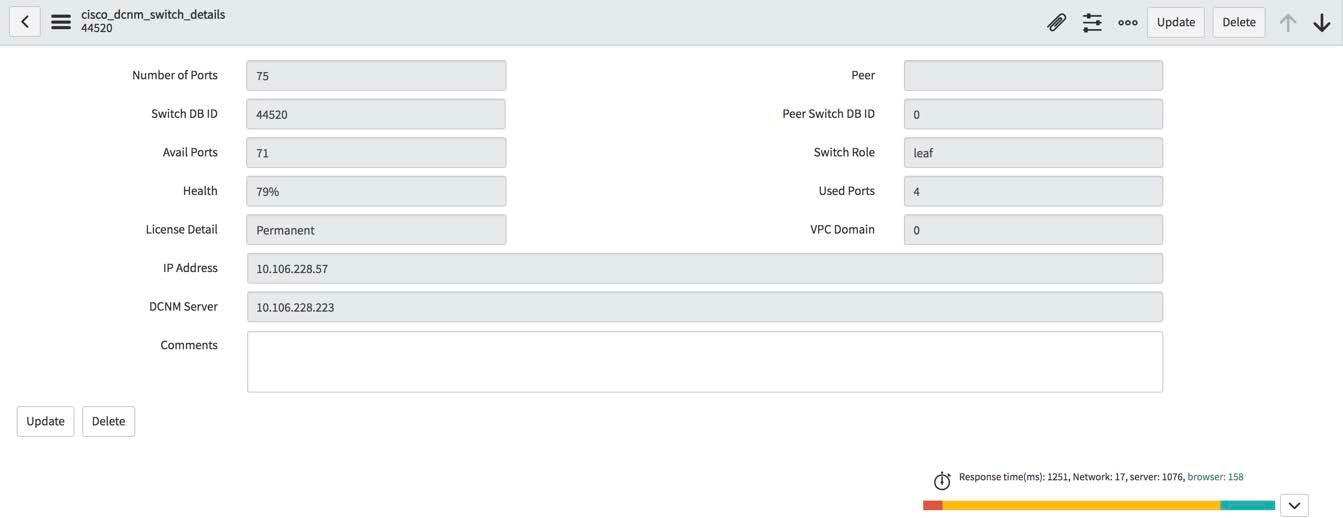
Port Utilization - This displays information about port utilization based on each IP address. The number of ports having 1G, 2G, 4G, 8G, 10G,
16G, 25G, 32G, 40G, and 100G availability, are displayed. Click an IP address to display more information.
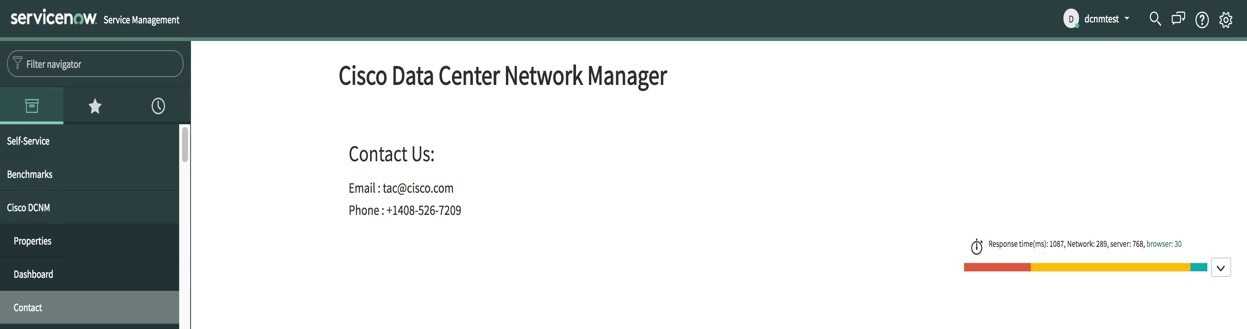
Contact Us
Choose Cisco DCNM>Contact to display an email address and a telephone number that can be used to contact Cisco Systems for any queries.
Troubleshooting DCNM Integration with ServiceNow
In case data is not being retrieved in the ServiceNow table:
-
Check if the MID server is up or down.
-
Check for information entries in system logs with the source “x_caci_cisco_dcnm”.
-
Check the login credentials added in Cisco DCNM Properties.
-
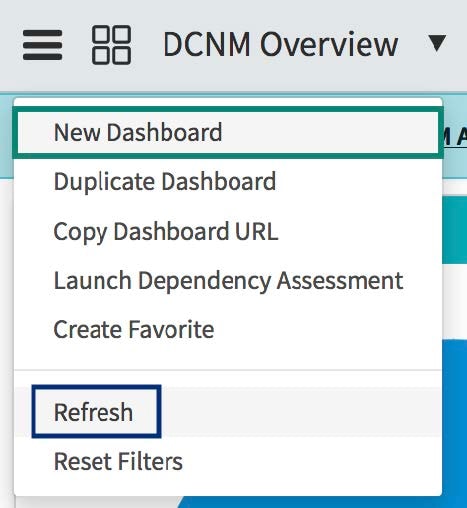
Consider a scenario in which data is being displayed on the ServiceNow dashboard for the selected DCNM server and then you want to display data for another DCNM server. In such a scenario, the ServiceNow dashboard may take some time to load data from the other DCNM server due to a delay in refreshing the cache. To refresh the data manually, click the Refresh icon that appears on the top right corner of the individual tiles when you hover the cursor over the tiles.

You can also refresh the whole dashboard by clicking on the Dashboard Controls icon
 and then clicking Refresh to load the reports correctly.
For more information on DCNM application integration with ServiceNow, click here.
 Feedback