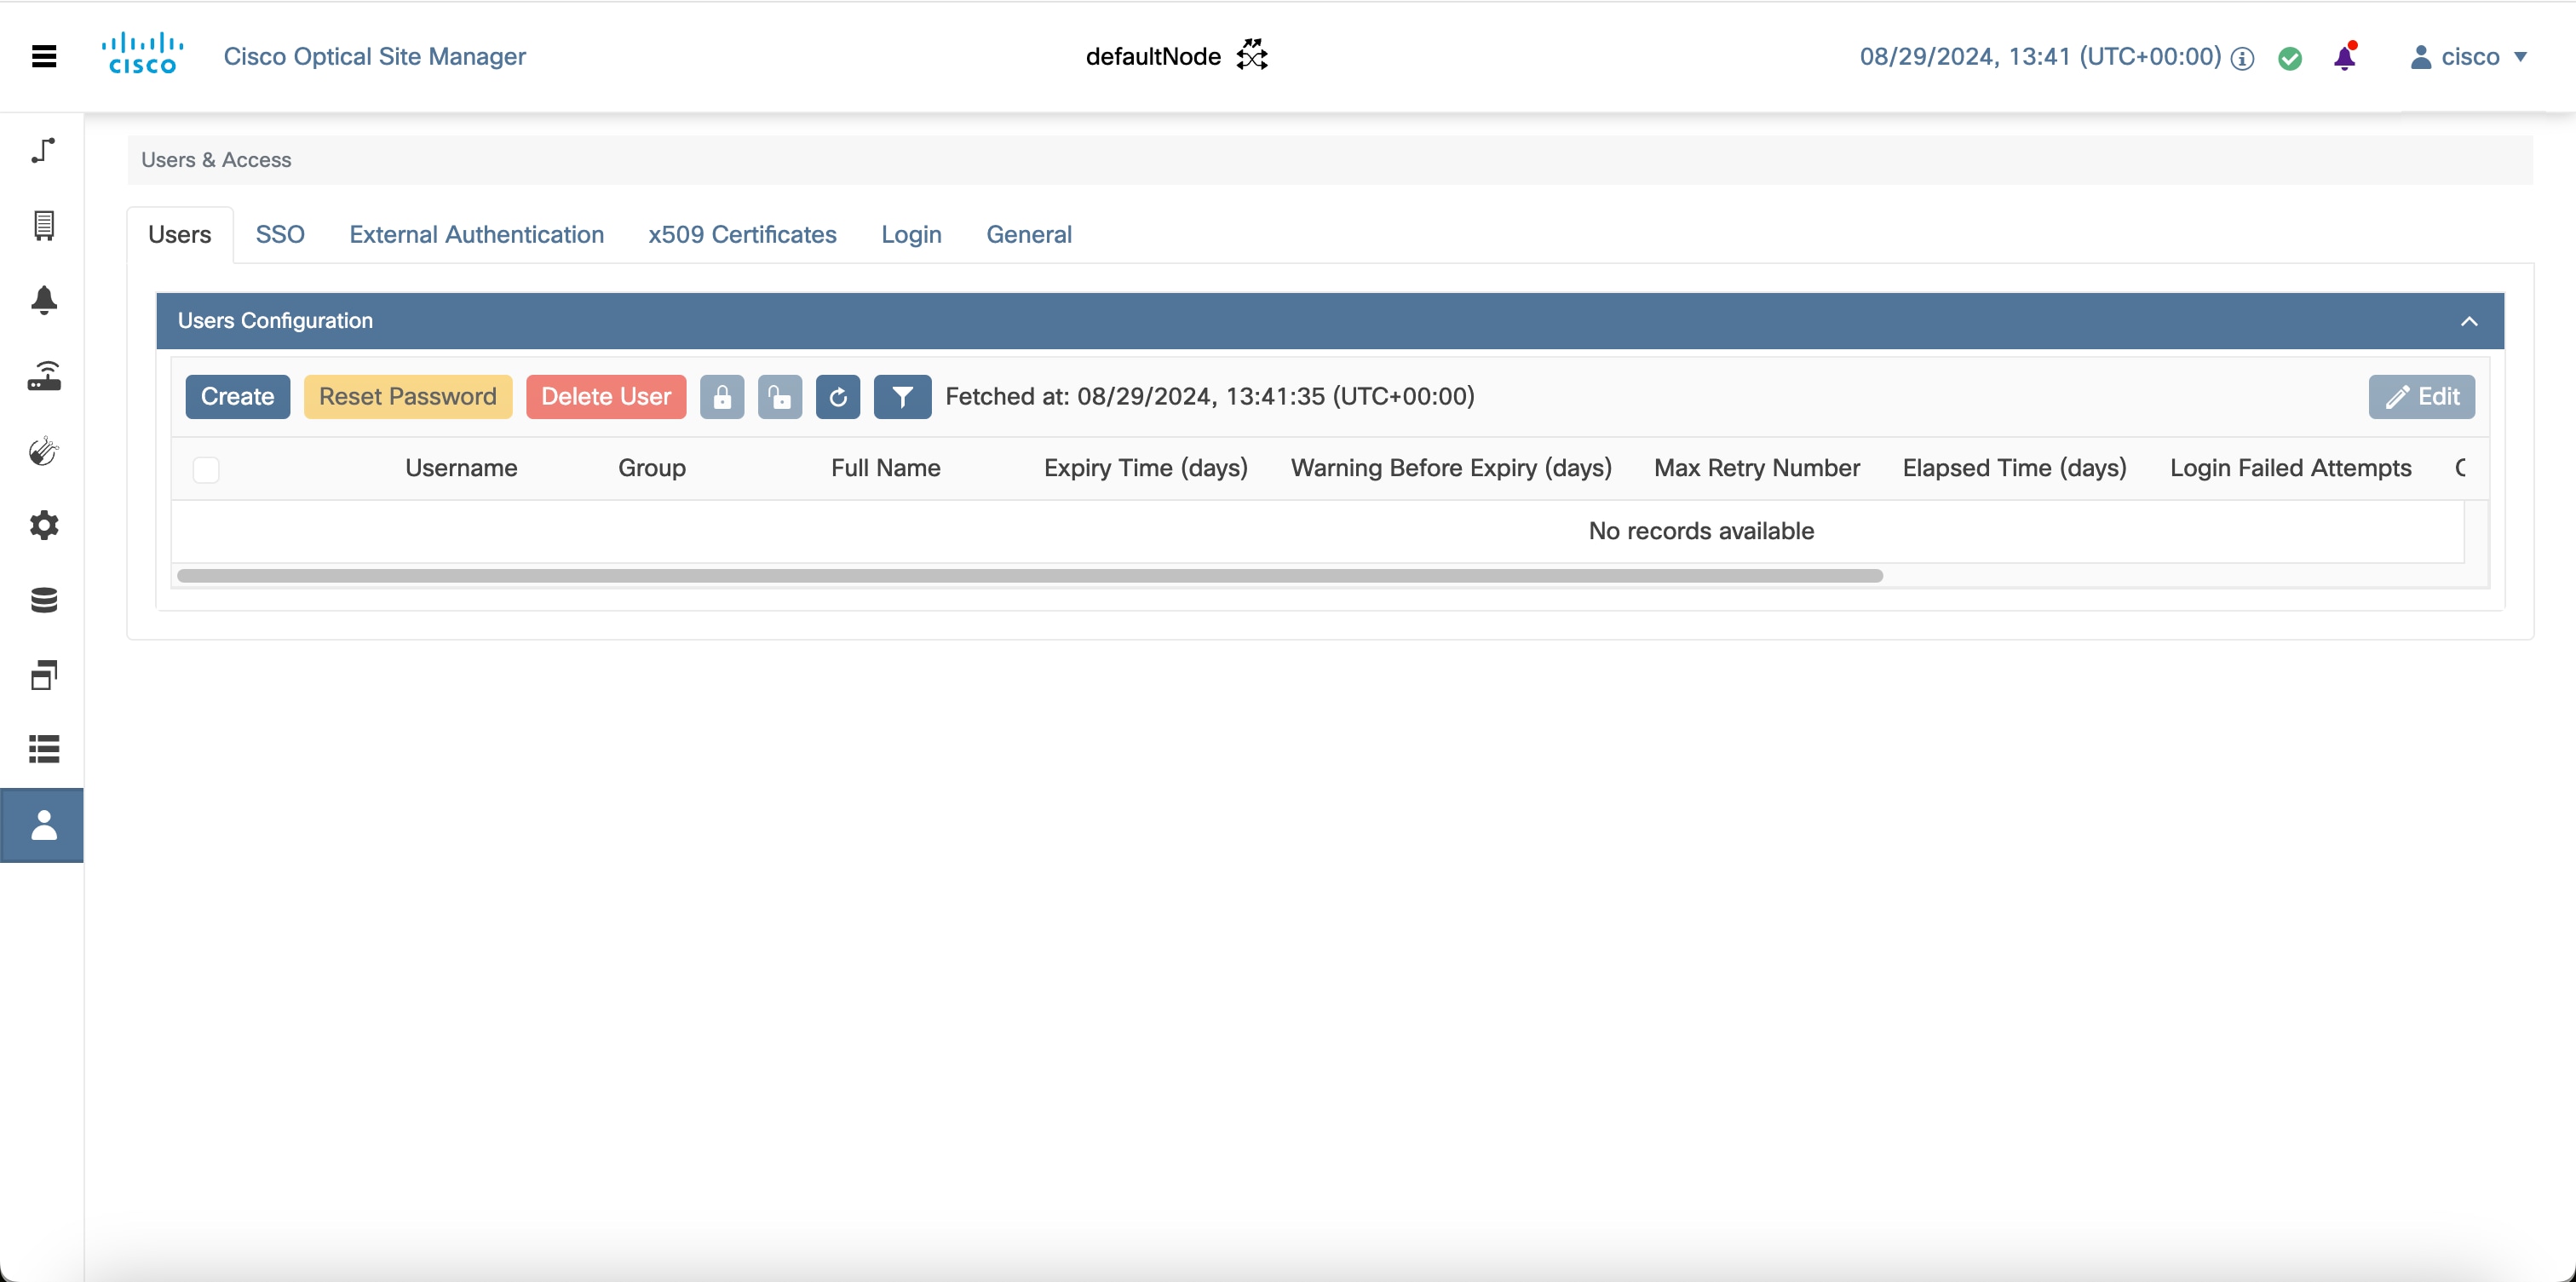
Users Access and Authentication

This chapter describes the tasks to manage users accounts, SSO authentication, external authentication, web certificates.

Figure 1. Users Access and Authentication

Users Configuration

This section describes the tasks to manage users and user profile passwords.

Create Users

Use this task to create new users. Only an admin can create new users.

Before you begin

Log into Cisco Optical Site Manager

Procedure


Step 1

Click Users & Access in the left panel.

Step 2

Click the Users tab.

Step 3

In the Users Configuration section, click Create.

The Create User dialog box is displayed.

Step 4

Enter the following details in the Create User dialog box.

  1. User Name—Type the user name. The user name must be a minimum of six and a maximum of 40 characters. It can include alphanumeric characters (a-z, A-Z, 0-9) and special characters @, " - " (hyphen), and " . " (dot).

  2. Password—Enter the password that will be used by the user to log into Cisco Optical Site Manager. The password must be a combination of alphanumeric (a-z, A-Z, 0-9) and special (+, #,%) characters. The minimum number of characters in the password is eight and the maximum number is 127. The password must not contain the user name.

  3. Retype the password in the Retype Password field.

  4. Expiry Time (days)—Enter the time period in days before which the user needs to change the password. For example, if the user has set the expiry time to be 20 days, the user must change the password before 20 days are over.

    The user is automatically moved to the Password group after this time elapses. The user must change the password before performing any other action.

  5. Warning Before Expiry (days)—Enter the number of days the user is warned of the expiry of the password.

  6. Max Retry Number—Specify the maximum number of consecutive unsuccessful login attempts that are allowed. When the maximum number of failed login attempts is reached, the account is automatically moved to the Password group.

  7. Group—Select the group from the drop-down list. The available options are admin, editor, maintenance, snmp and viewer.

Step 5

Click Create.

The new user is added to the list.


Change User Password

Use this task to change password for a user. Only an admin or superusers can change the password.

Before you begin

Log into Cisco Optical Site Manager.

Procedure


Step 1

Click Users & Access in the left panel.

The User & Access page is displayed.

Step 2

Click the Users tab.

Step 3

Select the check box corresponding to the user you want to change the password in the Users Configuration section.

Step 4

Click Reset Password.

The Reset Username Password dialog box appears.

Step 5

Enter the new password in the New Password field.

The password must be a combination of alphanumeric (a-z, A-Z, 0-9) and special (+, #,%) characters. The minimum number of characters in the password is eight and the maximum is 127. The password must not contain the user name.

Step 6

Retype the same password in the Retype Password field.

Step 7

Click Reset Password.

A confirmation message appears.

Step 8

Click OK.


Delete Users

Use this task to delete users. Only an admin or superuser can delete users. Superusers cannot be deleted using this task.

Before you begin

Log into Cisco Optical Site Manager

Procedure


Step 1

Click Users & Access in the left panel.

Step 2

Click the Users tab.

Step 3

Select the check box corresponding to the user you want to delete in the Users Configuration section.

Step 4

Click Delete User.

A confirmation message appears.


Single sign-on (SSO)

This chapter describes the tasks to create and enable Single Sign On in Cisco Optical Site Manager using Security Assertion Markup Language (SAML) and Central Authentication Service (CAS).

Create and Enable SSO with SAMLv2

Use this task to configure and enable SSO SAMLv2 details. Only an admin can configure SSO SAMLv2 details.

Procedure


Step 1

Click Users & Access in the left panel.

Step 2

Click the SSO SAMLv2 section to expand it.

Step 3

Select the Enable SAML check box to enable the SAMLv2 protocol.

Step 4

Perform any one of the following:

  • Type the entity ID and metadata URL of the identity provider in the IDP Entity ID and IDP Metadata Url fields respectively.

  • Type the entity ID and metadata of the identity provider in the IDP Entity ID and IDP Metadata fields respectively.

Step 5

(Optional) Type the Proxy Address and Proxy Port.

Step 6

Click Apply.


Create SSO with CAS

Use this task to add an SSO user with CAS. Only an admin can add SSO users.

Ensure that both SSO users and other users are different.

Procedure


Step 1

Click Users & Access in the left panel.

Step 2

Click the SSO CAS section to expand it

Step 3

In the SSO Users area, perform these steps:

  1. Click the + button.

    The Creat SSO User dialog box appears.

  2. Enter the username in the Username field.

  3. Choose the user group from the Group drop-down list.

    The options are viewer and editor. The viewer when mapped for SSO, can only view the Cisco Optical Site Manager configurations. The Editor when mapped for SSO, can configure devices.

Step 4

Click Apply.

A confirmation message appears.

Step 5

Click Yes.


Enable SSO with CAS

Use this task to enable SSO. Only an admin or superuser can enable SSO.

Procedure


Step 1

Click Users & Access in the left panel.

Step 2

Click the SSO CAS tab.

Step 3

In the SSO CAS page, perform these steps:

  1. Click SELECTION to expand the section.

  2. Select the Enable CAS check box to enable SSO with CAS on Cisco Optical Site Manager.

  3. Enter the EPNM server IP address in the IP Address field.

  4. (Optional)You can change the port number in the Port field. The default port number is 443.

Step 4

Click Apply.

A confirmation message appears.

Step 5

Click Yes.


Manage External Authentication

This chapter describes the tasks related to external authentication in Cisco Optical Site Manager.

Manage External Authentication

Cisco Optical Site Manager supports RADIUS and TACACS modes of external authentication. Ensure that you enable and use either RADIUS or TACACS authentication method. You can add a maximum of up to ten servers for each of RADIUS or TACACS on Cisco Optical Site Manager.

There should be at least one RADIUS or TACACS authentication server that is configured for authentication to be enabled. In order to delete the last RADIUS or TACACS server, you must disable the external authentication first, and then delete the RADIUS or TACACS server.

When your login to Cisco Optical Site Manager with the external authentication enabled, Cisco Optical Site Manager first tries with the configured list of servers. If external authentication servers are not reachable, then Cisco Optical Site Manager uses local authentication provided the local authentication is enabled on Cisco Optical Site Manager.

To manage Cisco Optical Site Manager, the following users are created:

  • Local users (local authentication)—Specifies users who are created to manage Cisco Optical Site Manager instances.

  • External users (external authentication)—Specifies users who are created on the external authentication servers.

For more information related to users, see .

The following table lists some external authentication scenarios that describe some possible authentication errors, causes, and actions.

Table 1. External and Local Authentication Scenarios

External and Local Authentication Combination

Possible Authentication Scenario

Possible Cause

Action to be Taken

  • External Authentication Enabled and Local Authentication Disabled

Server denies authentication

External username or password is incorrect

Enter the correct username and password to log in to the system.

Server not reachable

IP address, shared secret or port number is not configured correctly although username or password could be correct

You are locked out of the system. Ensure that you have configured correct IP address, shared secret, and port number.

  • External authentication enabled and Local authentication enabled

Server denies authentication (although location authentication is enabled)

External username or password is incorrect

Enter the correct username and password to log in to the system.

Local authentication only works when the RADIUS or TACACS external servers are not reacheable.

Server not reachable (Local authentication is enabled)

IP address, shared secret, port number is not configured correctly although username or password could be correct

Use local authentication credentials to log in to Cisco Optical Site Manager.

Limitations for RADIUS or TACACS Authentication

  • External user list is maintained with username and its respective group (admin, editor, or viewer). The user list is populated whenever a new username is successfully authenticated. This user list is limited to 500 users. The Clear External Users List button available under the External Authentication tab is activated when 450 users limit is reached. Whenever you click the Clear External Users List button, the external users are cleared. In the user list, if the user limit is reached (500 users), then the new external user (501th external user) cannot login to Cisco Optical Site Manager.

    If you are logged in as external user and cleared the list, ensure that you must relogin on all the logged-in sessions. If you do not relogin, the system might not respond properly and information might not appear properly.

  • External authentication is applicable only on Cisco Optical Site Manager web user interface. External authentication using logging into the Netconf console is not supported.

RADIUS Authentication

Use the following tasks to manage RADIUS authentication on Cisco Optical Site Manager.


Note


Only an admin or superuser can manage RADIUS authentication on Cisco Optical Site Manager.


Create RADIUS Server Entry

Use this task to create RADIUS server entry on Cisco Optical Site Manager. Only an admin can add RADIUS server.

Before you begin

Log into Cisco Optical Site Manager

Ensure that you have added Cisco Optical Site Manager instances with RADIUS IP addresses in the Cisco Secure ACS server.

Procedure

Step 1

Click Users & Access in the left panel.

Step 2

Click the External Authentication tab.

Step 3

In the RADIUS Configuration section, perform the following steps:

  1. Click the + button.

    The Create RADIUS Server Entry dialog box appears.

  2. Enter the following fields:

    • Name—Name of the RADIUS server.

    • Host—IPv4 or IPv6 address of the RADIUS server.

    • Authentication Port—1812 is default for RADIUS. The range is from 0 to 65535. RADIUS server must be running on the port that is configured.

    • Shared Secret—Shared secret configured on the RADIUS server.

    • Confirm Secret—Confirm the above shared secret for the RADIUS server.

  3. Click Apply.

The RADIUS server is added to the RADIUS server list on Cisco Optical Site Manager.

Enable RADIUS Authentication

Use this task to enable RADIUS authentication. Only an admin or superuser can enable RADIUS authentication. You can add upto ten RADIUS servers on Cisco Optical Site Manager.

Before you begin
Procedure

Step 1

Click Users & Access in the left panel.

Step 2

Click the External Authentication tab.

Step 3

In the RADIUS Configuration area, perform the following steps:

  1. Click SELECTION to expand it.

  2. Check the Enable RADIUS Authentication check box to enable RADIUS server on Cisco Optical Site Manager.

  3. Check the Enable node as final authentication when RADIUS server is reacheable check box to enable the RADIUS server as a final authentication option.

    Note


    When you enable external authentication, local authentication is enabled by default to avoid lock out scenarios (such as configuration errors). Until external authentication is enabled, local authentication can be enabled or disabled based on your requirement.

  4. In the Timeout (seconds) field, enter the time interval (seconds) to wait for a response from the RADIUS server before retrying to contact the server.

  5. In the Attempts field, enter the number of attempts to contact the first RADIUS server in the authentication list. If there is no response after the allotted number of attempts, then Cisco Optical Site Manager tries to contact the the next RADIUS server in the list.

Step 4

Click Apply.


Modify RADIUS Server Parameters

Use this task to modify RADIUS authentication settings. Only an admin or superuser can modify RADIUS server settings.

Before you begin

Log into Cisco Optical Site Manager and Create RADIUS Server Entry

Procedure

Step 1

Click Users & Access in the left panel.

The Users & Access page is displayed.

Step 2

Click the External Authentication tab.

Step 3

In the RADIUS Configuration area, select the RADIUS server to edit from the list of available RADIUS servers and perform the following tasks:

  1. Click the Edit button.

  2. Edit the following fields:

    • Name

    • Host

    • Authentication Port

    • Shared Secret

  3. Click Apply.


Disable the RADIUS Authentication

Use this task to disable RADIUS authentication.

Before you begin

Log into Cisco Optical Site Manager

Procedure

Step 1

Click Users & Access in the left panel.

The Users & Access page is displayed.

Step 2

Click the External Authentication tab.

Step 3

In the RADIUS Configuration area, perform the following steps:

  1. Click SELECTION to expand it.

  2. Uncheck the Enable RADIUS Authentication check box to disable RADIUS authentication on Cisco Optical Site Manager.

  3. Uncheck the Enable node as final authentication when RADIUS server is reacheable check box to disable the RADIUS server as a final authentication option.

Note


When external authentication is disabled, then local authentication is disabled by default.

Step 4

Click Apply.


Delete the RADIUS Server from Cisco Optical Site Manager

Use this task to delete the RADIUS server entry from Cisco Optical Site Manager.

Before you begin

Log into Cisco Optical Site Manager

Procedure

Step 1

Click Users & Access in the left panel.

Step 2

Click the External Authentication tab.

Step 3

In the RADIUS Configuration area, select the RADIUS server to delete and click the - button.


TACACS+ Authentication

Use the following tasks to manage TACACS+ authentication.


Note


Only users with admin privileges can manage TACACS+ authentication on Cisco Optical Site Manager.


Create TACACS+ Server Entry on Cisco Optical Site Manager

Use this task to create TACACS+ server entry on Cisco Optical Site Manager. Only an admin or superuser can add TACACS+ server. You can add upto ten TACACS+ server.

Before you begin

Log into Cisco Optical Site Manager

Ensure that you have added Cisco Optical Site Manager instances with TACACS+ IP addresses in the Cisco Secure ACS server.

Procedure

Step 1

Click Users & Access in the left panel.

Step 2

Click the External Authentication tab.

Step 3

In the TACACS+ Configuration section, perform the following steps:

  1. Click the + button.

    The Create TACACS+ server Entry dialog box appears.

  2. Enter the following fields:

    • Name—Name of the TACACS+ server.

    • Host—IP address of the TACACS+ server.

    • Authentication Port—49 is default for TACACS+. TACACS+ server must be running on the port that is configured.

    • Shared Secret—Shared secret configured on the TACACS+ server.

    • Confirm Secret—Confirm the above shared secret for the TACACS+ server.

  3. Click Apply.

The TACACS+ server is added to the TACACS+ server list on Cisco Optical Site Manager.

Enable TACACS+ Authentication

Use this task to enable TACACS+ authentication.

Before you begin
Procedure

Step 1

Click Users & Access in the left panel.

The Users & Access page is displayed.

Step 2

Click the External Authentication tab.

Step 3

In the TACACS+ Configuration section, perform the following steps:

  1. Click SELECTION to expand it.

  2. Check the Enable TACACS+ Authentication check box to enable TACACS+ server on Cisco Optical Site Manager.

  3. Check the Enable node as final authentication when TACACS+ server is reacheable check box to enable the TACACS+ server as a final authentication option.

    Note


    When you enable external authentication, local authentication is enabled by default to avoid lock out scenarios (such as configuration errors). Until external authentication is enabled, local authentication can be enabled or disabled based on your requirement.

  4. In the Timeout (seconds) field, enter the time interval (seconds) to wait for a response from the TACACS+ server before retrying to contact the server.

  5. In the Attempts field, enter the number of attempts to contact the first TACACS+ server in the authentication list. If there is no response after the allotted number of attempts, then Cisco Optical Site Manager tries to contact the the next RADIUS server in the list.

Step 4

Click Apply.


Modify TACACS+ Server Parameters

Use this task to modify TACACS+ authentication settings. Only an admin or superuser can modify TACACS+ server settings.

Before you begin

Log into Cisco Optical Site Manager and Create TACACS+ Server Entry on Cisco Optical Site Manager

Procedure

Step 1

Click Users & Access in the left panel.

Step 2

Click the External Authentication tab.

Step 3

In the TACACS+ Configuration area, select the TACACS+ server to edit from the list of available TACACS+ servers and perform the following tasks:

  1. Click the Edit button.

  2. Edit the following fields:

    • Name

    • Host

    • Authentication Port

    • Shared Secret

  3. Click Apply.


Disable the TACACS+ Authentication

Use this task to disable TACACS+ authentication.

Before you begin

Log into Cisco Optical Site Manager

Procedure

Step 1

Click Users & Access in the left panel.

The Users & Access page is displayed.

Step 2

Click the External Authentication tab.

Step 3

In the TACACS+ Configuration area, perform the following steps:

  1. Click SELECTION to expand it.

  2. Uncheck the Enable TACACS+ Authentication check box to disable TACACS+ authentication on Cisco Optical Site Manager.

  3. Uncheck the Enable node as final authentication when TACACS+ server is reacheable check box to disable the TACACS+ server as a final authentication option.

Note


When external authentication is disabled, then local authentication is disabled by default.

Step 4

Click Apply.


Delete the TACACS+ Server from Cisco Optical Site Manager

Use this task to delete the TACACS+ server entry from Cisco Optical Site Manager.

Before you begin

Disable the TACACS+ Authentication

Procedure

Step 1

Click Users & Access in the left panel.

Step 2

Click the External Authentication tab.

Step 3

In the TACACS+ Configuration area, select the TACACS+ server to delete and click the - .


Manage x509 Certificates

Table 2. Feature History

Feature Name

Release Information

Description

Improved x509 Certificate Handling

Cisco IOS XR Release 24.1.1

You can now upload an x509 certificate in the Personal Information Exchange (PFX) format, which improves the security of the connection between the Cisco Optical Site Manager and its server. PFX files can be password-protected, offering an extra layer of protection against potential attackers.

The options to automatically generate and upload certificates are available in the new x509 Certificates tab under the Users & Access menu.

x509 certificates are used to establish a secure communication channel between a client and a server. In Cisco Optical Site Manager, you have the option to either automatically generate a self-signed x509 certificate or upload CA authorized certificate in digital or PFX format. This certificate is essential for building trust between the client and server, and it helps protect sensitive information from unauthorized parties. Additionally, x509 certificates provide the ability to detect any tampering or modification of data during transmission.

Generate and Upload x509 Certificates

Use this task to automatically generate and apply a x509 certificate. You can also use this task to upload the certificate in digital (.cert) or PFX (.pfx) file formats.

Before you begin

Log into Cisco Optical Site Manager

Procedure


Step 1

Click Users & Access in the left panel.

Step 2

Click the x509 Certificates tab.

Step 3

Click the Certificates Configuration section to expand it.

Step 4

Perform any one of the following steps:

  1. Click Auto Generate and Apply Certificate to generate and apply a self signed certificate automatically.

  2. To upload a digital certificate, perform these steps:

    1. Select CERT + KEY from the Certificate Type drop-down list.

    2. Select the .cert or .crt file from the Certificate File field and click Upload.

    3. Select the .key file from the Key File field and click Upload.

    4. Click Apply.

  3. To upload a Personal Information Exchange (PFX) certificate, perform these steps:

    1. Select PFX + PASSWORD from the Certificate Type drop-down list.

    2. Select the .pfx file from the Certificate File field and click Upload.

    3. Type the password in the Password field if the input private key file is password protected.

    4. Click Apply.


View Active Login User Details

This chapter describes the procedures involved in monitoring active users and their login records.

View Active Login Sessions

You can view the currently logged in users and their details, such as username, login time, interface name, and IP address. To view the list of currently logged in users, perform these steps:

Before you begin

Log into Cisco Optical Site Manager.

Procedure


Step 1

Click Users & Access in the left panel.

The Users & Access page is displayed.

Step 2

Click the Login tab.

Step 3

Click Active Login Sessions to view the currently logged in users and their details.


View User Login History

You can view the user login history and their details, such as login ID, username, last login and logout date, interface name, and IP address. To view the user login history, perform these steps:

Before you begin

Log into Cisco Optical Site Manager.

Procedure


Step 1

Click Users & Access in the left panel.

The Users & Access page is displayed.

Step 2

Click the Login tab.

Step 3

Click Last Successful Logins to view user login history and their details.


Manage Web Configurations

Configure Netconf and Nodal Craft Session Timeout

To configure timeout for Netconf and Nodal Craft sessions, follow these steps:

Before you begin

Log into Cisco Optical Site Manager.

Procedure


Step 1

Click Users & Access in the left panel.

Step 2

Click the General tab.

Step 3

To configure the Nodal Craft session timeout, perform these steps in the Nodal Craft Session Timeout Configuration section:

  1. Select the time in minutes from the Idle Session Timeout drop-down.

    This setting configures how long users are inactive before they are signed out of the Nodal Craft session.

  2. Select the time in hours from the Absolute Session Timeout drop-down.

    This setting configures the maximum amount of time a session can be active.

  3. Click Apply.

Step 4

To configure the Netconf session timeout, perform these steps in the Netconf Session Timeout Configuration section:

  1. Select the time in minutes from the Idle Session Timeout drop-down.

    This setting configures how long users are inactive before they are signed out of the Netconf session.

  2. Click Apply.