Prerequisites and Guidelines
Before you upgrade your existing Nexus Dashboard cluster:
-
Ensure that you have read the target release's Release Notes for any changes in behavior, guidelines, and issues that may affect your upgrade.
The upgrade process is the same for all Nexus Dashboard form factors. However, if your existing cluster is deployed using physical servers, VMware ESX, Linux KVM, Azure, or AWS, you will use the target release's ISO image (
nd-dk9.<version>.iso) to upgrade; if your existing cluster is deployed in Red Hat Enterprise Linux, you will use the RHEL-specific image (nd-rhel-<version>.tar). -
Ensure that you have read the Release Notes and upgrade guides for any services you run in the existing cluster and plan to run on the target release for service-specific changes in behavior, guidelines, and issues that may affect your upgrade.
You can find the service-specific documents at the following links:
-
If you are upgrading a physical Nexus Dashboard cluster, ensure that the nodes have the minimum supported CIMC version for the target Nexus Dashboard release.
Supported CIMC versions are listed in the Nexus Dashboard Release Notes for the target release.
CIMC upgrade is described in detail in the "Troubleshooting" sections of the Nexus Dashboard User Guide.
-
You must perform configuration backups of your Nexus Dashboard and services before the upgrade to safeguard data and minimize any potential risk before proceeding with the upgrade.
-
You must be running Nexus Dashboard release 2.1(2) or later to upgrade directly to release 2.3(x).
If you are running a version prior to the minimum required release, we recommend that you upgrade to release 2.2(2) as described in Cisco Nexus Dashboard Deployment Guide, Release 2.2(x) before upgrading to a 2.3(x) release.

Note
Additional upgrade path and minimum version requirements may depend on the specific services you have installed in your cluster. Check the service-specific Release Notes and Upgrade Guides linked above for more information.
-
You must disable all services running in the cluster before upgrading to a 2.3(x) release.
-
If you are upgrading Nexus Dashboard from one patch to another patch within the same release (for example, from 2.3.2b to 2.3.2d), simply re-enable the services after Nexus Dashboard upgrade is completed.
-
If you are upgrading Nexus Dashboard from one release to another release (for example, 2.3.1 to 2.3.2), your existing services may not be compatible with your target Nexus Dashboard release, in which case you must also upgrade the services after the platform upgrade is completed.
For a complete list of Nexus Dashboard and services interoperability support, see the Nexus Dashboard and Services Compatibility Matrix or the service-specific upgrade guides listed earlier in this section.
Note
-
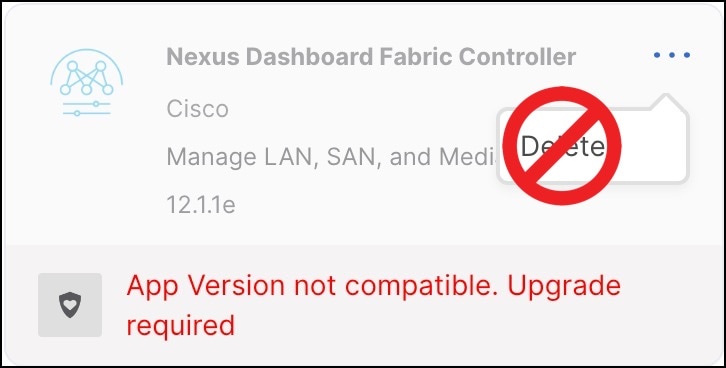
For Nexus Dashboard Fabric Controller, you must keep the service disabled after the cluster is upgraded until you upgrade the service as well.
After the Nexus Dashboard cluster is upgraded, you may see that the existing version of the service is listed with the
App Version not compatible. Upgrade required.warning.You must not delete or re-enable this version before uploading the Fabric Controller upgrade image. After you upload the new version, you must enable it and complete the service upgrade before you can delete the older release. Deleting the older service version before the new release is activated may cause the upgrade to fail.
-
For Nexus Dashboard Insights, you must keep the service disabled after the cluster is upgraded until you upgrade the service as well.
After the Nexus Dashboard cluster is upgraded, you may see that the existing version of the service is listed with the
App Version not compatible. Upgrade required.warning.You must not delete or re-enable this version before uploading the Insights upgrade image. After you upload the new version, you must enable it and complete the service upgrade before you can delete the older release. Deleting the older service version before the new release is activated may cause the upgrade to fail.

-
For Nexus Dashboard Orchestrator, you must re-enable the existing version of the service before uploading and activating the new version.
-
-
-
You must have valid DNS and NTP servers configured and reachable by all cluster nodes.
-
Ensure that your current Nexus Dashboard cluster is healthy.
You can check the system status on the Overview page of the Nexus Dashboard's Admin Console or by logging in to one of the nodes as
rescue-userand ensuring that theacs healthcommand returnsAll components are healthy. -
Ensure that no configuration changes are made to the cluster, such as adding worker or standby nodes, while the upgrade is in progress.
-
Nexus Dashboard does not support platform downgrades.
If you want to downgrade to an earlier release, you will need to deploy a new cluster and reinstall the services.

 Feedback