About Intrusion and Network Analysis Policies
Network analysis and intrusion policies work together to detect and prevent intrusion threats.
-
A network analysis policy (NAP) governs how traffic is decoded and preprocessed so that it can be further evaluated, especially for anomalous traffic that might signal an intrusion attempt.
-
An intrusion policy uses intrusion and preprocessor rules, which are collectively known as intrusion rules, to examine the decoded packets for attacks based on patterns. The rules can either prevent (drop) the threatening traffic and generate an event, or simply detect (alert) it and generate an event only.
As the system analyzes traffic, the network analysis decoding and preprocessing phase occurs before and separately from the intrusion prevention phase. Together, network analysis and intrusion policies provide broad and deep packet inspection. They can help you detect, alert on, and protect against network traffic that could threaten the availability, integrity, and confidentiality of hosts and their data.
System-Defined Network Analysis and Intrusion Policies
The system includes several pairs of same-named network analysis and intrusion policies that complement and work with each other. For example there are both NAP and intrusion policies named “Balanced Security and Connectivity,” which are meant to be used together. The system-provided policies are configured by the Cisco Talos Intelligence Group (Talos). For these policies, Talos sets the intrusion and preprocessor rule states and provides the initial configurations for preprocessors and other advanced settings.
As new vulnerabilities become known, Talos releases intrusion rule updates. These rule updates can modify any system-provided network analysis or intrusion policy, and can provide new and updated intrusion rules and preprocessor rules, modified states for existing rules, and modified default policy settings. Rule updates might also delete rules from system-provided policies and provide new rule categories, as well as modify the default variable set.
You can manually update the rules database, or configure a regular update schedule. You must deploy an update for it to take effect. For more information on updating system databases, see Updating System Databases.
The following are the system-provided policies:
- Balanced Security and Connectivity network analysis and intrusion policies
-
These policies are built for both speed and detection. Used together, they serve as a good starting point for most networks and deployment types. The system uses the Balanced Security and Connectivity network analysis policy as the default.
- Connectivity Over Security network analysis and intrusion policies
-
These policies are built for networks where connectivity, the ability to get to all resources, takes precedence over network infrastructure security. The intrusion policy enables far fewer rules than those enabled in the Security over Connectivity policy. Only the most critical rules that block traffic are enabled.
- Security Over Connectivity network analysis and intrusion policies
-
These policies are built for networks where network infrastructure security takes precedence over user convenience. The intrusion policy enables numerous network anomaly intrusion rules that could alert on or drop legitimate traffic.
- Maximum Detection network analysis and intrusion policies
-
These policies are built for networks where network infrastructure security is given even more emphasis than is given by the Security Over Connectivity policies, with the potential for even greater operational impact. For example, the intrusion policy enables rules in a large number of threat categories including malware, exploit kit, old and common vulnerabilities, and known in-the-wild exploits.
Inspection Mode: Prevention vs. Detection
By default, all intrusion policies operate in Prevention mode to implement an Intrusion Prevention System (IPS). In the Prevention inspection mode, if a connection matches an intrusion rule whose action is to drop traffic, the connection is actively blocked.
If you instead want to test the effect of the intrusion policy on your network, you can change the mode to Detection, which implements an Intrusion Detection System (IDS). In this inspection mode, drop rules are treated like alert rules, where you are notified of matching connections, but the action result becomes Would Have Blocked, and connections are never in fact blocked.
You change the inspection mode per intrusion policy, so you can have a mix of prevention and detection.
The Snort 3 network analysis policy (NAP) also has an inspection mode. Unlike the intrusion policy, the NAP policy is global, so you must run all NAP processing in either Prevention or Detection mode. You should use the same mode you use for your intrusion policies. If you have a mix of Prevention and Detection policies, select Prevention to match your most restrictive intrusion policies.
Intrusion and Preprocessor Rules
An intrusion rule is a specified set of keywords and arguments that the system uses to detect attempts to exploit vulnerabilities in your network. As the system analyzes network traffic, it compares packets against the conditions specified in each rule, and triggers the rule if the data packet meets all the conditions specified in the rule.
The system includes the following types of rules created by Cisco Talos Intelligence Group (Talos):
-
Intrusion rules, which are subdivided into shared object rules and standard text rules
-
Preprocessor rules, which are rules associated with preprocessors and packet decoder detection options in the network analysis policy. Most preprocessor rules are disabled by default.
The following topics explain intrusion rules in more depth.
Intrusion Rule Attributes
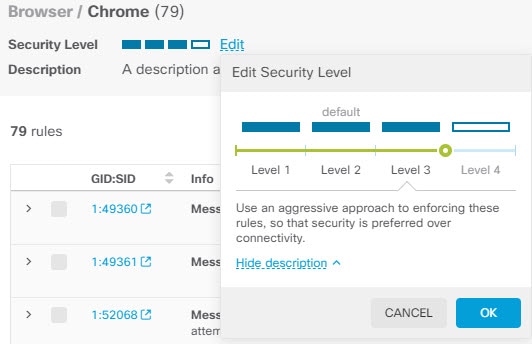
When you view an intrusion policy, you see a list of all the intrusion rules available for identifying threats.
The list of rules for each policy is the same. The difference is in the action configured for each rule. Because there are over 30,000 rules, scrolling through the list will take time. Rules are revealed as you scroll through the list.
Following are the attributes that define each rule:
- > (Signature Description)
-
Click the > button in the left column to open the signature description. The description is the actual code used by the Snort inspection engine to match traffic against the rule. Explaining the code is out of scope for this document, but it is explained in detail in Management Center Configuration Guide; select the book for your software version from http://www.cisco.com/c/en/us/support/security/defense-center/products-installation-and-configuration-guides-list.html. Look for information on intrusion rule editing.
The signatures contain variables for certain items. For more information, see Default Intrusion Variable Set.
- GID
-
Generator Identifier (ID). This number indicates which system component evaluates the rule and generates events. A 1 indicates a standard text intrusion rule, a 3 indicates a shared object intrusion rule. (The difference in these rule types is not meaningful for a device manager user.) These are the main rules of interest when configuring an intrusion policy. For information on the other GIDs, see Generator Identifiers.
- SID
-
Snort Identifier (ID), also called signature ID. Snort IDs lower than 1000000 were created by the Cisco Talos Intelligence Group (Talos).
- Action
-
The state of this rule in the selected intrusion policy. For each rule, “(Default)” is added to the action that is the default action for the rule within this policy. To return a rule to its default setting, you select this action. Possible actions are:
-
Alert—Create an event when this rule matches traffic, but do not drop the connection.
-
Drop—Create an event when this rule matches traffic, and also drop the connection.
-
Disabled—Do not match traffic against this rule. No events are generated.
-
- Status
-
For Snort 2 rules, Status is a separate column. If you change the default action for a rule, this column shows “Overridden.” Otherwise, the column is empty.
For Snort 3 rules, the “Overridden” status is shown at the bottom of the Action attribute, if you changed it.
- Message
-
This is the name of the rule, which also appears in events triggered by the rule. The message typically identifies the threat that the signature matches. You can search the Internet for more information on each threat.
Default Intrusion Variable Set
The intrusion rule signatures contain variables for certain items. Following are the default values for the variables, with $HOME_NET and $EXTERNAL_NET being the most commonly used variables. Note that the protocol is specified separately from port numbers, so port variables are numbers only.
-
$DNS_SERVERS = $HOME_NET (meaning any IP address).
-
$EXTERNAL_NET = any IP address.
-
$FILE_DATA_PORTS = $HTTP_PORTS, 143, 110.
-
$FTP_PORTS = 21, 2100, 3535.
-
$GTP_PORTS = 3386, 2123, 2152.
-
$HOME_NET = any IP address.
-
$HTTP_PORTS = 144 ports numbered: 36, 80-90, 311, 383, 443, 555, 591, 593, 631, 666, 801, 808, 818, 901, 972, 1158, 1212, 1220, 1414, 1422, 1533, 1741, 1830, 1942, 2231, 2301, 2381, 2578, 2809, 2980, 3029, 3037, 3057, 3128, 3443, 3507, 3702, 4000, 4343, 4848, 5000, 5117, 5222, 5250, 5450, 5600, 5814, 6080, 6173, 6767, 6988, 7000, 7001, 7005, 7071, 7080, 7144, 7145, 7510, 7770, 7777-7779, 8000, 8001, 8008, 8014, 8015, 8020, 8028, 8040, 8060, 8080-8082, 8085, 8088, 8118, 8123, 8161, 8180-8182, 8222, 8243, 8280, 8300, 8333, 8344, 8400, 8443, 8500, 8509, 8787, 8800, 8888, 8899, 8983, 9000, 9002, 9060, 9080, 9090, 9091, 9111, 9290, 9443, 9447, 9710, 9788, 9999, 10000, 11371, 12601, 13014, 15489, 19980, 23472, 29991, 33300, 34412, 34443, 34444, 40007, 41080, 44449, 50000, 50002, 51423, 53331, 55252, 55555, 56712.
-
$HTTP_SERVERS = $HOME_NET (meaning any IP address).
-
$ORACLE_PORTS = any
-
$SHELLCODE_PORTS = 180.
-
$SIP_PORTS = 5060, 5061, 5600
-
$SIP_SERVERS = $HOME_NET (meaning any IP address).
-
$SMTP_SERVERS = $HOME_NET (meaning any IP address).
-
$SNMP_SERVERS = $HOME_NET (meaning any IP address).
-
$SQL_SERVERS = $HOME_NET (meaning any IP address).
-
$SSH_PORTS = 22.
-
$SSH_SERVERS = $HOME_NET (meaning any IP address).
-
$TELNET_SERVERS = $HOME_NET (meaning any IP address).
Generator Identifiers
The generator identifier (GID) identifies the subsystem that evaluates an intrusion rule and generates events. Standard text intrusion rules have a generator ID of 1, and shared object intrusion rules have a generator ID of 3. There are also several sets of rules for various preprocessors. The following table explains the GIDs.
|
ID |
Component |
|---|---|
|
1 |
Standard Text Rule. |
|
2 |
Tagged Packets. (Rules for the Tag generator, which generates packets from a tagged session. ) |
|
3 |
Shared Object Rule. |
|
102 |
HTTP Decoder. |
|
105 |
Back Orifice Detector. |
|
106 |
RPC Decoder. |
|
116 |
Packet Decoder. |
|
119, 120 |
HTTP Inspect Preprocessor. (GID 120 rules relate to server-specific HTTP traffic.) |
|
122 |
Portscan Detector. |
|
123 |
IP Defragmentor. |
|
124 |
SMTP Decoder. (Exploits against SMTP verbs.) |
|
125 |
FTP Decoder. |
|
126 |
Telnet Decoder. |
|
128 |
SSH Preprocessor. |
|
129 |
Stream Preprocessor. |
|
131 |
DNS Preprocessor. |
|
133 |
DCE/RPC Preprocessor. |
|
134 |
Rule Latency, Packet Latency. (Events for these rules are generated when rule latency suspends (SID 1) or re-enables (SID 2) a group of intrusion rules, or when the system stops inspecting a packet because the packet latency threshold is exceeded (SID 3).) |
|
135 |
Rate-Based Attack Detector. (Excessive connections to hosts on the network.) |
|
137 |
SSL Preprocessor. |
|
138, 139 |
Sensitive Data Preprocessor. |
|
140 |
SIP Preprocessor. |
|
141 |
IMAP Preprocessor. |
|
142 |
POP Preprocessor. |
|
143 |
GTP Preprocessor. |
|
144 |
Modbus Preprocessor. |
|
145 |
DNP3 Preprocessor. |
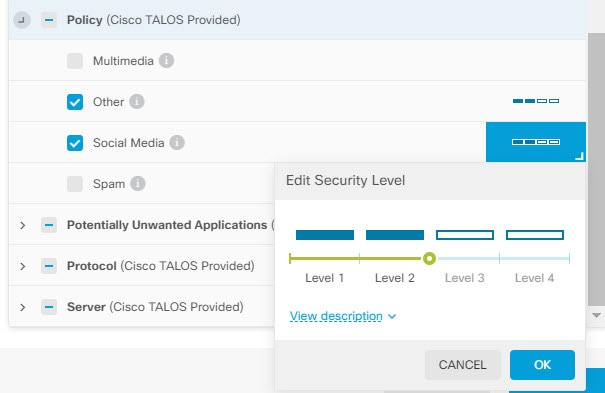
Network Analysis Policies
Network analysis policies control traffic preprocessing. Preprocessors prepare traffic to be further inspected by normalizing traffic and identifying protocol anomalies. Network analysis-related preprocessing occurs after Security Intelligence drops and SSL decryption, but before access control and intrusion or file inspection.
By default, the system uses the Balanced Security and Connectivity network analysis policy to preprocess all traffic handled by the access control policy. However, if you configure an intrusion policy on any access control rule, the system uses the network analysis policy that matches the most aggressive intrusion policy applied. For example, if you use both Security over Connectivity and Balanced policies in your access control rules, the system uses the Security over Connectivity NAP for all traffic. For Snort 3 custom intrusion policies, this assignment is done according to the base template policy assigned to the intrusion policy.
When using Snort 3, you can select a policy explicitly and optionally customize its settings. We recommend that you select the policy whose name matches the intrusion policy that you use for most traffic that goes through the device, whether you use the intrusion policy directly, or you use it as the base policy in your custom intrusion policies. You can then change the inspection mode, or adjust specific inspector or binder settings to account for the traffic on your network.
In addition, consider whether you have enabled preprocessor rules in the intrusion policy. If you enable rules that require a preprocessor, ensure that you also enable the corresponding inspector in the NAP. For each inspector, you can also adjust the attributes for the inspector, including the ports examined (the binders), to customize inspector behavior for your network.
 Note |
If you are using Snort 2, the system uses the same-named NAP policy as the most restrictive intrusion policy you apply in any access control rule, and you cannot edit inspector or binder settings. |


 Feedback