Access Control Rules

The following topics describe how to configure access control rules:

Introduction to Access Control Rules

Within an access control policy, access control rules provide a granular method of handling network traffic across multiple managed devices.


Note


Security Intelligence filtering, SSL inspection, user identification, and some decoding and preprocessing occur before access control rules evaluate network traffic.


The system matches traffic to access control rules in the order you specify. In most cases, the system handles network traffic according to the first access control rule where all the rule’s conditions match the traffic.

Each rule also has an action, which determines whether you monitor, trust, block, or allow matching traffic. When you allow traffic, you can specify that the system first inspect it with intrusion or file policies to block any exploits, malware, or prohibited files before they reach your assets or exit your network.

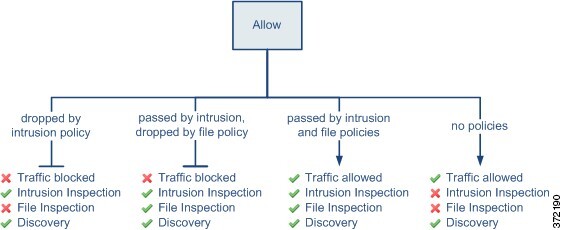
The following scenario summarizes the ways that traffic can be evaluated by access control rules in an inline, intrusion prevention deployment.

Diagram that summarizes the ways traffic can be evaluated by access control rules

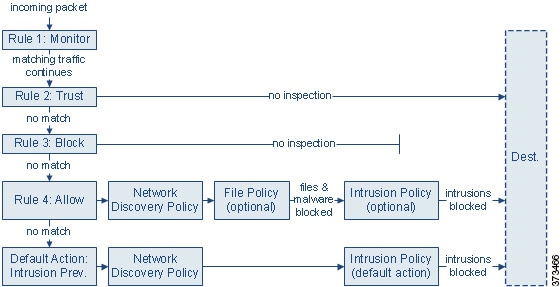
In this scenario, traffic is evaluated as follows:

  • Rule 1: Monitor evaluates traffic first. Monitor rules track and log network traffic. The system continues to match traffic against additional rules to determine whether to permit or deny it. (However, see an important exception and caveat at Access Control Rule Monitor Action.)

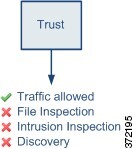
  • Rule 2: Trust evaluates traffic next. Matching traffic is allowed to pass to its destination without further inspection, though it is still subject to identity requirements and rate limiting. Traffic that does not match continues to the next rule.

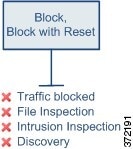
  • Rule 3: Block evaluates traffic third. Matching traffic is blocked without further inspection. Traffic that does not match continues to the final rule.

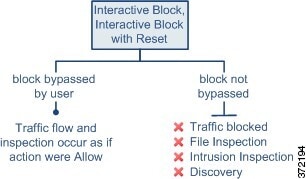
  • Rule 4: Allow is the final rule. For this rule, matching traffic is allowed; however, prohibited files, malware, intrusions, and exploits within that traffic are detected and blocked. Remaining non-prohibited, non-malicious traffic is allowed to its destination, though it is still subject to identity requirements and rate limiting. You can configure Allow rules that perform only file inspection, or only intrusion inspection, or neither.

  • Default Action handles all traffic that does not match any of the rules. In this scenario, the default action performs intrusion prevention before allowing non-malicious traffic to pass. In a different deployment, you might have a default action that trusts or blocks all traffic, without further inspection. (You cannot perform file or malware inspection on traffic handled by the default action.)

Traffic you allow, whether with an access control rule or the default action, is automatically eligible for inspection for host, application, and user data by the network discovery policy. You do not explicitly enable discovery, although you can enhance or disable it. However, allowing traffic does not automatically guarantee discovery data collection. The system performs discovery only for connections involving IP addresses that are explicitly monitored by your network discovery policy; additionally, application discovery is limited for encrypted sessions.

Note that access control rules handle encrypted traffic when your SSL inspection configuration allows it to pass, or if you do not configure SSL inspection. However, some access control rule conditions require unencrypted traffic, so encrypted traffic may match fewer rules. Also, by default, the system disables intrusion and file inspection of encrypted payloads. This helps reduce false positives and improve performance when an encrypted connection matches an access control rule that has intrusion and file inspection configured.

Access Control Rule Management

The Rules tab of the access control policy editor allows you to add, edit, categorize, search, filter move, enable, disable, delete, and otherwise manage access control rules in the current policy. Use the search bar to filter the list of access control policy rules. To switch between the list of rules that match the filter criteria, and all rules in the current access control policy, click Toggle.

For each access control rule, the policy editor displays its name, a summary of its conditions, the rule action, and icons that communicate the rule’s inspection options or status. These icons represent:

  • Time Range Option (time range icon)

  • Intrusion policy (intrusion policy icon)

  • File policy (file policy icon)

  • Safe search (safe search icon)

  • YouTube EDU (YouTube EDU icon)

  • Logging (logging icon)

  • Original Client option

  • Comment (comment icon)

  • Warning (warninig icon)

  • Errors (error icon)

  • important Information (import section icon)

Disabled rules are dimmed and marked (disabled) beneath the rule name.

To create or edit a rule, use the access control rule editor. You can:

  • Configure basic properties such as the rule’s name, state, position, and action in the upper portion of the editor.

  • Add conditions using the tabs on the left side of the lower portion of the editor.

  • Use the tabs on the right side of the lower portion to configure inspection and logging options, and also to add comments to the rule. For your convenience, the editor lists the rule’s inspection and logging options regardless of which tab you are viewing.


Note


Properly creating and ordering access control rules is a complex task, but one that is essential to building an effective deployment. If you do not plan your policy carefully, rules can preempt other rules, require additional licenses, or contain invalid configurations. To help ensure that the system handles traffic as you expect, the access control policy interface has a robust warning and error feedback system for rules.


Access Control Rule Components

In addition to its unique name, each access control rule has the following basic components:

State

By default, rules are enabled. If you disable a rule, the system does not use it and stops generating warnings and errors for that rule.

Position

Rules in an access control policy are numbered, starting at 1. If you are using policy inheritance, rule 1 is the first rule in the outermost policy. The system matches traffic to rules in top-down order by ascending rule number. With the exception of Monitor rules, the first rule that traffic matches is the rule that handles that traffic.

Rules can also belong to a section and a category, which are organizational only and do not affect rule position. Rule position goes across sections and categories.

Section and Category

To help you organize access control rules, every access control policy has two system-provided rule sections, Mandatory and Default. To further organize access control rules, you can create custom rule categories inside the Mandatory and Default sections.

If you are using policy inheritance, the current policy's rules are nested between its parent policy's Mandatory and Default sections.

Conditions

Conditions specify the specific traffic the rule handles. Conditions can be simple or complex; their use often depends on license.

Traffic must meet all of the conditions specified in all of the tabs in a rule. For example, if the Applications tab specifies HTTP but not HTTPS, the URL category and reputation conditions in the URLs tab will not apply to HTTPS traffic.

Applicable Time

You can specify days and times during which a rule is applicable.

Action

A rule’s action determines how the system handles matching traffic. You can monitor, trust, block, or allow (with or without further inspection) matching traffic. The system does not perform deep inspection on trusted, blocked, or encrypted traffic.

Inspection

Deep inspection options govern how the system inspects and blocks malicious traffic you would otherwise allow. When you allow traffic with a rule, you can specify that the system first inspect it with intrusion or file policies to block any exploits, malware, or prohibited files before they reach your assets or exit your network.

Logging

A rule’s logging settings govern the records the system keeps of the traffic it handles. You can keep a record of traffic that matches a rule. In general, you can log sessions at the beginning or end of a connection, or both. You can log connections to the database, as well as to the system log (syslog) or to an SNMP trap server.

Comments

Each time you save changes to an access control rule, you can add comments.

Access Control Rule Order

Rules in an access control policy are numbered, starting at 1. The system matches traffic to access control rules in top-down order by ascending rule number.

In most cases, the system handles network traffic according to the first access control rule where all the rule’s conditions match the traffic. Except for Monitor rules, the system does not continue to evaluate traffic against additional, lower-priority rules after that traffic matches a rule.

To help you organize access control rules, every access control policy has two system-provided rule sections, Mandatory and Default. To further organize, you can create custom rule categories inside the Mandatory or Default sections. After you create a category, you cannot move it, although you can delete it, rename it, and move rules into, out of, within, and around it. The system assigns rule numbers across sections and categories.

If you use policy inheritance, the current policy's rules are nested between its parent policy's Mandatory and Default rule sections. Rule 1 is the first rule in the outermost policy, not the current policy, and the system assigns rule numbers across policies, sections, and categories.

Any predefined user role that allows you to modify access control policies also allows you to move and modify access control rules within and among rules categories. You can, however, create custom roles that restrict users from moving and modifying rules. Any user who is allowed to modify access control policies can add rules to custom categories and modify rules in them without restriction.


Tip


Proper access control rule order reduces the resources required to process network traffic, and prevents rule preemption. Although the rules you create are unique to every organization and deployment, there are a few general guidelines to follow when ordering rules that can optimize performance while still addressing your needs.


Requirements and Prerequisites for Access Control Rules

Model Support

Any

Supported Domains

Any

User Roles

  • Admin

  • Access Admin

  • Network Admin

Adding an Access Control Rule Category

You can divide an access control policy's Mandatory and Default rule sections into custom categories. After you create a category, you cannot move it, although you can delete it, rename it, and move rules into, out of, within, and around it. The system assigns rule numbers across sections and categories.

Procedure


Step 1

In the access control policy editor, click Add Category.

Tip


If your policy already contains rules, you can click a blank area in the row for an existing rule to set the position of the new category before you add it. You can also right-click an existing rule and select Insert new category.

Step 2

Enter a Name.

Step 3

From the Insert drop-down list, choose where you want to add the category:

  • To insert a category below all existing categories in a section, choose into Mandatory or into Default.

  • To insert a category above an existing category, choose above category, then choose a category.

  • To insert a category above or below an access control rule, choose above rule or below rule, then enter an existing rule number.

Step 4

Click OK.

Step 5

Click Save to save the policy.


What to do next

Create and Edit Access Control Rules

If you edit an access control rule that is actively in use, the changes do not apply to established connections at deploy-time. The updated rule is used to match against future connections. However, if the system is actively inspecting a connection (for example, with an intrusion policy), it will apply changed matching or action criteria to existing connections.

For Firepower Threat Defense, you can ensure that your changes apply to all current connections by using the FTD clear conn CLI command to end established connections. Note that you should only do this if it is OK to end those connections, on the assumption that the sources for the connections will then attempt to reestablish the connection and thus be matched appropriately against the new rule.

Procedure


Step 1

In the access control policy editor, you have the following options:

  • To add a new rule, click Add Rule.

  • To edit an existing rule, click Edit (edit icon).

  • To edit multiple rules, shift-click a range of rules or control-click multiple rules to edit, then right-click and choose an option.

If View (View button) appears next to a rule instead, the rule belongs to an ancestor policy, or you do not have permission to modify the rule.

Step 2

If this is a new rule, enter a Name.

Step 3

Configure the rule components, or accept the defaults.

If you are bulk-editing multiple rules, only a subset of options are available.

  • Enabled—Specify whether the rule is Enabled.

  • Position—Specify the rule position; see Access Control Rule Order.

  • Action—Choose a rule Action; see Access Control Rule Actions.

    Note


    VLAN tags in access rules only apply to inline sets; they cannot be used in access rules applied to firewall interfaces.

  • Time Range—(Supported on FTD devices only) Add or choose the days and times when the rule is applicable. For details, see Creating Time Range Objects.

  • Conditions—Click the corresponding condition you want to add. See Rule Condition Types for more information.

  • Deep Inspection—For Allow and Interactive Block rules, click Intrusion policy (intrusion policy icon) or File policy (file policy icon) to configure the rule’s Inspection options. If the option is dimmed, no policy of that type is selected for the rule. See Understanding Access Control for more information.

  • Content Restriction—Click Safe search (safe search icon) or YouTube EDU (YouTube EDU icon) to configure content restriction settings on Applications of the rule editor. If the option are dimmed, content restriction is disabled for the rule. See About Content Restriction for more information.

  • Logging—Click Logging (logging icon) to specify Logging options. If the option is dimmed, connection logging is disabled for the rule. See Best Practices for Connection Logging for more information.

  • Comments—Click the number in the comment column to add Comments. The number indicates how many comments the rule already contains. See Access Control Rule Comments for more information.

Step 4

Save the rule.

Step 5

Click Save to save the policy.


What to do next

If you will deploy time-based rules, specify the time zone of the device to which the policy is assigned. See Configure Device Time Zone for Policy Application.

Deploy configuration changes; see Deploy Configuration Changes.

Enabling and Disabling Access Control Rules

When you create an access control rule, it is enabled by default. If you disable a rule, the system does not use it to evaluate network traffic and stops generating warnings and errors for that rule. When viewing the list of rules in an access control policy, disabled rules are grayed out, although you can still modify them.


Tip


You can also enable or disable an access control rule using the rule editor.


Procedure


Step 1

In the access control policy editor, right-click the rule and choose a rule state.

If View (View button) appears next to a rule instead, the rule belongs to an ancestor policy, or you do not have permission to modify the rule.

Step 2

Click Save.


What to do next

Copying Access Control Rules from One Access Control Policy to Another

You can copy access control rules from one access control policy to another. You can copy the rules either to the Default section or the Mandatory section of the access control policy.

Before you begin

Note the following conditions before you proceed:

  • All the settings of the copied rules, except the comments, are retained in the pasted version. However, a new comment is added in the copied rule mentioning the source access control policy.

Procedure


Step 1

In the access control policy editor, select the rules that you want to copy with a left-click on your mouse.

Tip


To select multiple rules, use the Ctrl (Control) key on your keyboard.

Step 2

Right-click the selected rules and choose Copy to > Another policy.

Step 3

Select the destination access control policy from the Access Policy drop-down list.

Step 4

From the Place Rules drop-down list, choose where you want to position the copied rules:

  • To position as the last set of rules in the Default section, choose At the bottom (within the Default section).
  • To position as the first set of rules in the Mandatory section, choose At the top (within the Mandatory section).

Step 5

Click Copy.


What to do next

Moving Access Control Rules to a Prefilter Policy

You can move access control rules from an access control policy to the associated prefilter policy.

Before you begin

Note the following conditions before you proceed:

  • When moving an access control rule to a prefilter policy the layer 7 (L7) parameters in the access control rule cannot be moved. The L7 parameters are dropped during the operation.

  • The comments in the access control rule configuration are lost after moving the rule. However, a new comment is added in the moved rule mentioning the source access control policy.

  • You cannot move access control rules with Monitor set as the Action parameter.

  • The Action parameter in the access control rule is changed to a suitable action in the prefilter rule when moved. To know what each action in the access control rule maps to, see the following table:

    Action in the access control rule

    Action in the prefilter rule

    Allow

    Analyze

    Block

    Block

    Block with reset

    Block

    Interactive Block

    Block

    Interactive Block with reset

    Block

    Trust

    Fastpath

  • Similarly, based on the action configured in the access control rule, the logging configuration is set to an appropriate setting after the rule is moved, as mentioned in the following table.

    Action in the access control rule

    Enabled Logging configurations in the prefilter rule

    Allow

    None of the check boxes are checked.

    Block

    • Log at Beginning of Connection

    • Event Viewer

    • Syslog Server

    • SNMP Trap

    Block with reset

    • Log at Beginning of Connection

    • Event Viewer

    • Syslog Server

    • SNMP Trap

    Interactive Block

    • Log at Beginning of Connection

    • Event Viewer

    • Syslog Server

    • SNMP Trap

    Interactive Block with reset

    • Log at Beginning of Connection

    • Event Viewer

    • Syslog Server

    • SNMP Trap

    Trust

    • Log at Beginning of Connection

    • Log at End of Connection

    • Event Viewer

    • Syslog Server

    • SNMP Trap

  • The access control rules cannot be moved to the default prefilter policy since the default prefilter policy cannot have rules.

  • While moving rules from the source policy, if another user modifies those rules, the FMC displays a message. You may continue with the process after refreshing the page.

Procedure


Step 1

In the access control policy editor, select the rules that you want to move with a left-click on your mouse.

Tip


To select multiple rules, use the Ctrl (Control) key on your keyboard.

Step 2

Right-click the selected rules and choose Move to another policy.

Step 3

From the Place Rules drop-down list, choose where you want to position the moved rules:

  • To position as the last set of rules, choose At the bottom.
  • To position as the first set of rules, choose At the top.

Step 4

Click Move.


What to do next

Positioning an Access Control Rule

You can move an existing rule within an access control policy. When you add or move a rule to a category, the system places it last in the category.


Tip


You can move multiple rules at once by selecting the rules then cutting and pasting using the right-click menu.


Before you begin

Review rule order guidelines in Best Practices for Access Control Rules.

Procedure


Step 1

In the access control rule editor, you have the following options:

  • If you are adding a new rule, use the Insert drop-down list.
  • If you are editing an existing rule, click Move.

Step 2

Choose where you want to move or insert the rule:

  • Choose into Mandatory or into Default.
  • Choose a into Category, then choose the user-defined category.
  • Choose above rule or below rule, then type the appropriate rule number.

Step 3

Click Save.

Step 4

Click Save to save the policy.


What to do next

Access Control Rule Actions

Every access control rule has an action that determines how the system handles and logs matching traffic. You can monitor, trust, block, or allow (with or without further inspection).

The access control policy’s default action handles traffic that does not meet the conditions of any access control rule with an action other than Monitor.

Access Control Rule Monitor Action

The Monitor action is not designed to permit or deny traffic. Rather, its primary purpose is to force connection logging, regardless of how matching traffic is eventually handled.

If a connection matches a Monitor rule, the next non-Monitor rule that the connection matches should determine traffic handling and any further inspection. If there are no additional matching rules, the system should use the default action.

There is an exception, however. If a Monitor rule contains layer 7 conditions—such as an application condition—the system allows early packets to pass and the connection to be established (or the SSL handshake to complete). This occurs even if the connection should be blocked by a subsequent rule; this is because these early packets are not evaluated against subsequent rules. So that these packets do not reach their destination completely uninspected, you can specify an intrusion policy for this purpose in the access control policy’s Advanced settings; see Inspection of Packets That Pass Before Traffic Is Identified. After the system completes its layer 7 identification, it applies the appropriate action to the remaining session traffic.


Caution


As a best practice, avoid placing layer 7 conditions on broadly-defined monitor rules high in your rule priority order, to prevent inadvertently allowing traffic into your network. Also, if locally bound traffic matches a Monitor rule in a Layer 3 deployment, that traffic may bypass inspection. To ensure inspection of the traffic, enable Inspect Local Router Traffic in the advanced device settings for the managed device routing the traffic.

Access Control Rule Trust Action

The Trust action allows traffic to pass without deep inspection or network discovery. Trusted traffic is still subject to identity requirements and rate limiting.

Diagram showing that the Trust rule action allows traffic to pass and you cannot further inspect the traffic with a file, intrusion, or network discovery policy.


Note


Some protocols, such as FTP and SIP, use secondary channels, which the system opens through the process of inspection. In some cases, trusted traffic can bypass all inspection, and these secondary channels cannot be opened properly. If you run into this problem, change the trust rule to Allow.


Access Control Rule Blocking Actions

The Block and Block with reset actions deny traffic without further inspection of any kind.

Diagram showing that the Block and Block with reset rule actions deny traffic, and you cannot inspect blocked traffic with a file, intrusion, or network discovery policy.

Block with reset rules reset the connection, with the exception of web requests met with an HTTP response page. This is because the response page, which you configure to appear when the system blocks web requests, cannot display if the connection is immediately reset. For more information, see HTTP Response Pages and Interactive Blocking.

Access Control Rule Interactive Blocking Actions

For more information, see HTTP Response Pages and Interactive Blocking.

Diagram showing that, when the user bypasses a traffic block by the Interactive Block or Interactive Block with Reset rule action, inspection occurs as if the action were Allow and, when the block is not bypassed, you cannot inspect the blocked traffic with a file, intrusion, or network discovery policy.

If a user bypasses the block, the rule mimics an allow rule. Therefore, you can associate interactive block rules with file and intrusion policies, and matching traffic is also eligible for network discovery.

If a user does not (or cannot) bypass the block, the rule mimics a block rule. Matching traffic is denied without further inspection.

Note that if you enable interactive blocking, you cannot reset all blocked connections. This is because the response page cannot display if the connection is immediately reset. Use the Interactive Block with reset action to (non-interactively) block-with-reset all non-web traffic, while still enabling interactive blocking for web requests.

For more information, see HTTP Response Pages and Interactive Blocking.

Access Control Rule Allow Action

The Allow action allows matching traffic to pass, though it is still subject to identity requirements and rate limiting.

Optionally, you can use deep inspection to further inspect and block unencrypted or decrypted traffic before it reaches its destination:

  • You can use an intrusion policy to analyze network traffic according to intrusion detection and prevention configurations, and drop offending packets depending on the configuration.

  • You can perform file control using a file policy. File control allows you to detect and block your users from uploading (sending) or downloading (receiving) files of specific types over specific application protocols.

  • You can perform network-based advanced malware protection (AMP), also using a file policy. AMP for Networks can inspect files for malware, and block detected malware depending on the configuration.

The following diagram illustrates the types of inspection performed on traffic that meets the conditions of an Allow rule (or a user-bypassed Interactive Block rule. Notice that file inspection occurs before intrusion inspection; blocked files are not inspected for intrusion-related exploits.

Diagram showing types of inspection performed on traffic that meets the conditions of an Allow rule. The diagram shows that, when file inspection results in dropped traffic, the same traffic is not inspected for intrusions but can be inspected for nework discovery. The diagram also shows that, in three cases, traffic can be inspected by network discovery. The three cases are when traffic is passed by a file policy and dropped by an intrusion policy, when traffic is passed by both intrusion and file policies, and when allowed traffic is not inspected by an intrusion or file policy.

For simplicity, the diagram displays traffic flow for situations where both (or neither) an intrusion and a file policy are associated with an access control rule. You can, however, configure one without the other. Without a file policy, traffic flow is determined by the intrusion policy; without an intrusion policy, traffic flow is determined by the file policy.

Regardless of whether the traffic is inspected or dropped by an intrusion or file policy, the system can inspect it using network discovery. However, allowing traffic does not automatically guarantee discovery inspection. The system performs discovery only for connections involving IP addresses that are explicitly monitored by your network discovery policy; additionally, application discovery is limited for encrypted sessions.

Access Control Rule Comments

When you create or edit an access control rule, you can add a comment. For example, you might summarize the overall configuration for the benefit of other users, or note when you change a rule and the reason for the change. You can display a list of all comments for a rule along with the user who added each comment and the date the comment was added.

When you save a rule, all comments made since the last save become read-only.

To search access control rule comments, use the "Search Rules" bar on the rule listing page. See Searching for Rules.

Adding Comments to an Access Control Rule

Procedure


Step 1

In the access control rule editor, click Comments.

Step 2

Click New Comment.

Step 3

Enter your comment and click OK. You can edit or delete this comment until you save the rule.

Step 4

Click Save.

Step 5

Click Save to save the policy.


What to do next

History for Access Control Rules

Feature

Version

Details

Search for access control rule comments

6.7

The Search Rules bar now offers the option to search for comments.

New/modified pages: Access control rules page, Search Rules text entry field.

Supported platforms: FMC

Copy or move rules between access control and prefilter policies

6.7

You can copy access control rules from one access control policy to another. You can also move access control rules from an access control policy to the associated prefilter policy.

New/modified pages: Access control policy page; the right-click menu for the selected rules provides additional options to copy and move.

Supported platforms: FMC

Bulk edit of certain settings in access control rules

6.6

In the list of rules in a policy, shift-click or control-click to select multiple rules, then right-click and choose an option. Example bulk operations: You can enable or disable the rules, select a rule action, and edit most inspection and logging settings.

New/modified pages: Access control rules page.

Supported platforms: FMC

Enhanced searching on configured rules

6.6

Enhanced searching on configured rules.

New/modified pages: Access control rules page.

Supported platforms: FMC

Time ranges for rule application

6.6

Ability to specify an absolute or recurring time or time range for a rule to be applied. The rule is applied based on the time zone of the device that processes the traffic.

New/modified pages:

  • A new option on the access control Add Rule page.

  • A related new option on the Devices > Platform Settings > FTD page to specify time zones for managed devices.

Supported platforms: FTD devices only

View object details from access control rule pages

pre-6.6

To see information about an object in a list of rules or from the rule configuration dialog, right-click the object.

New/modified pages: Policies > Access Control > Access Control, and Add Rule page.

Supported platforms: FMC