Endpoint Locator
The Endpoint Locator (EPL) feature allows real-time tracking of endpoints within a data center. The tracking includes tracing the network life history of an endpoint and getting insights into the trends that are associated with endpoint additions, removals, moves, and so on. An endpoint is anything with at least one IP address (IPv4 and\or IPv6) and MAC address. EPL feature is also capable of displaying MAC-Only endpoints. By default, MAC-Only endpoints are not displayed. An endpoint can be a virtual machine (VM), container, bare-metal server, service appliance and so on.
 Note |
|
EPL relies on BGP updates to track endpoint information. Hence, typically the Nexus Dashboard Fabric Controller must peer with the BGP Route-Reflector (RR) to get these updates. For this purpose, IP reachability from the Nexus Dashboard Fabric Controller to the RR is required. This can be achieved over in-band network connection to the Nexus Dashboard Fabric Controller Data Network interface. There is no option to configure static routes for pods on ND, so the selected RRs must be reachable through the default data network gateway.
Some key highlights of the Endpoint Locator are:
-
Support for dual-homed and dual-stacked (IPv4 + IPv6) endpoints
-
Support for up to two BGP Route Reflectors or Route Servers
-
Support real-time and historical search for all endpoints across various search filters such as VRF, Network, Layer-2 VNI, Layer-3 VNI, Switch, IP, MAC, port, VLAN, and so on.
-
Support for real-time and historical dashboards for insights such as endpoint lifetime, network, endpoint, VRF daily views, and operational heat map.
-
Support for iBGP and eBGP based VXLAN EVPN fabrics. The fabrics may be created as Easy Fabrics or External Fabrics. EPL can be enabled with an option to automatically configure the spine or RRs with the appropriate BGP configuration.
-
You can enable the EPL feature for upto 4 fabrics.
-
EPL is supported on Multi-Site Domain (MSD).
-
IPv6 underlay is not supported.
-
Support for high availability
-
Support for endpoint data that is stored for up to 60 days, amounting to a maximum of 2 GB storage space.
-
Support for optional flush of the endpoint data to start afresh.
-
Supported scale: Maximum of 50K unique endpoints per fabric. A maximum of 4 fabrics is supported. However, the maximum total number of endpoints across all fabrics should not exceed 100K.
If the total number of endpoints across all fabrics exceeds 100K, an alarm is generated and is listed under the Alarms icon at the top right of the window. This icon starts flashing whenever a new alarm is generated.
-
From NDFC Release 12.0.1a, Persistent or External IP addresses are required to enable EPL. For each VXLAN fabric, a specific container is spawned running a BGP instance to peer with the spines of the fabric. This container must have a persistent IP associated that is then configured as a iBGP neighbor on the spines. A different container is used for each fabric, so the number of fabrics that are managed by NDFC where EPL is enabled decides how many persistent IP addresses must be distributed for EPL. Also, the EPL establishes iBGP sessions only over the Cisco Nexus Dashboard Data interface.
-
For Virtual Cisco Nexus Dashboard deployments, enable or accept promiscuous mode on the port-groups that are associated with the Nexus Dashboard Management and/or Data vNICs where IP stickiness is required. The Persistent IP addresses are given to the pods (for example, SNMP Trap/Syslog receiver, Endpoint Locator instance per Fabric, SAN Insights receiver, and so on). Every POD in Kubernetes can have multiple virtual interfaces. Specifically for IP stickiness an extra virtual interface is associated with the POD that is allocated an appropriate free IP from the external service IP pool. The vNIC has its own unique MAC address that is different from the MAC addresses associated with the vND virtual vNICs. Moreover, all communication to and from the PODs toward an external switch goes out of the same bond interface for North-to-South traffic flows. The EPL container uses Nexus Dashboard Data Interface. The Data vNIC maps to bond0 (also known as bond0br) interface. By default, the VMware system checks if the traffic flows out of a particular vNIC is matched with the Source-MAC that is associated with the vNIC. In case of NDFC, the traffic flows are sourced with the Persistent IP addresses of the given PODs. Therefore, we must enable the required settings on the VMware side.
If you are using a Virtual Cisco Nexus Dashboard Cluster before you begin, ensure that the Persistent IP addresses, EPL feature, and required settings are enabled. See below links:
Cisco Nexus Dashboard Fabric Controller Deployment Guide
Cisco Nexus Dashboard Fabric Controller Installation and Upgrade Guide
Backup and Restore
EPL only backups data for fabrics that EPL has been configured. If EPL is disabled for a fabric(even if EPL has previously been configured there), then you cannot backup the data for that fabric. Also, you can backup only historical data (data on the Endpoint Search page).
If a backup is initiated when EPL is enabled, then when restoring the backup, the same external data IPs that EPL was using must be available on ND. If those IPs are not available, then select the Ignore External Service IP Configuration option in the restore backup form. However, there are chances that the EPL pods will be brought up with different IPs, so any existing EPL policies become invalid. If EPL was previously configured with the Configure My Fabric option, you need to disable and enable EPL so that the old policy is cleaned up and an updated policy is deployed. If you did not use the Configure My Fabric option, then manually update their config with the new IPs.
EPL Connectivity Options
Sample topologies for the various EPL connectivity options are as given below.
NDFC Cluster Mode: Physical Server to VM Mapping
Refer to Cisco Nexus Dashboard Fabric Controller Verified Scalability Guide for more information.
Configuring Endpoint Locator
The Nexus Dashboard Fabric Controller OVA or the ISO installation comes with two interfaces:
-
Management
-
Data
(Out-of-band or OOO) connectivity of switches via switch mgmt0 interface can be through data or Management interface. For more information refer to NDFC Installation and Upgrade Guide.
The Management interface provides reachability to the devices via the mgmt0 interface either Layer-2 or Layer-3 adjacent. This allows Nexus Dashboard Fabric Controller to manage and monitor these devices including POAP. EPL requires BGP peering between the Nexus Dashboard Fabric Controller and the Route-Reflector. Since the BGP process on Nexus devices typically runs on the default VRF, in-band IP connectivity from the Nexus Dashboard Fabric Controller to the fabric is required. The data network interface can be configured during Nexus Dashboard installation. You can't modify the configured in-band network configurations.
Note |
The setup of Data network interface on the Nexus Dashboard Fabric Controller is a prerequisite of any application that requires the in-band connectivity to the devices within fabric. This includes EPL and Network Insights Resources (NIR). |
On the fabric side, for a standalone Nexus Dashboard Fabric Controller deployment, if the Nexus Dashboard data network port is directly connected to one of the front-end interfaces on a leaf, then that interface can be configured using the epl_routed_intf template. An example scenario of how this can be done when IS-IS or OSPF is employed as the IGP in the fabric, is depicted below:

However, for redundancy purposes, it is always advisable to have the server on which the Nexus Dashboard Fabric Controller is installed to be dual-homed or dual-attached. With the OVA Nexus Dashboard Fabric Controller deployment, the server can be connected to the switches via a port-channel. This provides link-level redundancy. To also have node-level redundancy on the network side, the server may be attached to a vPC pair of Leaf switches. In this scenario, the switches must be configured such that the HSRP VIP serves as the default gateway of the Data Network interface on the Nexus Dashboard Fabric Controller.
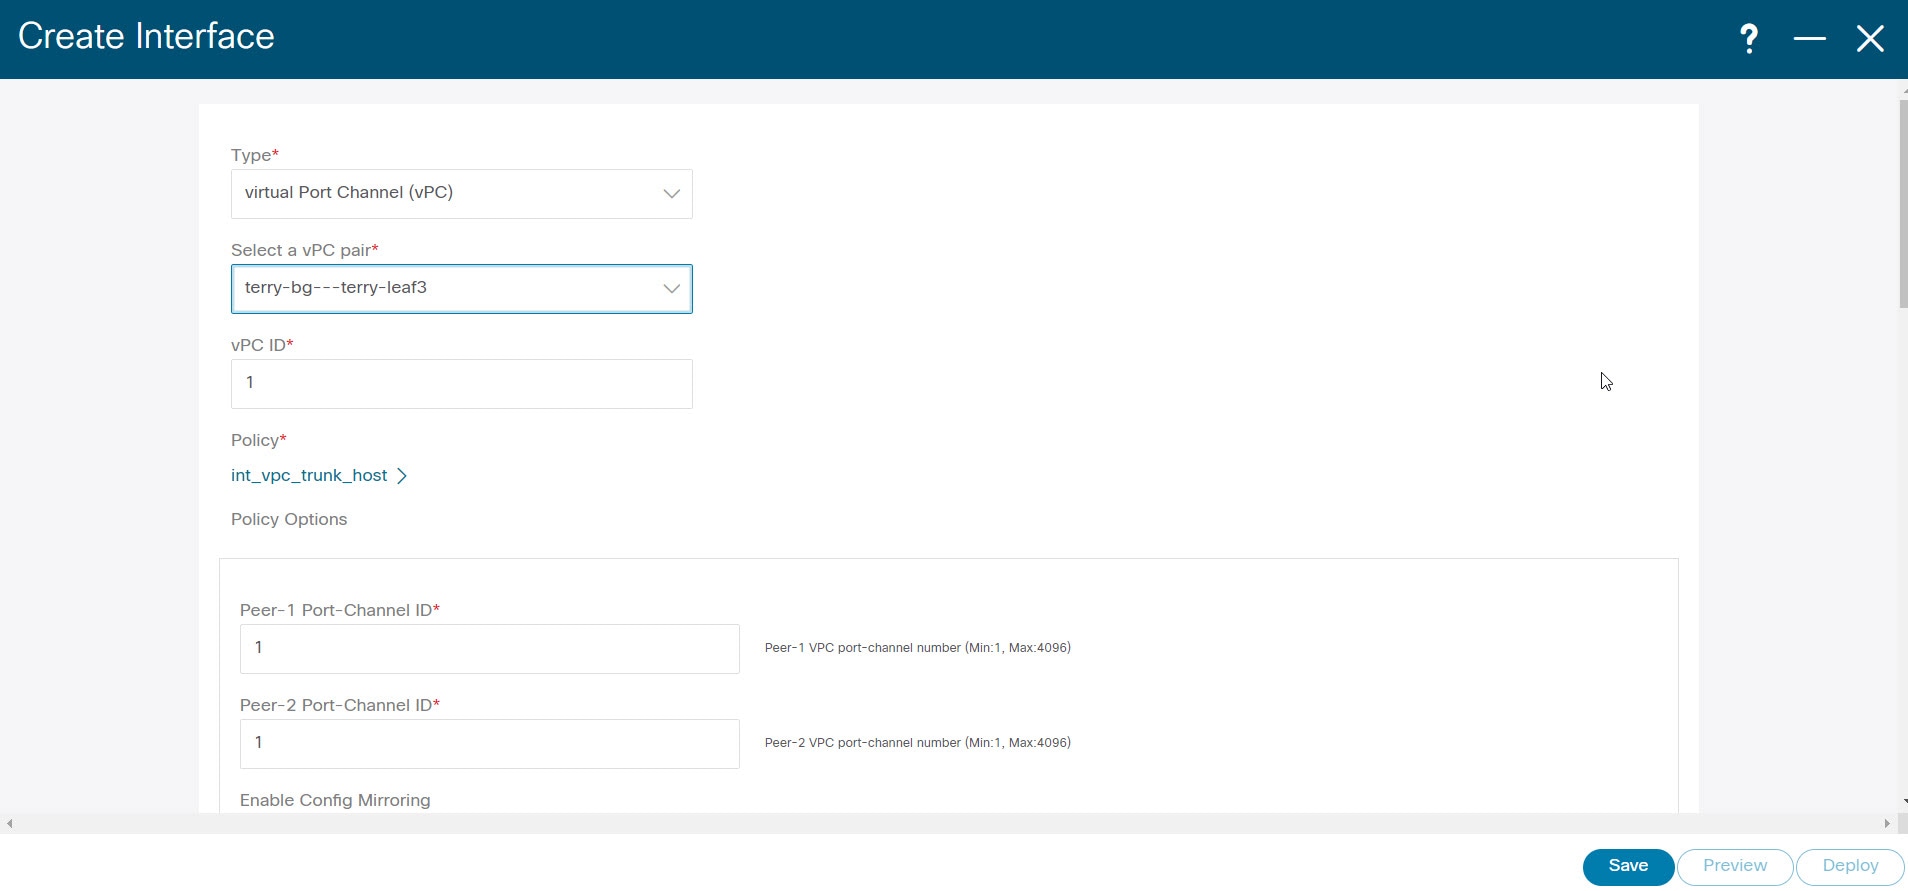
For the HSRP configuration on terry-leaf3, the switch_freeform policy may be employed as shown in the following image: 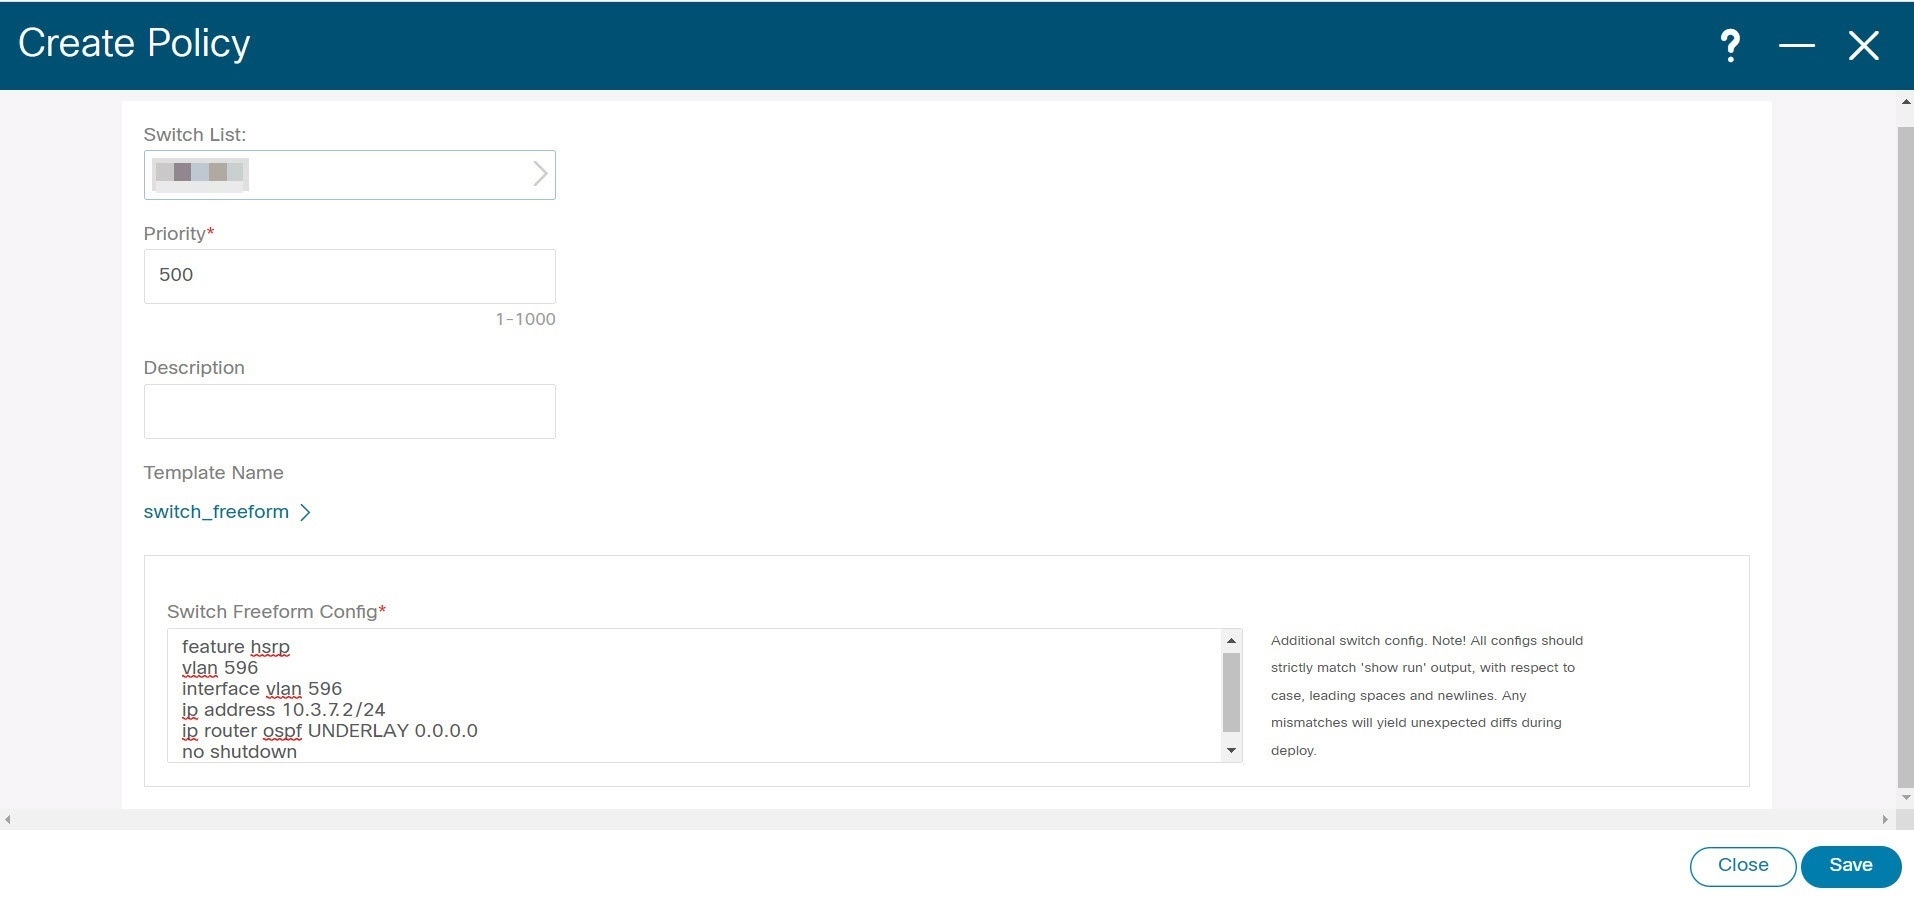
You can deploy a similar configuration on terry-leaf3 while using IP address 10.3.7.2/24 for SVI 596. This establishes an in-band connectivity from the Nexus Dashboard Fabric Controller to the fabrics over the Data Network interface with the default gateway set to 10.3.7.3.
After you establish the in-band connectivity between the physical or virtual Nexus Dashboard Fabric Controller and the fabric, you can establish BGP peering.
During the EPL configuration, the route reflectors (RRs) are configured to accept Nexus Dashboard Fabric Controller as a BGP peer. During the same configuration, the Nexus Dashboard Fabric Controller is also configured by adding routes to the BGP loopback IP on the spines/RRs via the Data Network Interface gateway.
Note |
Ensure that you have enabled EPL feature for Cisco Nexus Dashboard Fabric Controller. Choose choose check box Endpoint Locator. You can view the added EPL details on dashboard. |
Note |
Cisco Nexus Dashboard Fabric Controller queries the BGP RR to glean information for establishment of the peering, like ASN, RR, IP, and so on. |
To configure Endpoint Locator from the Cisco Nexus Dashboard Fabric Controller Web UI, On Fabric Overview page, choose . Similarly, you can configure EPL on Topology page, right-click on required fabric, click . The Endpoint Locator window appears.

You can enable EPL for one fabric at a time.
Select the switches on the fabric hosting the RRs from the drop-down list. Cisco Nexus Dashboard Fabric Controller will peer with the RRs.
By default, the Configure My Fabric option is selected. This option only configures EPL as a BGP neighbor of the switch and this option does not configure network reachability between EPL and the switch. This knob controls whether BGP configuration will be pushed to the selected spines/RRs as part of the enablement of the EPL feature. If the spine/RR needs to be configured manually with a custom policy for the EPL BGP neighborship, then this option should be unchecked. For external fabrics that are only monitored and not configured by Nexus Dashboard Fabric Controller, this option is greyed out as these fabrics are not configured by Nexus Dashboard Fabric Controller.
Select the Process MAC-Only Advertisements option to enable processing of MAC-Only advertisements while configuring the EPL feature.
Note |
If EPL is enabled on a fabric with or without selecting the Process Mac-Only Advertisements checkbox and you want to toggle this selection later, then you have to first disable EPL and then click Database Clean-up to delete endpoint data before re-enabling EPL with the desired Process Mac-Only Advertisements setting. |
Select Yes under Collect Additional Information to enable collection of additional information such as PORT, VLAN, VRF etc. while enabling the EPL feature. To gather additional information, NX-API must be supported and enabled on the switches, ToRs, and leafs. If the No option is selected, this information will not be collected and reported by EPL.
Note |
For all fabrics except external fabrics, NX-API is enabled by default. For external fabrics, you have to enable NX-API in the external fabric settings by selecting the Enable NX-API checkbox in the Advanced tab of the External_Fabric_11_1 fabric template. |
Click the i icon to view a template of the configuration that is pushed to the switches while enabling EPL. This configuration can be copied and pasted on spines or border gateway devices to enable EPL on external monitored fabrics.
Once the appropriate selections are made and various inputs have been reviewed, click Submit to enable EPL. If there are any errors while you enable EPL, the enable process aborts and the appropriate error message is displayed. Otherwise, EPL is successfully enabled.
The Nexus Dashboard Data Service IP is used as BGP neighbor.
When the Endpoint Locator feature is enabled, there are a number of steps that occur in the background. Nexus Dashboard Fabric Controller contacts the selected RRs and determines the ASN. It also determines the interface IP that is bound to the BGP process. Also, appropriate BGP neighbor statements are added on the RRs or spines in case of eBGP underlay, to get them ready to accept the BGP connection that will be initiated from the Nexus Dashboard Fabric Controller. The external Nexus Dashboard Data Service IP address that is assigned to the EPL pod will be added as the BGP neighbor. Once EPL is successfully enabled, the user is automatically redirected to the EPL dashboard that depicts operational and exploratory insights into the endpoints that are present in the fabric.
For more information about the EPL dashboard, refer Monitoring Endpoint Locator.
Flushing the Endpoint Database
After you enable the Endpoint Locator feature, you can clean up or flush all the Endpoint information. This allows starting from a clean-slate with respect to ensuring no stale information about any endpoint is present in the database. After the database is clean, the BGP client re-populates all the endpoint information learnt from the BGP RR. You can flush the endpoint database even if you have not re-enabled the EPL feature on a fabric on which the EPL feature was previously disabled.
To flush all the Endpoint Locator information from the Cisco Nexus Dashboard Fabric Controller Web UI, perform the following steps:
Procedure
|
Step 1 |
Choose Endpoint Locator > Configure, and click Database Clean-Up. |
|
Step 2 |
Click Delete to continue or Cancel to abort. |
Configuring Endpoint Locator for Single VXLAN EVPN Site
To configure endpoint locator for single VXLAN EVPN site, perform the following steps:
Before you begin
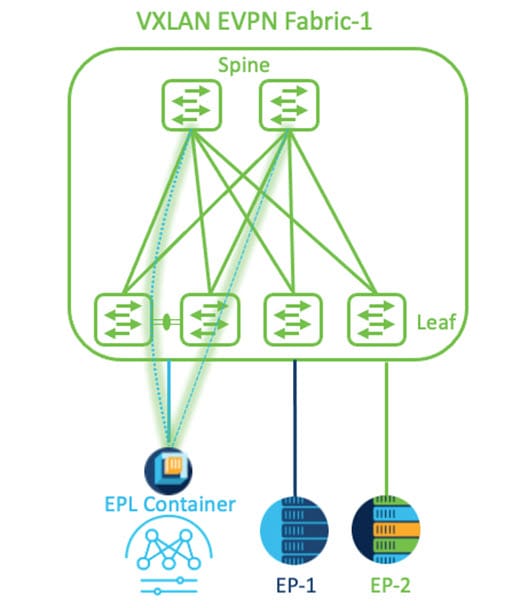
In the below figure, the NDFC service application is attached to the VPC pair of Leaf switches as it provides the link and node-level redundancy. The BGP instance running on EPL container establishes iBGP peering with the fabric spines. The iBGP peering is between Spine loopback addresses (loopback0) and EPL container persistent IP addresses. The loopback0 address of Spines is reachable via VXLAN Underlay, therefore, EPL container IP must have IP reachability towards the spines. We can configure an SVI on Leaf switches that can provide IP connectivity. The SVI will be a non-VXLAN enabled VLAN and will only participate in the underlay.
Procedure
|
Step 1 |
You must configure persistent IP addresses on Cisco Nexus Dashboard. On Nexus Dashboard, choose . |
||
|
Step 2 |
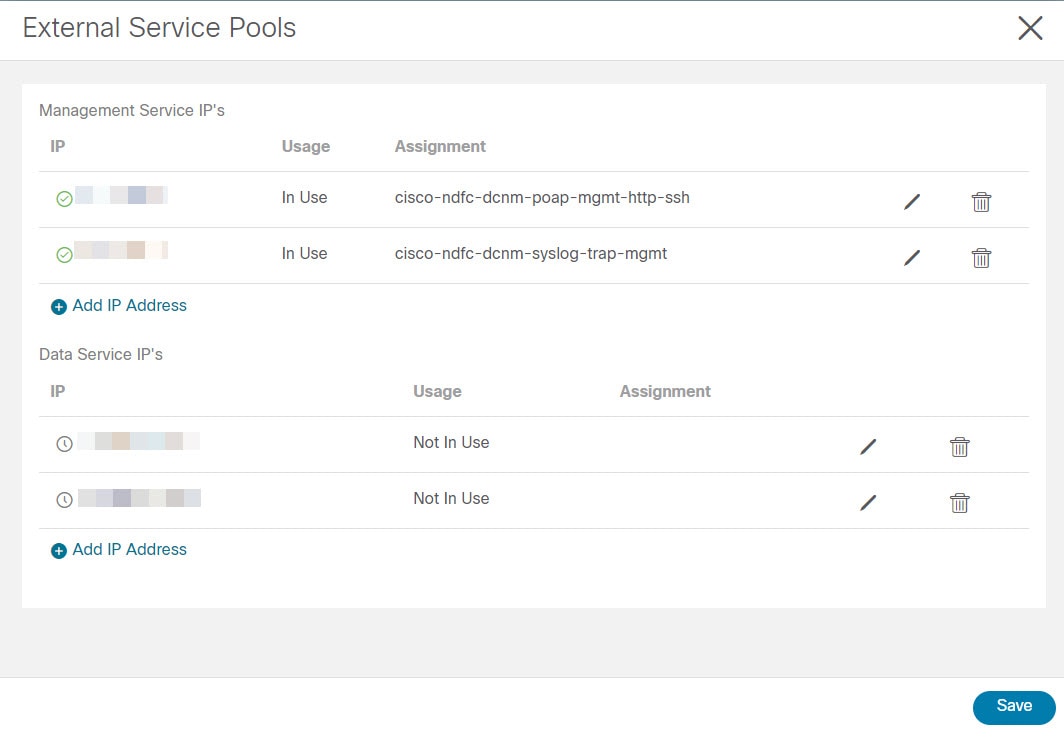
On General tab, in External Service Pools card, click Edit icon. The External Service Pools window appears. |
||
|
Step 3 |
Enter Persistent IP addresses in Data Service IP’s and click check icon.
 |
||
|
Step 4 |
Configure SVI using FHRP for ND Data Interface and Underlay IP connectivity. You can use switch_freeform policy on fabric Leaf 1. To create a freeform policy, perform the following steps: |
||
|
Step 5 |
Verify IP reachability between Nexus Dashboard Data Interface and fabric switches. 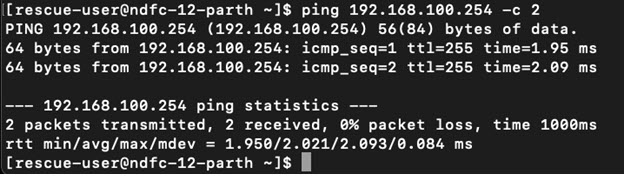 |
||
|
Step 6 |
Enable EPL at fabric level.
|

Configuring Endpoint Locator for Multi-Fabric using VXLAN EVPN Multisite
To configure endpoint locator for mult-fabric VXLAN EVPN multisite, perform the following steps:
Before you begin
The below figure enables EPL for Multi-Fabric using VXLAN EVPN Multisite. The BGP peering’s are established between the Spines/RRs of each VXLAN EVPN Site and NDFC EPL Container. The Persistent IPs are required based on the number of VXLAN EVPN Sites. The NDFC application hosted on Cisco ND Cluster is located on Site 1. The routing information to reach the Spines/RRs deployed in the remote site must be exchanged across the Multisite. Once the BGP session is formed, local EPs of Fabric 2 can be visualized and tracked.
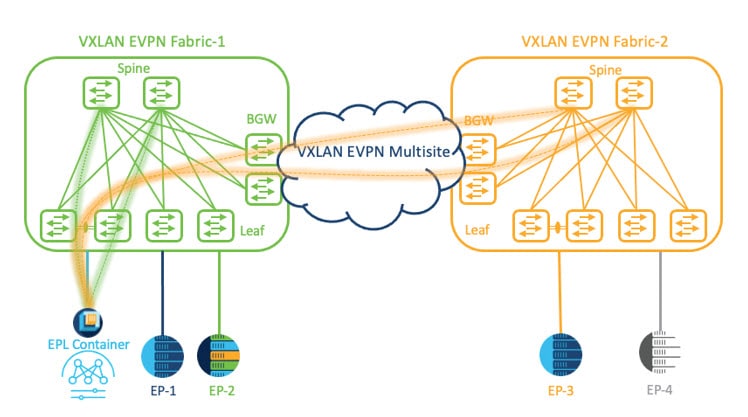
By default, Nexus Dashboard data Interface and Site 2 Spines/RRs loopback prefixes are not advertised across the BGWs. Therefore, prefixes must be exchanged using custom route maps and prefix lists across the sites. At the same time, route redistribution between OSPF and BGP is required as Spines/RRs loopback prefixes are part of OSPF protocol while BGWs peer with each other using BGP.
Procedure
|
Step 1 |
You must configure persistent IP addresses on Cisco Nexus Dashboard. On Nexus Dashboard, choose . |
||
|
Step 2 |
On General tab, in External Service Pools card, click Edit icon. The External Service Pools window appears. |
||
|
Step 3 |
Enter Persistent IP addresses in Data Service IP’s and click check icon.
|
||
|
Step 4 |
Configure Route Redistribution for VXLAN EVPN Fabrics. Route Redistribution for Fabric 1 The following switch_freeform policy can be used on Fabric 1 BGWs. To create a new switch_freeform policy, refer to the above examples. Below the example of sample configuration Route Redistribution for Fabric 2 The following switch_freeform policy can be used on Fabric 2 BGWs. To create a new switch_freeform policy, refer to the above examples. Below the example of sample configuration |
||
|
Step 5 |
To configure EPL, choose LAN> Fabrics> Fabric Overview. |
||
|
Step 6 |
On Fabric Overview window, choose Actions> More> Configure EndPoint Locator. |
||
|
Step 7 |
Choose the appropriate switches on the fabric hosting the Spine/Route Reflector RRs from the drop-down list. Once the appropriate selections are made and various inputs have been reviewed, click Save Config to enable EPL. If there are any errors while you enable EPL, the enable process aborts and the appropriate error message is displayed. Otherwise, EPL is successfully enabled. Once the EPL is enabled the Persistent IP will be in-use. You can view EPL enabled for fabric-1 and fabric-2 successfully. To view and track EPs, Refer the Monitoring Endpoint Locator section. |
Configuring Endpoint Locator for vPC Fabric Peering Switches
Networks Administrator can create vPC between a pair of switches using a Physical Peer Link or Virtual Peer link. vPC Fabric Peering provides an enhanced dual-homing access solution without the overhead of wasting physical ports for vPC Peer Link. For Virtual Peer link, EPL can still be connected to vPC pair of Leaf switches for the link and node-level redundancy. However, VXLAN VLAN (Anycast Gateway) as the First hop for EPL will be used. The loopback0 address of Spines/RRs is reachable only via VXLAN Underlay, while VXLAN VLAN will be part of a Tenant VRF. Therefore, to establish IP communication, route-leaking is configured between Tenant VRF and Default VRF. For more information, refer to vPC Fabric Peering section.
To configure endpoint locator for vPC Fabric Peering switches perform the following steps:
Procedure
|
Step 1 |
You must configure persistent IP addresses on Cisco Nexus Dashboard. On Nexus Dashboard, choose . |
|
Step 2 |
On General tab, in External Service Pools card, click Edit icon. The External Service Pools window appears. |
|
Step 3 |
Enter Persistent IP addresses in Data Service IP’s and click check icon. |
|
Step 4 |
Create a Tenant VRF and Anycast Gateway on the vPC fabric peering switches. add two images |
|
Step 5 |
Configure Route-leaking between Tenant VRF and Default VRF. Advertise from Tenant VRF to Default VRF. The following switch_freeform policy can be used on fabric Leaf where ND is connected. Advertise from Default VRF to Tenant VRF. The following switch_freeform policy can be used on fabric Leaf where ND is connected. |
|
Step 6 |
Enable EPL at fabric level. |
Configuring Endpoint Locator for External Fabrics
In addition to Easy fabrics, Nexus Dashboard Fabric Controller allows you to enable EPL for VXLAN EVPN fabrics comprising of switches that are imported into the external fabric. The external fabric can be in managed mode or monitored mode, based on the selection of Fabric Monitor Mode flag in the External Fabric Settings. For external fabrics that are only monitored and not configured by Nexus Dashboard Fabric Controller, this flag is disabled. Therefore, you must configure BGP sessions on the Spine(s) via OOB or using the CLI. To check the sample template, click ℹ icon to view the configurations required while enabling EPL.
In case the Fabric Monitor Mode checkbox in the External Fabric settings is unchecked, then EPL can still configure the spines/RRs with the default Configure my fabric option. However, disabling EPL would wipe out the router bgp config block on the spines/RRs. To prevent this, the BGP policies must be manually created and pushed onto the selected spines/RRs.
Configuring Endpoint Locator for eBGP EVPN Fabrics
You can enable EPL for VXLAN EVPN fabrics, where eBGP is employed as the underlay routing protocol. Note that with an eBGP EVPN fabric deployment, there is no traditional RR similar to iBGP. The reachability of the in-band subnet must be advertised to the spines that behave as Route Servers. To configure EPL for eBGP EVPN fabrics from the Cisco Nexus Dashboard Fabric Controller Web UI, perform the following steps:
Procedure
|
Step 1 |
Choose LAN > Fabrics. Select the fabric to configure eBGP on or create eBGP fabric with the Easy_Fabric_eBGP template. |
|
Step 2 |
Use the leaf_bgp_asn policy to configure unique ASNs on all leaves. |
|
Step 3 |
Add the ebgp_overlay_leaf_all_neighbor policy to each leaf. Fill Spine IP List with the spines’ BGP interface IP addresses, typically the loopback0 IP addresses. Fill BGP Update-Source Interface with the leaf’s BGP interface, typically loopback0. |
|
Step 4 |
Add the ebgp_overlay_spine_all_neighbor policy to each spine. Fill Leaf IP List with the leaves’ BGP interface IPs, typically the loopback0 IPs. Fill Leaf BGP ASN with the leaves’ ASNs in the same order as in Leaf IP List. Fill BGP Update-Source Interface with the spine’s BGP interface, typically loopback0. After the in-band connectivity is established, the enablement of the EPL feature remains identical to what is listed so far. EPL becomes a iBGP neighbor to the Route Servers running on the spines. |
 Feedback