Services Management
With Cisco Nexus Dashboard, you can manage all of your services including their entire lifecycle from the Services GUI page. This page also allows you to explore the Cisco DC App Center and discover all the services that are available for the Nexus Dashboard.
Installing Services Using App Store
The App Store screen allows you to deploy services directly from the Cisco DC App Center.
-
You must have administrative privileges to install services.
-
The Cisco DC App Center must be reachable from the Nexus Dashboard via the Management Network directly or using a proxy configuration.
Setting up a proxy is described in Cluster Configuration.
-
Keep in mind that only the latest versions of services are available for installation using the App Store.
If you want to install a version of a service prior to the latest available in the App Store, you can follow the manual installation procedures as described in Installing Services Manually.
-
You must have configured the App Infra Services with deployment profiles appropriate for your use case, as described in App Infra Services.
-
Ensure that the cluster is healthy before installing a service.
To install a service from the App Store:
-
Navigate to your Nexus Dashboard’s Admin Console.
-
Install a service from the App Store.
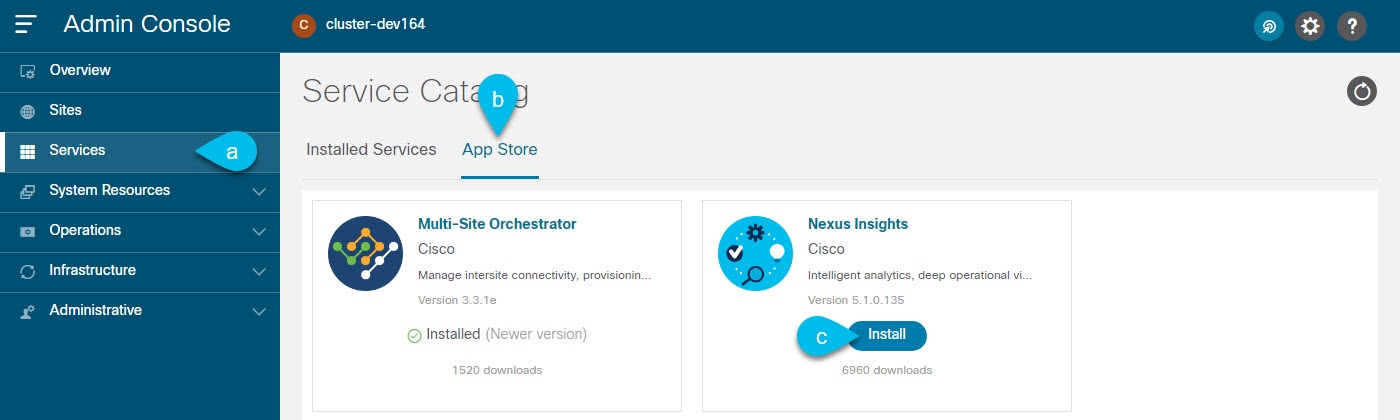
Figure 8. Install Service from App Store -
From the main navigation menu, select Services.
-
In the main pane, select the App Store tab.
-
In the tile of the service you want to install, click Install.
Nexus Dashboard will download the service directly from the DC App Center and install it. After the process completes, the service will become available in the Services page.
This may take up to 20 minutes depending on the service.
-
-
Enable the service.
By default, after the service is installed, it remains in the
disabledstate. Follow the steps described in Enabling Services to enable it.This may take up to 20 minutes depending on the service.
Installing Services Manually
Alternatively, you may choose to manually download the services from the DC App Center and then upload them to the Nexus Dashboard to install.
-
You must have administrative privileges to install services.
-
You must have configured the App Infra Services with deployment profiles appropriate for your use case, as described in App Infra Services.
To install a service manually:
-
Download the service’s image.
-
Browse to the Cisco DC App Center.
-
In the Search for apps… field, enter the name of the service you want to download and press Enter.
For example,
network insights. -
On the search results page, click the service.
-
On the service page, click Download.
-
In the License Agreement window, click Agree and download.
This will download the service’s image file to your system.

Note
 Prior releases used
 .aciextension for service images. Starting with release 2.1(1), most services will come in.napfile instead.
-
-
Log in to your Nexus Dashboard GUI.
-
From the main navigation menu, select Admin Console.
-
Upload the service image.
-
From the main navigation menu, select Services.
-
In the top right of the main pane, click the Actions menu and select Upload App.
-
Choose the image file you downloaded.
You can choose to upload the service from an
httpservice or from your local machine.To upload a local image, select Local and click Choose File to select the service image you downloaded to your local system.
To use a remote server, select Remote and provide the URL to the image file.
Note
If you are providing an httpURL to the image, your web server must be configured to not interpret.napfiles and serve them as-is. Typically, this means including the extension in the following line in the web server’shttpd.confconfiguration file:AddType application/x-gzip .gz .tgz .nap
-
Click Upload to upload the app.
This may take up to 20 minutes depending on the service.
-
-
Wait for the upload and initialization process to finish.
-
Enable the app.
By default, after the service is installed, it remains in the
disabledstate. Follow the steps described in Enabling Services to enable it.This may take up to 20 minutes depending on the service.
Enabling Services
By default, after a service is installed, it remains in the disabled state. This section describes how to enable it.
-
You must have already installed the service as described in Services Management.
-
You must have configured the App Infra Services with deployment profiles appropriate for your use case, as described in App Infra Services.
-
Ensure that the cluster is healthy before enabling a service.
To enable a service:
-
Navigate to your Nexus Dashboard’s Admin Console.
-
From the main navigation menu, select Services.
-
In the service’s tile, click Enable.
Enable <service-name> window opens.
-
From the Deployment Profile dropdown, select the service profile you want to use.
When you enable a service, you will be prompted to select a Deployment Profile as shown in the figure below, which will define the resources that the Nexus Dashboard will allocate to the service.
Note
The service deployment profiles are different from the Infra services deployment profiles, which you select when you restart an infrastructure service as described in App Infra Services. The Infra services deployment profiles must be configured before you enable the services.
The service profiles are defined by the service developer and contain a set of tested and verified resource requirements based on specific use cases. You can find more detailed information about available profiles in the service’s documentation.

Figure 9. Service Deployment Profile
Changing Service Deployment Profile
Service deployment profiles are defined by the service developer and contain a set of tested and verified resource requirements based on specific use cases. You can find more detailed information about available profiles in the service-specific documentation.
You first choose the deployment profile for a service when you enable that service. After a service is already enabled, you can change the deployment profile in one of the following three ways:
-
When you upgrade the service.
You will be automatically prompted to select the deployment profile again.
-
By explicitly changing the deployment profile as described in this section.
Note ![]() You must not change any service’s profile to a lower scale profile. If you want to change to a smaller profile, you must uninstall the service completely and then re-install it to pick the new profile.
You must not change any service’s profile to a lower scale profile. If you want to change to a smaller profile, you must uninstall the service completely and then re-install it to pick the new profile.
-
You must have already installed the service as described in Services Management.
-
You must have configured the App Infra Services with deployment profiles appropriate for your use case, as described in App Infra Services.
-
You must have already enabled the service and chose a resource profile.
To change the resource profile for a service:
-
Log in to your Nexus Dashboard GUI.
-
From the main navigation menu, select Services.
-
Click the actions menu (…) on the service’s tile and select Edit Resource Profile.
Edit <service-name> window opens.
-
From the Deployment Profile dropdown, select the profile you want to use and click Restart.
This will change the deployment profile and restart the service.
Updating Services
The process for updating services is similar to first deploying it, as described in Installing Services Using App Store or Installing Services Manually.
When you upload a new version of an existing service, you will be able to select one of the available versions from the (…) menu on the service’s tile in the Services screen.
To update an existing service:
-
Deploy the new version as described in Installing Services Using App Store or Installing Services Manually.
-
Navigate to the Services screen in the Nexus Dashboard GUI.
-
Click the (…) menu on the service’s tile and select Available Version.
Alternatively, you can click on the version count in the service tile to open the same menu.
-
In the available versions window that opens, click Activate next to the new version.
Disabling Services
-
Navigate to your Nexus Dashboard’s Admin Console.
-
From the main navigation menu, select Services.
All services installed in your Nexus Dashboard are displayed here.
-
Click the (…) menu on the service’s tile and select Disable to disable the service.
Restarting Services
-
Navigate to your Nexus Dashboard’s Admin Console.
-
From the main navigation menu, select Services.
All services installed in your Nexus Dashboard are displayed here.
-
Click the (…) menu on the service’s tile and select Restart to restart the service.
Uninstalling Services
You must disable the service before you can delete it.
-
Log in to your Nexus Dashboard GUI.
-
From the main navigation menu, select Services.
All services installed in your Nexus Dashboard are displayed here.
-
Click the (…) menu on the service’s tile and select Delete to remove the service.
 Feedback