Deploying in Amazon Web Services

Prerequisites and Guidelines

Before you proceed with deploying the Nexus Dashboard cluster in Amazon Web Services (AWS), you must:

  • Ensure that the AWS form factor supports your scale and services requirements.

    Scale and services support and co-hosting vary based on the cluster form factor. You can use the Nexus Dashboard Capacity Planning tool to verify that the cloud form factor satisfies your deployment requirements.

  • Review and complete the general prerequisites described in the Deployment Overview.

  • Review and complete any additional prerequisites described in the Release Notes for the services you plan to deploy.

  • Have appropriate access privileges for your AWS account.

    You must be able to launch multiple instances of Elastic Compute Cloud (m5.2xlarge) to host the Nexus Dashboard cluster.

  • Have at least 6 AWS Elastic IP addresses.

    A typical Nexus Dashboard deployment consists of 3 nodes with each node requiring 2 AWS Elastic IP addresses for the management and data networks.

    By default, your AWS account has lower elastic IP limit, so you may need to request an increase. To request IP limit increase:

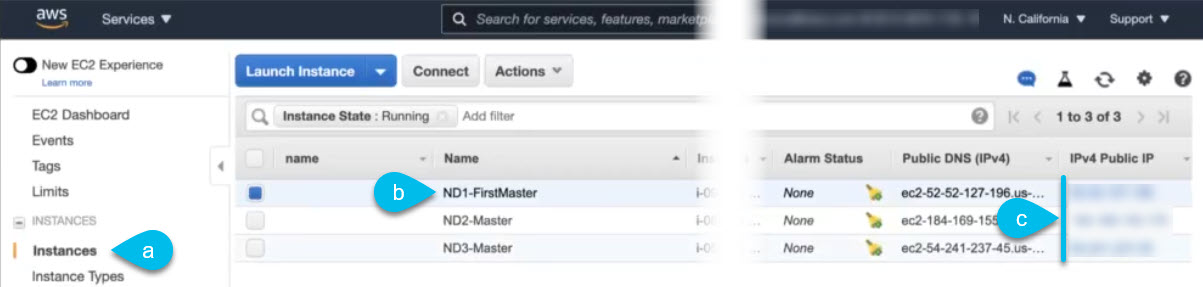
    1. In your AWS console, navigate to Computer > EC2.

    2. In the EC2 Dashboard, click Network & Security > Elastic IPs and note how many Elastic IPs are already being used.

    3. In the EC2 Dashboard, click Limits and note the maximum number of EC2-VPC Elastic IPs allowed.

      Subtract the number of IPs already being used from the limit to get. Then if necessary, click Request limit increase to request additional Elastic IPs.

  • Create a Virtual Private Cloud (VPC).

    A VPC is an isolated portion of the AWS cloud for AWS objects, such as Amazon EC2 instances. To create a VPC:

    1. In your AWS console, navigate to Networking & Content Delivery Tools > VPC.

    2. In the VPC Dashboard, click Your VPCs and choose Create VPC. Then provide the Name Tag and IPv4 CIDR block.

      The CIDR block is a range of IPv4 addresses for your VPC and must be in the /16 to /24 range. For example, 10.9.0.0/16.

  • Create an Internet Gateway and attach it to the VPC.

    Internet Gateway is a virtual router that allows a VPC to connect to the Internet. To create an Internet Gateway:

    • In the VPC Dashboard, click Internet Gateways and choose Create internet gateway. Then provide the Name Tag.

    • In the Internet Gateways screen, select the Internet Gateway you created, then choose Actions > Attach to VPC. Finally, from the Available VPCs dropdown, select the VPC you created and click Attach internet gateway.

  • Create a routes table.

    Routes table is used for connecting the subnets within your VPC and Internet Gateway to your Nexus Dashboard cluster. To create a routes table:

    • In the VPC Dashboard, click Route Tables, choose the Routes tab, and click Edit routes.

    • In the Edit routes screen, click Add route and create a 0.0.0.0/0 destination. From the Target dropdown, select Internet Gateway and choose the gateway you created. Finally, click Save routes.

  • Create a key pair.

    A key pair consists of a private key and a public key, which are used as security credentials to verify your identity when connecting to an EC2 instance. To create a key pair:

    • Navigate to All services > Compute > EC2.

    • In the EC2 Dashboard, click Network & Security > Key Pairs. Then click Create Key Pairs.

    • Provide a name for your key pair, select the pem file format, and click Create key pair.

      This will download the .pem private key file to your system. Move the file to a safe location, you will need to use it the first time you log in to an EC2 instance's console.


    Note


    By default only PEM-based login is enabled for each node. To be able to SSH into the nodes using a password, as required by the GUI setup wizard, you will need to explicitly enable password-based logins by logging in to each node using the generated key and running the required command as described in the setup section below.


Deploying Nexus Dashboard in AWS

This section describes how to deploy Cisco Nexus Dashboard cluster in Amazon Web Services (AWS).

Before you begin

Procedure


Step 1

Subscribe to Cisco Nexus Dashboard product in AWS Marketplace.

  1. Log into your AWS account and navigate to the AWS Management Console

    The Management Console is available at https://console.aws.amazon.com/.

  2. Navigate to Services > AWS Marketplace Subscriptions.

  3. Click Manage Subscriptions.

  4. Click Discover products.

  5. Search for Cisco Nexus Dashboard and click the result.

  6. In the product page, click Continue to Subscribe.

  7. Click Accept Terms.

    It may take a couple of minutes for the subscription to be processed.

  8. Finally click Continue to Configuration.

Step 2

Select software options and region.

  1. From the Delivery Method dropdown, select Cisco Nexus Dashboard for Cloud.

  2. From the Software Version dropdown, select the version you want to deploy.

  3. From the Region dropdown, select the regions where the template will be deployed.

    This must be the same region where you created your VPC.

  4. Click Continue to Launch.

    The product page appears, which shows a summary of your configuration and enables you to launch the cloud formation template.

Step 3

From the Choose Action, select Launch CloudFormation and click Launch.

The Create stack page appears.

Step 4

Create stack.

  1. In the Prerequisite - Prepare template area, select Template is ready.

  2. In the Specify Template area, select Amazon S3 URL for the template source.

    The template will be populated automatically.

  3. Click Next to continue.

    The Specify stack details page appears.

Step 5

Specify stack details.

  1. Provide the Stack name.

  2. From the VPC identifier dropdown, select the VPC you created.

    For example, vpc-038f83026b6a48e98(10.176.176.0/24).

  3. In the ND cluster Subnet block, provide the VPC subnet CIDR block.

    Choose a subnet from the VPC CIDR that you defined. You can provide a smaller subnet or use the whole CIDR. The CIDR can be a /24 or /25 subnet and will be segmented to be used across the availability zones.

    For example, 10.176.176.0/24.

  4. From the Availability Zones dropdown, select one or more available zones.

    We recommend you choose 3 availability zones. For regions that support only 2 availability zones, 2nd and 3rd nodes of the cluster will launch in the second availability zone.

  5. From the Number of Availability Zones dropdown, select the number of zones you added in the previous substep.

    Ensure that the number matches the number of availability zones you selected in the previous substep.

  6. Enable Data Interface EIP support.

    This field enables external connectivity for the node. External connectivity is required for communication with Cisco ACI fabrics outside AWS.

  7. In the Password and Confirm Password fields, provide the password.

    This password will be used for the Nexus Dashboard's rescue-user login, as well as the initial password for the GUI's admin user.

  8. From the SSH key pair dropdown, select the key pair you created.

  9. In the Access control field, provide the external network allowed to access the cluster.

    For example, 0.0.0.0/0 to be able to access the cluster from anywhere.

  10. Click Next to continue.

Step 6

In the Advanced options screen, simply click Next.

Step 7

In the Review screen, verify template configuration and click Create stack.

Step 8

Wait for the deployment to complete, then start the VMs.

You can view the status of the instance deployment in the CloudFormation page, for example CREATE_IN_PROGRESS. You can click the refresh button in the top right corner of the page to update the status.

When the status changes to CREATE_COMPLETE, you can proceed to the next step.

Step 9

Note down all nodes' public IP addresses.

  1. After all instances are deployed, navigate to the AWS console's EC2 > Instances page.

  2. Note down which node is labeled as FirstMaster.

    You will use this node's public IP address to complete cluster configuration.

  3. Note down all nodes' public IP addresses.

    You will provide this information to the GUI bootstrap wizard in the following steps.

Step 10

Enable password-based login on all nodes.

By default only PEM-based login is enabled for each node. To be able to SSH into the nodes using a password, as required by the GUI setup wizard, you will need to explicitly enable password-based logins.

Note


You must enable password-based login on all nodes before proceeding to cluster bootstrap described in the following steps or you will not be able to complete the cluster configuration.

  1. SSH into one of the instances using its public IP address and the PEM file.

    Use the PEM file you created for this as part of Prerequisites and Guidelines.

    # ssh -i <pem-file-name>.pem rescue-user@<node-public-ip>
  2. Enable password-based login.

    On each node, run the following command:

    # acs login-prompt enable
  3. Repeat this step for the other two instances.

Step 11

Open your browser and navigate to https://<first-node-public-ip> to open the GUI.

Note


You must use the public IP address of the first node (FirstMaster) or cluster configuration cannot be completed.

The rest of the configuration workflow takes place from the first node's GUI. You do not need to log in to or configure the other two nodes directly.

Enter the password you provided during template deployment and click Begin Setup

Step 12

Enter the password you provided for the first node and click Begin Setup.

Step 13

Provide the Cluster Details.

In the Cluster Details screen of the initial setup wizard, provide the following information:

  1. Provide the Cluster Name for this Nexus Dashboard cluster.

  2. Click +Add NTP Host to add one or more NTP servers.

    You must provide an IP address, fully qualified domain name (FQDN) are not supported.

    After you enter the IP address, click the green checkmark icon to save it.

  3. Click +Add DNS Provider to add one or more DNS servers.

    After you enter the IP address, click the green checkmark icon to save it.

  4. Provide a Proxy Server.

    For clusters that do not have direct connectivity to Cisco cloud, we recommend configuring a proxy server to establish the connectivity, which will allow you to mitigate risk from exposure to non-conformant hardware and software in your fabrics.

    If you want to skip proxy configuration, click the information (i) icon next to the field, then click Skip.

  5. (Optional) If your proxy server required authentication, change Authentication required for Proxy to Yes and provide the login credentials.

  6. (Optional) Expand the Advanced Settings category and change the settings if required.

    Under advanced settings, you can configure the following:

    • Provide one or more search domains by clicking +Add DNS Search Domain.

      After you enter the IP address, click the green checkmark icon to save it.

    • Provide custom App Network and Service Network.

      The application overlay network defines the address space used by the application's services running in the Nexus Dashboard. The field is pre-populated with the default 172.17.0.1/16 value.

      The services network is an internal network used by the Nexus Dashboard and its processes. The field is pre-populated with the default 100.80.0.0/16 value.

      Application and Services networks are described in the Prerequisites and Guidelines section earlier in this document.

  7. Click Next to continue.

Step 14

In the Node Details screen, provide the node's information.

  1. Click the Edit button next to the first node.

  2. Provide the node's Name.

    The Management Network and Data Network information will be already populated from the VPC subnet you have configured before deploying the cluster.

    The cluster creates six subnets from the given VPC CIDR, from which the data and management networks will be allocated for the cluster's three nodes.

  3. Leave IPv6 addresses and VLAN fields blank.

    Cloud Nexus Dashboard clusters do not support these options.

  4. Click Save to save the changes.

Step 15

Click Add Node to add the second node to the cluster.

The Node Details window opens.

  1. Provide the node's Name.

  2. In the Credentials section, provide the node's Public IP Address and the password you provided during template deployment, then click Verify.

    The IP address and password are used to pull that node's Management Network and Data Network information, which will be populated in the fields below.

  3. Click Save to save the changes.

Step 16

Repeat the previous step to add the 3rd node.

Step 17

Click Next to continue.

Step 18

In the Confirmation screen, review the entered information and click Configure to create the cluster.

During the node bootstrap and cluster bring-up, the overall progress as well as each node's individual progress will be displayed in the UI.

It may take up to 30 minutes for the cluster to form and all the services to start. When cluster configuration is complete, the page will reload to the Nexus Dashboard GUI.

Step 19

Verify that the cluster is healthy.

It may take up to 30 minutes for the cluster to form and all the services to start.

After all three nodes are ready, you can log in to any one node via SSH and run the following command to verify cluster health:

  1. Verify that the cluster is up and running.

    You can check the current status of cluster deployment by logging in to any of the nodes and running the acs health command.

    While the cluster is converging, you may see the following outputs:

    $ acs health
    k8s install is in-progress
    $ acs health
    k8s services not in desired state - [...]
    $ acs health
    k8s: Etcd cluster is not ready
    When the cluster is up and running, the following output will be displayed:
    $ acs health
    All components are healthy
  2. Log in to the Nexus Dashboard GUI.

    After the cluster becomes available, you can access it by browsing to any one of your nodes' management IP addresses. The default password for the admin user is the same as the rescue-user password you chose for the first node of the Nexus Dashboard cluster.

Step 20

Verify that the cluster is healthy.

It may take up to 30 minutes for the cluster to form and all the services to start.

After all three nodes are ready, you can log in to any one node via SSH and run the following command to verify cluster health:

  1. Verify that the cluster is up and running.

    You can check the current status of cluster deployment by logging in to any of the nodes and running the acs health command.

    While the cluster is converging, you may see the following outputs:

    $ acs health
    k8s install is in-progress
    $ acs health
    k8s services not in desired state - [...]
    $ acs health
    k8s: Etcd cluster is not ready
    When the cluster is up and running, the following output will be displayed:
    $ acs health
    All components are healthy
  2. Log in to the Nexus Dashboard GUI.

    After the cluster becomes available, you can access it by browsing to any one of your nodes' management IP addresses. The default password for the admin user is the same as the rescue-user password you chose for the first node of the Nexus Dashboard cluster.