NVIDIA Licensing Information

This chapter contains the following sections:

NVIDIA GRID License Server Overview

The NVIDIA Tesla P6 GPU combines Tesla and GRID functionality when you enable the licensed GRID features GRID vGPU and GRID Virtual Workstation. You enable these features during OS boot by borrowing a software license that is served over the network from the NVIDIA GRID License Server virtual appliance. The license is returned to the GRID License Server when the OS shuts down.

The NVIDIA Tesla P6 GPU has dual personality. It can work in Compute (Tesla) and GRID mode. Only GRID mode needs a license.

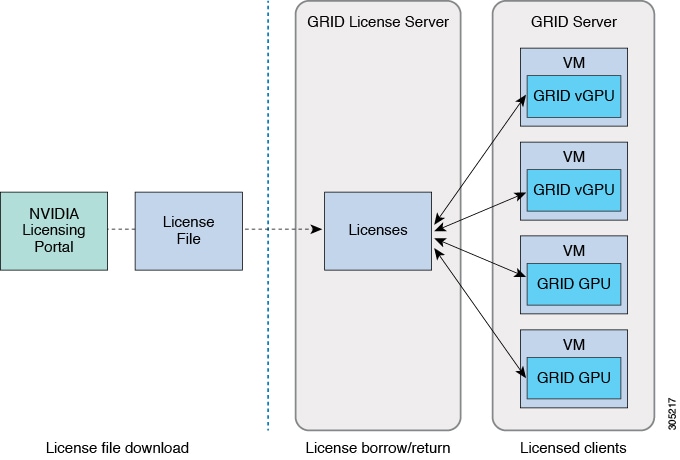
You obtain the licenses that are served by the GRID License Server from the NVIDIA Licensing Portal as downloadable license files, which you install into the GRID License Server via its management interface. See the following figure.

Figure 1. GRID Licensing Architecture


There are three editions of GRID licenses that enable three different classes of GRID features. The GRID software automatically selects the license edition based on the features that you are using. See the following table.

Table 1. GRID Licensing Editions

GRID License Edition

GRID Features

GRID Virtual GPU (vGPU)

Virtual GPUs for business desktop computing

GRID Virtual Workstation

Virtual GPUs for mid-range workstation computing

GRID Virtual Workstation - Extended

Virtual GPUs for high-end workstation computing

Workstation graphics on GPU pass-through

Registering Your Product Activation Keys with NVIDIA

After your order is processed, NVIDIA sends you a Welcome email that contains your product activation keys (PAKs) and a list of the types and quantities of licenses that your purchased.

Procedure


Step 1

Select the Log In link, or the Register link if you do not already have an account.

The NVIDIA Software Licensing Center > License Key Registration dialog opens.
Step 2

Complete the License Key Registration form and then click Submit My Registration Information.

The NVIDIA Software Licensing Center > Product Information Software Dialog opens.
Step 3

If you have additional PAKs, click Register Additional Keys. For each additional key, complete the form on the License Key Registration dialog, and then click Submit My Registration Information.

Step 4

Agree to the terms and conditions and set a password when prompted.


Downloading the GRID Software Suite

Procedure


Step 1

Return to the NVIDIA Software Licensing Center > Product Information Software dialog box.

Step 2

Click Current Releases.

Step 3

Click the NVIDIA GRID link to access the Product Download dialog. This dialog includes download links for:

  • The NVIDIA License Manager software

  • The gpumodeswitch utility

  • The host driver software

Step 4

Use the links to download the software.


Installing NVIDIA GRID License Server Software

For full instructions and troubleshooting information, see the NVIDIA GRID License Server User Guide. Also see the NVIDIA GRID License Server Release Notes for the latest information about your release. Both documents are available at the following URL:

http://www.nvidia.com

Platform Requirements for NVIDIA GRID License Server

  • The hosting platform can be a physical or a virtual machine. NVIDIA recommends using a host that is dedicated to running only the License Server.

  • The hosting platform must run a supported Windows OS.

  • The hosting platform must have a constant IP address.

  • The hosting platform must have at least one constant Ethernet MAC address.

  • The hosting platform's date and time must be set accurately.

Installing on Windows

Before you begin

The License Server requires a Java Runtime Environment and an Apache Tomcat installation. Apache Tomcat is installed when you use the NVIDIA installation wizard for Windows.

Procedure


Step 1

Download and install the latest Java 32-bit Runtime Environment from https://www.oracle.com/downloads/index.html.

Note 

Install the 32-bit Java Runtime Environment, regardless of whether your platform is Windows 32-bit or 64-bit.

Step 2

Create a server interface.

  1. In the NVIDIA Software Licensing Center dialog box, click Grid Licensing > Create License Server.

  2. In the Create Server dialog box, fill in your desired server details.

  3. Save the .bin file that is generated to your license server for installation.

Step 3

Unzip the NVIDIA License Server installer Zip file that you downloaded previously and run setup.exe.

Step 4

Accept the EULA for the NVIDIA License Server software and the Apache Tomcat software. Tomcat is installed automatically during the License Server installation.

Step 5

Use the installer wizard to step through the installation.

Note 

In the Choose Firewall Options dialog box, select the ports to be opened in the firewall. NVIDIA recommends that you use the default setting, which opens port 7070 but leaves port 8080 closed.

Step 6

To verify the installation, open a web browser on the License Server host and connect to the URL http://localhost:8080/licserver. If the installation was successful, you see the NVIDIA Licenses Client Manager interface.


Installing on Linux

Before you begin

The License Server requires a Java Runtime Environment and an Apache Tomcat installation. Use the following commands to install both separately before installing the License Server on Linux.

Procedure


Step 1

Verify that Java was installed with your Linux installation:

java -version

If a Java version does not display, use your Linux package manager to install Java:

sudo yum install java
Step 2

Use your Linux package manager to install the Tomcat and Tomcat webapp packages.

  1. Install Tomcat:

    sudo yum install tomcat
  2. Enable the Tomcat service for automatic startup on boot:

    sudo systemctl enable tomcat.service
  3. Start the Tomcat service:

    sudo systemctl start tomcat.service
  4. To verify that the Tomcat service is operational, open a web browser on the License Server host and connect to the URL http://localhost:8080. If the installation was successful, you see the Tomcat webapp.

Step 3

Install the License Server.

  1. Unpack the License Server tar file:

    tar xfz NVIDIA-linux-2015.09-0001.tgz
  2. Run the unpacked setup binary as root:

    sudo./setup.bin
  3. Accept the EULA and then continue with the installation wizard to finish the installation.

    Note 

    In the Choose Firewall options dialog, select the ports to be opened in the firewall. NVIDIA recommends that you use the default setting, which opens port 7070 but leaves port 8080 closed.

Step 4

To verify the installation, open a web browser on the License Server host and connect to the URL http://localhost:8080/licserver. If the installation was successful, you see the NVIDIA License Client Manager interface.


Installing GRID Licenses From the NVIDIA Licensing Portal to the License Server

Accessing the GRID License Server Management Interface

Open a web browser on the License Server host and access the URL http://localhost:8080/licserver.

If you configure the License Server host's firewall to permit remote access to the License Server, the management interface is accessible from remote machines at the URL http://localhost:8080/licserver.

Reading Your License Server's MAC Address

Your License Server's Ethernet MAC address is used as an identifier when registering the License Server with NVIDIA's Licensing Portal.

Procedure


Step 1

Access the GRID License Server Management Interface in a browser.

Step 2

In the left-side License Server panel, select Configuration.

Step 3

In the License Server Configuration panel, from the Server host ID pull-down menu, select your License Server's Ethernet MAC address.

Note 

It is important to use the same Ethernet ID consistently to identify the server when generating licenses on NVIDIA's Licensing Portal. NVIDIA recommends that you select one entry for a primary, non-removable Ethernet interface on the platform.


Installing Licenses From the Licensing Portal

Procedure


Step 1

Access the GRID License Server Management Interface in a browser.

Step 2

In the left-side License Server panel, select Configuration.

Step 3

From the License Server Configuration menu, click Choose File.

Step 4

Browse to the license .bin file that you generated earlier and want to install, and click Open.

Step 5

Click Upload.

The license file installs on your License Server. When the installation is complete, you see the confirmation message, "Successfully applied license file to license server."

Viewing Available Licenses

Use the following procedure to view the licenses that are installed and available and their properties.

Procedure


Step 1

Access the GRID License Server Management Interface in a browser.

Step 2

In the left-side License Server panel, select Licensed Feature Usage.

Step 3

Click a feature in the Feature column to see detailed information about the current usage of that feature.


Viewing Current License Usage

Use the following procedure to view information about that licenses that are currently in-use and borrowed from the server.

Procedure


Step 1

Access the GRID License Server Management Interface in a browser.

Step 2

In the left-side License Server panel, select Licensed Clients.

Step 3

To view detailed information about a single licensed client, click its Client ID in the list.


Managing GRID Licenses

Features that require GRID licensing run at reduced capability until a GRID license is acquired.

Acquiring a GRID License on Windows

To acquire a GRID license on Windows, use the following procedure.

Procedure


Step 1

Open the NVIDIA Control Panel using one of the following methods:

  • Right-click the Windows desktop and select NVIDIA Control Panel from the menu.

  • Open the Windows Control Panel and double-click the NVIDIA Control Panel icon.

Step 2

In the NVIDIA Control Panel left pane under Licensing, select Manage License.

The Manage License task pane opens and shows the current license edition being used. The GRID software automatically selects the license edition based on the feature that you are using. The default is Tesla (unlicensed).
Step 3

If you want to acquire a license for GRID Virtual Workstation, under License Edition, select GRID Virtual Workstation.

Step 4

In the License Server field, enter the address of your local GRID License Server.

The address can be a domain name or an IP address.

Step 5

In the Port Number field, enter your port number or leave it set to the default used by the server, which is 7070.

Step 6

Select Apply.

The system requests the appropriate license edition from your configured License Server. After a license is successfully acquired, the features of that license edition are enabled.
Note 

After you configure licensing settings in the NVIDIA Control Panel, the settings persist across reboots.


Acquiring a GRID License on Linux

To acquire a GRID license on Linux, use the following procedure.

Procedure


Step 1

Edit the configuration file:

sudo vi /etc/nvidia/gridd.conf
Step 2

Edit the ServerUrl line with the address of your local GRID License Server.

The address can be a domain name or an IP address. See the Sample Configuration File.

Step 3

Append the port number (default 7070) to the end of the address with a colon. See the Sample Configuration File.

Step 4

Edit the FeatureType line with an integer for the license type. See the Sample Configuration File.

  • GRID vGPU = 1

  • GRID Virtual Workstation = 2

Step 5

Restart the nvidia-gridd service:

sudo service nvidia-gridd restart

The service automatically acquires the license edition that you specified in the FeatureType line. You can confirm this in /var/log/messages.

Note 

After you configure licensing settings in gridd.conf, the settings persist across reboots.

Sample Configuration File

# /etc/nvidia/gridd.conf - Configuration file for NVIDIA Grid Daemon
# Description: Set License Server URL
# Data type: string
# Format: "<address>:<port>"
Server URL=10.31.20.45:7070

# Description: set Feature to be enabled
# Data type: integer
# Possible values:
# 1 => for GRID vGPU
# 2 => for GRID Virtual Workstation
FeatureType=1

Installing Drivers to Support the NVIDIA GPU Cards

After you install the hardware, you must update to the correct level of server BIOS, activate the BIOS firmware, and then install NVIDIA drivers and other software in this order:

1. Updating the Server BIOS Firmware

Install the latest Cisco server BIOS for your blade server by using Cisco UCS Manager.


Note

You must do this procedure before you update the NVIDIA drivers.


Caution

Do not remove the hardware that contains the endpoint or perform any maintenance on it until the update process completes. If the hardware is removed or otherwise unavailable due to maintenance, the firmware update fails. This failure might corrupt the backup partition. You cannot update the firmware on an endpoint with a corrupted backup partition.


Procedure


Step 1

In the Navigation pane, click Equipment.

Step 2

On the Equipment tab, expand Equipment > Chassis > Chassis Number > Servers.

Step 3

Click the Name of the server for which you want to update the BIOS firmware.

Step 4

On the Properties page in the Inventory tab, click Motherboard.

Step 5

In the Actions area, click Update BIOS Firmware.

Step 6

In the Update Firmware dialog box, do the following:

  1. From the Firmware Version drop-down list, select the firmware version to which you want to update the endpoint.

  2. Click OK.

Cisco UCS Manager copies the selected firmware package to the backup memory slot, where it remains until you activate it.

Step 7

(Optional) Monitor the status of the update in the Update Status field.

The update process can take several minutes. Do not activate the firmware until the firmware package you selected displays in the Backup Version field in the BIOS area of the Inventory tab.


What to do next

Activate the server BIOS firmware.

2. Activating the Server BIOS Firmware

Procedure


Step 1

In the Navigation pane, click Equipment.

Step 2

On the Equipment tab, expand Equipment > Chassis > Chassis Number > Servers.

Step 3

Click the Name of the server for which you want to activate the BIOS firmware.

Step 4

On the Properties page in the Inventory tab, click Motherboard.

Step 5

In the Actions area, click Activate BIOS Firmware.

Step 6

In the Activate Firmware dialog box, do the following:

  1. Select the appropriate server BIOS version from the Version To Be Activated drop-down list.

  2. If you want to set only the start-up version and not change the version running on the server, check Set Startup Version Only.

    If you configure Set Startup Version Only, the activated firmware moves into the pending-next-reboot state and the server is not immediately rebooted. The activated firmware does not become the running version of firmware until the server is rebooted.

  3. Click OK.


What to do next

Update the NVIDIA drivers.

3. Updating the NVIDIA Drivers

After you update the server BIOS, you can install NVIDIA drivers to your hypervisor virtual machine.

Procedure


Step 1

Install your hypervisor software on a computer. Refer to your hypervisor documentation for the installation instructions.

Step 2

Create a virtual machine in your hypervisor. Refer to your hypervisor documentation for instructions.

Step 3

Install the NVIDIA drivers to the virtual machine. Download the drivers:

Step 4

Restart the server.

Step 5

Check that the virtual machine is able to recognize the NVIDIA card. In Windows, use the Device Manager and look under Display Adapters.