Server Setup

This chapter provides instructions for setting up the server. It includes the following topics:

Connect Power Supplies and KVM Adapter

To begin, connect both power supplies on the back of your appliance. Connect the included KVM adapter to an external monitor and keyboard, and plug into the KVM port located at the front of the server, as illustrated in Figure 3.

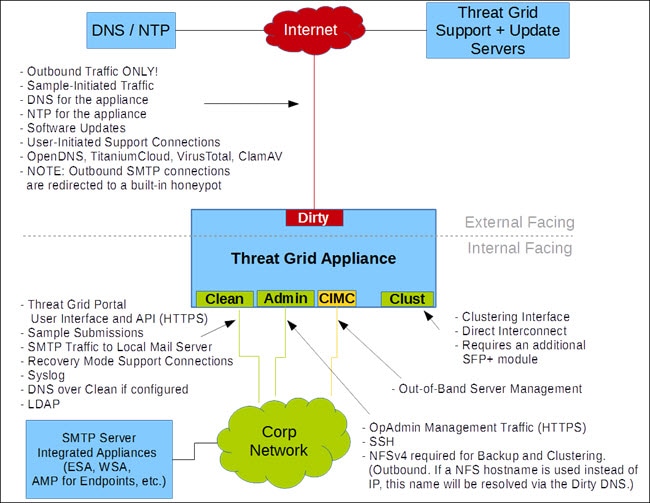
If CIMC is configured, you can use a remote KVM. See CIMC Configuration.

Refer to the server product documentation for detailed hardware and environmental setup information (See Product Documentation).

Network Interface Connections Setup

The SFP+ modules must be connected to the chassis before the appliance is powered on for the session in which the configuration wizard is going to be run. However, wiring the SFP up to the network can be done between power on and configuration.


Note

For Threat Grid Appliance (version 2.7.2 or later), only the Threat Grid M5 Appliance is supported. Refer to the Cisco Threat Grid M5 Appliance Hardware Installation Guide for server setup instructions.


C220 M3 Rack Server Setup

The interfaces must be properly connected and configured for the appliance to operate.


Note

The details for your appliance may differ from the illustrations. Contact support@threatgrid.com if you have any questions.


Find the two SFP+ ports and three Ethernet ports on the back of the appliance and attach the network cables as illustrated in Figure 4.

Reserved is the non-Admin SFP+ port that is reserved for future use.

Figure 1. Cisco UCS C220 M3 SFF Rack Server
Figure 2. Cisco UCS C220 M3 Rear View Details

Note

For releases 1.0-1.2 a reboot may be needed if an interface was not plugged in at boot time. This is a pre-1.3 issue, except for any interface requiring an SFP, which will still needs to be plugged in at boot time post 1.3. The network cable plugged into the SFP may be safely hot-plugged.


C220 M4 Rack Server Setup

The interfaces must be properly connected and configured for the appliance to operate.

Use port 3 Slot 2 for the (optional) Clust interface.


Note

The details for your appliance may differ from the illustrations. Contact support@threatgrid.com if you have any questions.


Figure 3. Cisco UCS C220 M4 SFF Rack Server
Figure 4. CIsco UCS C220 M4 Rear View Details

Connections:

  • 1 Admin, Clust

  • 8 (left) Clean

  • 8 (right) Dirty

  • 6 CIMC

Network Interface Setup Diagram

This section describes the most logical and recommended setup for a Threat Grid Appliance. However, each customer's interface setup is different. Depending on your network requirements, you may decide to connect the Dirty interface to the inside, or the Clean interface to the outside with appropriate network security measures in place, for example.

Figure 5. Network Interfaces Setup Diagram

Note

In Threat Grid Appliance (v2.7.2 and later), there is also the enable_clean_interface option, which is disabled by default. This option (after applying configuration and rebooting) enables access to the administrative interface on port 8443 of the assigned clean IP.


Firewall Rules

This section provides suggested firewall rules.


Note

Implementing a restrictive outgoing policy on the Dirty interface for ports 22 and 19791 requires tracking updates over time and spending more time maintaining the firewall. See the required destinations in the configuration sections.


Note

Using IPv4LL address space (168.254.0.16) for the Dirty interface is NOT supported.


Dirty Interface Outbout

Source

Destination

Protocol

Port

Action

Note

Dirty Interface Internet ANY ANY Allow Allow outbound traffic from samples. (To get accurate results it is required that malware be allowed to contact its command and control server using whatever port and protocol it is designed to use.)

Dirty Interface Inbound

Source

Destination

Protocol

Port

Action

Note

ANY Dirty Internet ANY ANY Deny Deny all incoming connections.

Clean Interface Outbound

Source

Destination

Protocol

Port

Action

Note

Clean Interface SMTP Servers TCP 25 Allow The appliance uses the clean interface to initiate SMTP connections to the configured mail server.

Clean Interface Outbound (Optional)

Source

Destination

Protocol

Port

Action

Note

Clean Interface Corporate DNS Server TCP/UDP 53 Allow Optional, only required if Clean DNS is configured.
Clean Interface AMP Private Cloud TCP 443 Allow Optional, only required if AMP for Endpoints Private Cloud integration is used.
Clean Interface Syslog Servers UDP 514 Allow Allow connectivity to server designated to receive Syslog messages and Threat Grid notifications.
Clean Interface LDAP Servers TCP/UDP 389 Allow Optional, only required if LDAP is configured.
Cean Interface LDAP Servers TCP 636 Allow Optional, only required if LDAP is configured.

Clean Interface Inbound

Source

Destination

Protocol

Port

Action

Note

User Subnet Clean Interface TCP 22 Allow Allow SSH conectivity to the tgsh-dialog.
User Subnet Clean Interface TCP 80 Allow Appliance API and Threat Grid user interface. This will redirect to HTTPS TCP/443.
User Subnet Clean Interface TCP 443 Allow Appliance API and Threat Grid user interface.
User Subnet Clean Interface TCP 9443 Allow Allow connectivity to the Threat Grid UI Glovebox.

Admin Interface Outbound (Optional)

The following depends on what services are configured.

Source

Destination

Protocol

Port

Action

Note

Admin Interface NFSv4 Server TCP 2049 Allow Optional, only required if Threat Grid appliance is configured to send backups to an NFSv4 share.

Admin Interface Inbound

Source

Destination

Protocol

Port

Action

Note

Admin Subnet Admin Interface TCP 22 Allow Allow SSH connectivity to the TGSH Dialog.
Admin Subnet Admin Interface TCP 80 Allow Allow Access to the OpAdmin Portal interface. This will redirect to HTTPS TCP/443.
Admin Subnet Admin Interface TCP 443 Allow Allow Access to the OpAdmin Portal interface.

Dirty Interface for Non Cisco-Validated/Recommended Deployment

Source

Destination

Protocol

Port

Action

Note

Dirty Interface Internet TCP 22 Allow Update, support snapshot, and licensing services.
Dirty Interface Internet TCP/UDP 53 Allow Allow outbound DNS.
Dirty Interface Internet UDP 123 Allow Allow outbound NTP.
Dirty Interface Internet TCP 19791 Allow Allow connectivity to Threat Grid support.
Dirty Interface Cisco Umbrella TCP 443 Allow Connect with third-party detection and enrichment services.
Dirty Interface VirusTotal TCP 443 Allow Connect with third-party detection and enrichment services.
Dirty Interface TitaniumCloud TCP 443 Allow Connect with third-party detection and enrichment services.

Power On and Boot Up Appliance

Once you have connected the server peripherals, network interfaces, and power cables, turn on the appliance and wait for it to boot up. The Cisco screen is briefly displayed.

Figure 6. Cisco Screen During Bootup

Note

If you want to configure this interface, press F8 after the memory check is completed and follow the instructions in CIMC Configuration.


The TGSH Dialog is displayed on the console when the server has successfully booted up and connected.

Figure 7. TGSH Dialog

The Admin URL shows as unavailable because the network interface connections are not yet configured and the OpAdmin Portal cannot be reached yet to perform this task.


Important

The TGSH Dialog displays the initial administrator Password, which will be needed to access and configure the OpAdmin Portal interface later in the configuration. Make a note of the Password in a separate text file (copy and paste).