Firepower 4100 Chassis Initial Configuration

Is This Chapter for You?

This chapter describes how to perform the initial setup for the Cisco Firepower 4100 chassis, including configuring interfaces for use with the ASA and the threat defense logical devices.

Is This Guide for You?

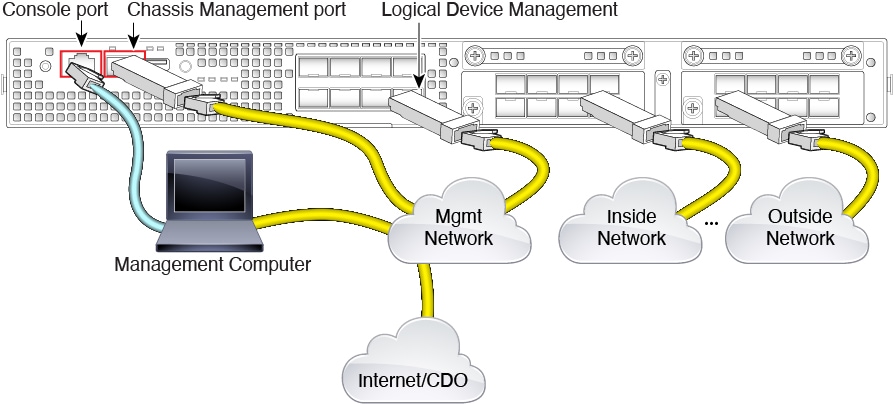
This guide describes how to set up the Firepower 4100 chassis for use with the ASA and/or threat defense application. This guide describes the following deployments:

  • Standalone threat defense as either a native or container instance (multi-instance capability) using the management center

  • Standalone threat defense using the device manager


    Note


    The device manager does not support multi-instance.


  • Standalone threat defense using CDO


    Note


    CDO does not support multi-instance.


  • Standalone ASA using ASDM

This guide does not cover the following deployments, for which you should refer to the FXOS, ASA, FDM, CDO, and FMC configuration guides:

  • High Availability/Failover

  • Clustering (ASA, or threat defense using the management center only)

  • Multi-instance (threat defense using the management center only)

  • Radware DefensePro decorator application

  • CLI configuration (ASA or FXOS only)

This guide also walks you through configuring a basic security policy; if you have more advanced requirements, refer to the configuration guide.

About the Firepower 4100 Chassis

The Firepower 4100 chassis is a next-generation platform for network and content security solutions. The Firepower 4100 includes a supervisor and a single security engine, on which you can install logical devices. It also accepts multiple high performance network modules.

How the Logical Device Works with the Firepower 4100/9300

The Firepower 4100/9300 runs its own operating system on the supervisor called the Firepower eXtensible Operating System (FXOS). The on-the-box chassis manager provides simple, GUI-based management capabilities. You configure hardware interface settings, smart licensing (for the ASA), and other basic operating parameters on the supervisor using the chassis manager. To use the FXOS CLI, see the FXOS CLI configuration guide.

A logical device lets you run one application instance and also one optional decorator application to form a service chain. When you deploy the logical device, the supervisor downloads an application image of your choice and establishes a default configuration. You can then configure the security policy within the application operating system.

Logical devices cannot form a service chain with each other, and they cannot communicate over the backplane with each other. All traffic must exit the chassis on one interface and return on another interface to reach another logical device. For container instances, you can share data interfaces; only in this case can multiple logical devices communicate over the backplane.

Supported Applications

You can deploy logical devices on your chassis using the following application types.

Threat Defense

The threat defense provides next-generation firewall services, including stateful firewalling, routing, VPN, Next-Generation Intrusion Prevention System (NGIPS), Application Visibility and Control (AVC), URL filtering, and malware defense.

You can manage the threat defense using one of the following managers:

  • Management Center—A full-featured, multidevice manager on a separate server.

  • Device Manager—A simplified, single device manager included on the device.

  • CDO—A cloud-based, multidevice manager.

ASA

The ASA provides advanced stateful firewall and VPN concentrator functionality in one device. You can manage the ASA using one of the following managers:

  • ASDM—A single device manager included on the device. This guide describes how to manage the ASA using ASDM.

  • CLI

  • CDO—A cloud-based, multidevice manager.

  • CSM—A multidevice manager on a separate server.

Radware DefensePro (Decorator)

You can install Radware DefensePro (vDP) to run in front of the ASA or the threat defense as a decorator application. vDP is a KVM-based virtual platform that provides distributed denial-of-service (DDoS) detection and mitigation capabilities on the Firepower 4100/9300. Traffic from the network must first pass through the vDP before reaching the ASA or the threat defense.

To deploy vDP, see the FXOS configuration guide.

Logical Device Application Instances: Container or Native

Logical device application instances run in the following deployment types:

  • Native instance—A native instance uses all of the resources (CPU, RAM, and disk space) of the security engine, so you can only install one native instance.

  • Container instance—A container instance uses a subset of resources of the security engine, so you can install multiple container instances. Note: Multi-instance capability is only supported for the threat defense; it is not supported for the ASA or in conjunction with vDP.

Maximum Container Instances per Model

  • Firepower 4110—3

  • Firepower 4112—3

  • Firepower 4115—7

  • Firepower 4120—3

  • Firepower 4125—10

  • Firepower 4140—7

  • Firepower 4145—14

  • Firepower 4150—7

End-to-End Procedure

See the following tasks to set up the Firepower 4100 chassis, and to deploy logical devices on your chassis.

Pre-Configuration

Set up the Firepower 4100 hardware. See the Firepower 4100 hardware guide.

Pre-Configuration

Cable the Chassis.

FXOS CLI or Web

Perform Initial Chassis Setup.

Chassis Manager

Log Into the Chassis Manager.

Chassis Manager

Configure NTP.

Chassis Manager

Add FXOS Users.

Chassis Manager

Configure Interfaces.

Chassis Manager

Create logical devices:

Note


Support for threat defense with the device manager was added in FXOS 2.7.1/threat defense 6.5

Application

Complete application configuration:

Cable the Chassis

Cable the following interfaces for initial chassis setup, continued monitoring, and logical device use.

  • Console port—(Optional) If you do not perform initial setup on the chassis Management port, connect your management computer to the console port to perform initial setup of the chassis. The Firepower 4100 includes an RS-232–to–RJ-45 serial console cable. You might need to use a third party serial-to-USB cable to make the connection.

  • Chassis Management port—Connect the chassis Management port to your management network for configuration and ongoing chassis management. You can perform initial setup on this port if it receives an IP address from a DHCP server.

  • Logical device Management interface—Use one or more interfaces to manage the logical devices. This guide assumes that you have a separate management network with its own internet access. You can choose any interfaces on the chassis for this purpose other than the chassis Management port, which is reserved for FXOS management. For multi-instance support, Management interfaces can be shared among logical devices, or you can use a separate interface per logical device. Typically, you share a Management interface with all logical devices, or if you use separate interfaces, put them on a single management network. But your exact network requirements may vary. For the threat defense, the Management interface is a separate interface from data interfaces, with its own network settings. In 6.7 and later, you can optionally configure a data interface for manager access instead of using the Management interface. In this case, you must still assign a Management interface to the logical device for internal architectural reasons, but you do not need to cable it. Note that for the management center, manager access from a data interface is not supported in High Availability or Clustering deployments. For more information, see the configure network management-data-interface command in the FTD command reference.

  • Data interfaces—Connect the data interfaces to your logical device data networks. You can configure physical interfaces, EtherChannels, VLAN subinterfaces (for container instances only), and breakout ports to divide up high-capacity interfaces. For multi-instance support, you can cable multiple logical devices to the same networks or to different networks, as your network needs dictate. For container instances, you can share data interfaces; only in this case can multiple logical devices communicate over the backplane. Otherwise, all traffic must exit the chassis on one interface and return on another interface to reach another logical device. For details about shared interface limitations and guidelines, see the FXOS configuration guide.


Note


All interfaces other than the console port require SFP/SFP+/QSFP transceivers. See the hardware installation guide for supported transceivers.


Note


Although not covered in this guide, for High Availability, use a Data interface for the failover/state link. For inter-chassis clustering, use an EtherChannel that is defined on the chassis as a Cluster type interface.


Threat Defense with the Management Center Cabling

This guide assumes that you have a separate management network with its own internet access. By default, the Management interface is preconfigured when you deploy, but you have to configure data interfaces later.

Place the management center on (or accessible from) the logical device management network. The threat defense and the management center need access to the internet via the Management network for updates and licensing. In 6.7 and later, you can optionally configure a data interface for the management center management instead of the Management interface. Note that the management center access from a data interface is not supported in High Availability or Clustering deployments. For more information about configuring a data interface for the management center access, see the configure network management-data-interface command in the FTD command reference.


Note


The management connection is a secure, SSL-encrypted communication channel between itself and the device. You do not need to run this traffic over an additional encrypted tunnel such as Site-to-Site VPN for security purposes. If the VPN goes down, for example, you will lose your management connection, so we recommend a simple management path.


Threat Defense with the Device Manager Cabling

This guide assumes that you have a separate management network with its own internet access. By default, the Management interface is preconfigured when you deploy, but you have to configure data interfaces later.

Perform initial the threat defense configuration on the logical device Management interface. The threat defense requires internet access for licensing, updates, and CDO management, and the default behavior is to route management traffic to the gateway IP address you specified when you deployed the threat defense. You can later enable the device manager management from any data interface.

Threat Defense with CDO Cabling

This guide assumes that you have a separate management network with its own internet access. By default, the Management interface is preconfigured when you deploy, but you have to configure data interfaces later.

Make sure the internet is accessible from the logical device management network. The threat defense needs access to the internet via the Management network for CDO management, updates, and licensing. You can optionally configure a data interface for CDO management instead of the Management interface. For more information about configuring a data interface for manager access, see the configure network management-data-interface command in the FTD command reference.


Note


The management connection is a secure, SSL-encrypted communication channel between itself and the device. You do not need to run this traffic over an additional encrypted tunnel such as Site-to-Site VPN for security purposes. If the VPN goes down, for example, you will lose your management connection, so we recommend a simple management path.


ASA Cabling

This guide assumes that you have a separate management network with its own internet access. By default, the Management interface is preconfigured when you deploy, but you have to configure data interfaces later.

Perform initial ASA configuration on the logical device Management interface. You can later enable management from any data interface.

Perform Initial Chassis Setup

Before you can use the chassis manager to configure and manage your system, you must perform some initial configuration tasks. You can perform the initial configuration using the FXOS CLI on the console port or an SSH session to the chassis Management port, or by using HTTPS on the chassis Management port.

Perform Initial Chassis Setup Using a Browser

The chassis Management port obtains an IP address using DHCP. For initial configuration, you can use a web browser to configure basic settings for the chassis. If you do not have a DHCP server, you need to use the console port for initial setup.


Note


To repeat the initial setup, you need to erase any existing configuration using the following commands from the CLI:


Firepower-chassis# connect local-mgmt
firepower-chassis(local-mgmt)# erase configuration


Before you begin

Gather the following information for use with the setup script:

  • New admin password

  • Management IP address and subnet mask

  • Gateway IP address

  • Subnets from which you want to allow HTTPS and SSH access

  • Hostname and domain name

  • DNS server IP address

Procedure


Step 1

Configure your DHCP server to assign an IP address to the chassis Management port.

The DHCP client request from the chassis contains the following information:

  • The management interface’s MAC address.

  • DHCP option 60 (vendor-class-identifier)—Set to “FPR4100”.

  • DHCP option 61 (dhcp-client-identifier)—Set to the chassis serial number. This serial number can be found on a pull-out tab on the chassis.

Step 2

Power on the chassis.

Step 3

Enter the following URL in your browser:

https://ip_address/api

Specify the IP address assigned by the DHCP server to the chassis Management port.

Step 4

When prompted, log in with the username install and the password chassis_serial_number.

The chassis_serial_number can be found on a pull-out tab on the chassis.

Step 5

Complete the system configuration as prompted.

  • Strong password enforcement policy.

  • Password for the admin account.

  • System name

  • Supervisor Management IPv4 address and subnet mask, or IPv6 address and prefix.

  • Default gateway IPv4 or IPv6 address.

  • Host/network address and netmask/prefix from which SSH access is allowed.

  • Host/network address and netmask/prefix from which HTTPS access is allowed.

  • DNS Server IPv4 or IPv6 address.

  • Default domain name.

Step 6

Click Submit.


Perform Initial Chassis Setup at the CLI

The first time you access the FXOS CLI at the console or using an SSH session to the chassis Management port, a setup wizard prompts you for the basic network configuration so you can access the chassis manager (using HTTPS) or the FXOS CLI (using SSH) from the chassis Management port.

The chassis Management port obtains an IP address using DHCP. If you do not have a DHCP server, you need to use the console port for initial setup.


Note


To repeat the initial setup, you need to erase any existing configuration using the following commands:


Firepower-chassis# connect local-mgmt
firepower-chassis(local-mgmt)# erase configuration


Before you begin

Gather the following information for use with the setup script:

  • New admin password

  • Management IP address and subnet mask

  • Gateway IP address

  • Subnets from which you want to allow HTTPS and SSH access

  • Hostname and domain name

  • DNS server IP address

Procedure


Step 1

Power on the chassis.

Step 2

Connect to the serial console port using a terminal emulator or use SSH to the chassis Management port.

The Firepower 4100 includes an RS-232–to–RJ-45 serial console cable. You might need to use a third party serial-to-USB cable to make the connection. Use the following serial parameters:

  • 9600 baud

  • 8 data bits

  • No parity

  • 1 stop bit

Step 3

When prompted, log in with the username admin and the password cisco123.

Step 4

Complete the system configuration as prompted.

Example:


            ---- Basic System Configuration Dialog ----
 
  This setup utility will guide you through the basic configuration of
  the system. Only minimal configuration including IP connectivity to
  the FXOS Supervisor is performed through these steps.
 
  Type Ctrl-C at any time for more options or to abort configuration
  and reboot system.
  To back track or make modifications to already entered values,
  complete input till end of section and answer no when prompted
  to apply configuration.
 
 
  You have chosen to setup a new Security Appliance.
        Continue? (yes/no): y
 
  Enforce strong password? (yes/no) [y]: n
 
  Enter the password for "admin": Farscape&32
  Confirm the password for "admin": Farscape&32
  Enter the system name:  firepower-4125
 
  Supervisor Mgmt IP address : 10.80.6.12
 
  Supervisor Mgmt IPv4 netmask : 255.255.255.0
 
  IPv4 address of the default gateway : 10.80.6.1
 
  The system cannot be accessed via SSH if SSH Mgmt Access is not configured.

  Do you want to configure SSH Mgmt Access? (yes/no) [y]: y

  SSH Mgmt Access host/network address (IPv4/IPv6): 10.0.0.0

  SSH Mgmt Access IPv4 netmask: 255.0.0.0
 
  Firepower Chassis Manager cannot be accessed if HTTPS Mgmt Access is not configured.

  Do you want to configure HTTPS Mgmt Access? (yes/no) [y]: y

  HTTPS Mgmt Access host/network address (IPv4/IPv6): 10.0.0.0

  HTTPS Mgmt Access IPv4 netmask: 255.0.0.0
 
  Configure the DNS Server IP address? (yes/no) [n]: y
 
    DNS IP address : 10.164.47.13
 
  Configure the default domain name? (yes/no) [n]: y
 
    Default domain name : cisco.com
 
  Following configurations will be applied:
 
    Switch Fabric=A
    System Name=firepower-4125
    Enforced Strong Password=no
    Supervisor Mgmt IP Address=10.89.5.14
    Supervisor Mgmt IP Netmask=255.255.255.192
    Default Gateway=10.89.5.1
    SSH Access Configured=yes
        SSH IP Address=10.0.0.0
        SSH IP Netmask=255.0.0.0
    HTTPS Access Configured=yes
        HTTPS IP Address=10.0.0.0
        HTTPS IP Netmask=255.0.0.0
    DNS Server=72.163.47.11
    Domain Name=cisco.com
 
  Apply and save the configuration (select 'no' if you want to re-enter)? (yes/no): y
  Applying configuration. Please wait...  Configuration file – Ok
.....
 
Cisco FPR Series Security Appliance
firepower-9300 login:  admin
Password: Farscape&32
Successful login attempts for user 'admin' : 1
Cisco Firepower Extensible Operating System (FX-OS) Software
TAC support: http://www.cisco.com/tac
Copyright (c) 2009-2019, Cisco Systems, Inc. All rights reserved.
 
[...]
 
firepower-chassis#                                             

Step 5

You can disconnect from the console port, if used, or end your SSH session.


Log Into the Chassis Manager

Use the chassis manager to configure chassis settings, including enabling interfaces and deploying logical devices.

Before you begin

Procedure


Step 1

Using a supported browser, enter the following URL.

https://chassis_mgmt_ip_address

  • chassis_mgmt_ip_address —Identifies the IP address or hostname of the chassis management port that you entered during initial configuration.

Step 2

Enter the username admin and new password.

You can add more users later according to Add FXOS Users.

Step 3

Click Login.

You are logged in, and the chassis manager opens to show the Overview page.

Configure NTP

Although you can set the time manually, we recommend that you use an NTP server. The correct time is required for Smart Software Licensing for the ASA and for the threat defense with the device manager. For the threat defense with the management center, the time must match between the chassis and the management center. In this case, we recommend that you use the same NTP server on the chassis as on the management center. Do not use the management center itself as the NTP server; this method is not supported.

Before you begin

If you use a hostname for the NTP server, you must configure a DNS server if you did not already do so in the initial setup. See Platform Settings > DNS.

Procedure


Step 1

Choose Platform Settings > NTP.

The Time Synchronization page is selected by default.

Step 2

Click the Use NTP Server radio button.

Step 3

(Optional) Check the NTP Server Authentication: Enable check box if you need to authenticate the NTP server.

You are prompted to enable NTP authentication. Click Yes to require an authentication key ID and value for all NTP server entries.

Only SHA1 is supported for NTP server authentication.

Step 4

Click Add, and set the following parameters:

  • NTP Server—The IP address or hostname of the NTP server.

  • Authentication Key and Authentication Value—Obtain the key ID and value from the NTP server. For example, to generate the SHA1 key on NTP server Version 4.2.8p8 or later with OpenSSL installed, enter the ntp-keygen -M command, and then view the key ID and value in the ntp.keys file. The key is used to tell both the client and server which value to use when computing the message digest.

Step 5

Click Add to add the server.

You can add up to 4 NTP servers.

Step 6

Click Save to save the servers.

Step 7

Click Current Time, and from the Time Zone drop-down list, choose the appropriate time zone for the chassis.

Step 8

Click Save.

Note


If you modify the system time by more than 10 minutes, the system will log you out and you will need to log in to the chassis manager again.


Add FXOS Users

Add local users for the chassis manager and FXOS CLI logins.

Procedure


Step 1

Choose System > User Management.

Step 2

Click Local Users.

Step 3

Click Add User to open the Add User dialog box.

Step 4

Complete the following fields with the required information about the user:

  • User Name—Sets the username, up to 32 characters. After you save the user, the login ID cannot be changed. You must delete the user account and create a new one.

  • (Optional) First Name—Sets the first name of the user, up to 32 characters.

  • (Optional) Last Name—Sets the last name of the user, up to 32 characters.

  • (Optional) Email—Sets the email address for the user.

  • (Optional) Phone Number—Sets the telephone number for the user.

  • Password and Confirm Password—Sets the password associated with this account. If you enable the password strength check, then the password must be strong, and FXOS rejects any password that does not meet the strength check requirements. See the FXOS configuration guide for strong password guidelines.

  • Account Status—Sets the status to Active or Inactive.

  • User Role—Sets the role that represents the privileges you want to assign to the user account. All users are assigned the Read-Only role by default, and this role cannot be deselected. To assign a different role, click the role name in the window so that it is highlighted. You can use one of the following user roles:

    • Admin—Complete read-and-write access to the entire system.

    • Read-Only—Read-only access to system configuration with no privileges to modify the system state.

    • Operations—Read-and-write access to NTP configuration, Smart Call Home configuration for Smart Licensing, and system logs, including syslog servers and faults. Read access to the rest of the system.

    • AAA Administrator—Read-and-write access to users, roles, and AAA configuration. Read access to the rest of the system.

  • (Optional) Account Expires—Sets that this account expires. The account cannot be used after the date specified in the Expiry Date field. After you configure a user account with an expiration date, you cannot reconfigure the account to not expire. You can, however, configure the account with the latest expiration date available. By default, user accounts do not expire.

  • (Optional) Expiry Date—The date on which the account expires. The date should be in the format yyyy-mm-dd. Click the calendar icon at the end of this field to view a calendar that you can use to select the expiration date.

Step 5

Click Add.


Configure Interfaces

By default, physical interfaces are disabled. In FXOS, you can enable interfaces, add EtherChannels, add VLAN subinterfaces, and edit interface properties. To use an interface, you must physically enable it in FXOS, and then logically enable it in the application.

To configure breakout ports, see the FXOS configuration guide.

Interface Types

Each interface is one of the following types:

  • Data—Use for regular data. Data interfaces cannot be shared between logical devices, and logical devices cannot communicate over the backplane to other logical devices. For traffic on Data interfaces, all traffic must exit the chassis on one interface and return on another interface to reach another logical device.

  • Data-sharing—Use for regular data. Only supported with container instances, these data interfaces can be shared by one or more logical devices/container instances (threat defense-using-management center only). Each container instance can communicate over the backplane with all other instances that share this interface. Shared interfaces can affect the number of container instances you can deploy. Shared interfaces are not supported for bridge group member interfaces (in transparent mode or routed mode), inline sets, passive interfaces, clusters, or failover links.

  • Mgmt—Use to manage application instances. These interfaces can be shared by one or more logical devices to access external hosts; logical devices cannot communicate over this interface with other logical devices that share the interface. You can only assign one management interface per logical device. Depending on your application and manager, you can later enable management from a data interface; but you must assign a Management interface to the logical device even if you don't intend to use it after you enable data management.


    Note


    Mgmt interface change will cause reboot of the logical device, for example one change mgmt from e1/1 to e1/2 will cause the logical device to reboot to apply the new management.


  • Eventing—Use as a secondary management interface for threat defense-using-management center devices. To use this interface, you must configure its IP address and other parameters at the threat defense CLI. For example, you can separate management traffic from events (such as web events). See the management center configuration guide for more information. Eventing interfaces can be shared by one or more logical devices to access external hosts; logical devices cannot communicate over this interface with other logical devices that share the interface. If you later configure a data interface for management, you cannot use a separate eventing interface.


    Note


    A virtual Ethernet interface is allocated when each application instance is installed. If the application does not use an eventing interface, then the virtual interface will be in an admin down state.

    Firepower # show interface Vethernet775
    Firepower # Vethernet775 is down (Administratively down)
    Bound Interface is Ethernet1/10
    Port description is server 1/1, VNIC ext-mgmt-nic5
    

  • Cluster—Use as the cluster control link for a clustered logical device. By default, the cluster control link is automatically created on Port-channel 48. The Cluster type is only supported on EtherChannel interfaces. For multi-instance clustering, you cannot share a Cluster-type interface across devices. You can add VLAN subinterfaces to the Cluster EtherChannel to provide separate cluster control links per cluster. If you add subinterfaces to a Cluster interface, you cannot use that interface for a native cluster. The device manager and CDO does not support clustering.

You must configure a Management interface and at least one Data (or Data-sharing) interface before you deploy a logical device.

Configure a Physical Interface

You can physically enable and disable interfaces, as well as set the interface speed and duplex. To use an interface, you must physically enable it in FXOS, and then logically enable it in the application.

Before you begin

Interfaces that are already a member of an EtherChannel cannot be modified individually. Be sure to configure settings before you add an interface to the EtherChannel.

Procedure


Step 1

Click Interfaces.

The All Interfaces page shows a visual representation of the currently-installed interfaces at the top of the page and provides a listing of the installed interfaces in the table below.

Step 2

Click the Edit (edit icon) for the interface you want to edit to open the Edit Interface dialog box.

Step 3

Check the Enable check box.

Step 4

Choose the interface Type: Data, Data-sharing, Mgmt, or Firepower-eventing

Note


There are limitations when using Data-sharing type interfaces; see the FXOS configuration guide for more information.

For Firepower-eventing, see the Firepower Management Center Configuration Guide.

Step 5

(Optional) Choose the Speed of the interface.

Step 6

(Optional) If your interface supports Auto Negotiation, click the Yes or No radio button.

Step 7

(Optional) Choose the Duplex of the interface.

Step 8

Click OK.


Add an EtherChannel (Port Channel)

An EtherChannel (also known as a port channel) can include up to 16 member interfaces of the same media type and capacity, and must be set to the same speed and duplex. The media type can be either RJ-45 or SFP; SFPs of different types (copper and fiber) can be mixed. You cannot mix interface capacities (for example 1GB and 10GB interfaces) by setting the speed to be lower on the larger-capacity interface.


Note


When the chassis creates an EtherChannel, the EtherChannel stays in a Suspended state for Active LACP mode or a Down state for On LACP mode until you assign it to a logical device, even if the physical link is up.


Procedure


Step 1

Click Interfaces.

The All Interfaces page shows a visual representation of the currently-installed interfaces at the top of the page and provides a listing of the installed interfaces in the table below.

Step 2

Click Add New > Port Channel.

Step 3

Enter a Port Channel ID, between 1 and 47.

Step 4

Check the Enable check box.

Step 5

Choose the interface Type:

  • Data

  • Data-sharing—For container instances only.

  • Mgmt

  • Firepower-eventing—For threat defense only.

  • Cluster—For clustering only.

Note


There are limitations when using Data-sharing type interfaces; see the FXOS configuration guide for more information.

For Firepower-eventing, see the Firepower Management Center Configuration Guide.

Step 6

Set the Admin Speed of the member interfaces from the drop-down list.

Step 7

For Data or Data-sharing interfaces, choose the LACP port-channel Mode: Active or On.

For non-Data or non-Data-sharing interfaces, the mode is always active. You should use the active mode unless you need to minimize the amount of LACP traffic.

Step 8

Set the Admin Duplex from the drop-down list.

Step 9

To add an interface to the port channel, select the interface in the Available Interface list and click Add Interface to move it to the Member ID list.

You can add up to 16 interfaces.

Tip


You can add multiple interfaces at a time. Click on the desired interfaces while holding down the Ctrl key. To select a range of interfaces, select the first interface in the range, and then, while holding down the Shift key, click to select the last interface in the range.

Step 10

To remove an interface from the port channel, click the Delete (delete icon) to the right of the interface in the Member ID list.

Step 11

Click OK.


Add a VLAN Subinterface for Container Instances

You can add up to 500 subinterfaces to your chassis. Subinterfaces are supported for container instances only; for more information, see Logical Device Application Instances: Container or Native.

For multi-instance clustering, you can only add subinterfaces to the Cluster-type interface; subinterfaces on data interfaces are not supported.

VLAN IDs per interface must be unique, and within a container instance, VLAN IDs must be unique across all assigned interfaces. You can reuse VLAN IDs on separate interfaces as long as they are assigned to different container instances. However, each subinterface still counts towards the limit even though it uses the same ID.

You can also add subinterfaces within the application. For more information on when to use FXOS subinterfaces vs. application subinterfaces, see the FXOS configuration guide.

Procedure


Step 1

Click Interfaces.

The All Interfaces page shows a visual representation of the currently installed interfaces at the top of the page and provides a listing of the installed interfaces in the table below.

Step 2

Click Add New > Subinterface to open the Add Subinterface dialog box.

Step 3

Choose the interface Type:

  • Data

  • Data-sharing

  • Cluster—If you add subinterfaces to a Cluster interface, you cannot use that interface for a native cluster.

For Data and Data-sharing interfaces: The type is independent of the parent interface type; you can have a Data-sharing parent and a Data subinterface, for example.

There are limitations when using Data-sharing type interfaces; see the FXOS configuration guide for more information.

Step 4

Choose the parent Interface from the drop-down list.

You cannot add a subinterface to a physical interface that is currently allocated to a logical device. If other subinterfaces of the parent are allocated, you can add a new subinterface as long as the parent interface itself is not allocated.

Step 5

Enter a Subinterface ID, between 1 and 4294967295.

This ID will be appended to the parent interface ID as interface_id.subinterface_id. For example, if you add a subinterface to Ethernet1/1 with the ID of 100, then the subinterface ID will be: Ethernet1/1.100. This ID is not the same as the VLAN ID, although you can set them to match for convenience.

Step 6

Set the VLAN ID between 1 and 4095.

Step 7

Click OK.

Expand the parent interface to view all subinterfaces under it.


Upload Software Images to the Chassis

This procedure describes how to upload new FXOS and application images, as well as how to upgrade the FXOS image. You might need to upload new images if the pre-installed images are not the versions you require.

Before you begin

  • Check compatibility between FXOS, ASA, and the threat defense versions in the FXOS compatibility guide.

  • Make sure the image you want to upload is available on your local computer. To obtain FXOS and application software for the Firepower 4100, see:

    http://www.cisco.com/go/firepower4100-software

  • To make sure your upload succeeds during your HTTPS session, you might need to change the absolute timeout at the FXOS CLI. The absolute timeout is 60 minutes (the maximum), and large uploads might take longer than 60 minutes. To disable the absolute timeout, enter:

    
    Firepower-chassis# scope security
    Firepower-chassis /security # scope default-auth
    Firepower-chassis /security/default-auth # set absolute-session-timeout 0
    Firepower-chassis /security/default-auth* # commit-buffer


Procedure


Step 1

Check your current FXOS version by looking at the Overview page.

You can view application images currently available on the chassis in the next step.

Step 2

Choose System > Updates.

The Available Updates page shows a list of the FXOS platform bundle images and application images.

Step 3

Click Upload Image to open the Upload Image dialog box.

Step 4

Click Browse to navigate to and select the image that you want to upload.

Step 5

Click Upload. The selected image is uploaded to the chassis.

The Upload Image dialog box shows a progress bar, and then a Success dialog box when the image finishes uploading.

Step 6

To upgrade the FXOS image:

  1. Click the Upgrade icon (Upgrade icon) for the FXOS platform bundle to which you want to upgrade.

  2. Click Yes to confirm that you want to proceed with installation.

    The chassis reloads. The upgrade process typically takes between 20 and 30 minutes.


History for FXOS

Feature Name

Version

Feature Information

VLAN subinterfaces for use with container instances

2.4.1

To provide flexible physical interface use, you can create VLAN subinterfaces in FXOS and also share interfaces between multiple instances.

Note


Requires the threat defense Version 6.3 or later.

New/Modified screens:

Interfaces > All Interfaces > Add New drop-down menu > Subinterface

New/Modified management center screens:

Devices > Device Management > Edit icon > Interfaces

Data-sharing interfaces for container instances

2.4.1

To provide flexible physical interface use, you can share interfaces between multiple instances.

Note


Requires the threat defense Version 6.3 or later.

New/Modified screens:

Interfaces > All Interfaces > Type

Support for data EtherChannels in On mode

2.4.1

You can now set data and data-sharing EtherChannels to either Active LACP mode or to On mode. Other types of EtherChannels only support Active mode.

New/Modified screens:

Interfaces > All Interfaces > Edit Port Channel > Mode

Support for EtherChannels in the threat defense inline sets

2.1.1

You can now use EtherChannels in the threat defense inline set.

Inline set link state propagation support for the threat defense

2.0.1

When you configure an inline set in the threat defense application and enable link state propagation, the threat defense sends inline set membership to the FXOS chassis. Link state propagation means that the chassis automatically brings down the second interface in the inline interface pair when one of the interfaces in an inline set goes down.

New/Modified commands: show fault |grep link-down, show interface detail

Support for Hardware bypass network modules for the threat defense

2.0.1

Hardware Bypass ensures that traffic continues to flow between an inline interface pair during a power outage. This feature can be used to maintain network connectivity in the case of software or hardware failures.

New/Modified management center screens:

Devices > Device Management > Interfaces > Edit Physical Interface

Firepower-eventing type interface for the threat defense

1.1.4

You can specify an interface as firepower-eventing for use with the threat defense. This interface is a secondary management interface for the threat defense devices. To use this interface, you must configure its IP address and other parameters at the threat defense CLI. For example, you can separate management traffic from events (such as web events). See the "Management Interfaces" section in the management center configuration guide System Configuration chapter.

New/Modified chassis manager screens:

Interfaces > All Interfaces > Type