Failover for High Availability in the Public Cloud

This chapter describes how to configure Active/Backup failover to accomplish high availability of the Cisco ASAv in a public cloud environment, such as Microsoft Azure.

About Failover in the Public Cloud

To ensure redundancy, you can deploy the ASAv in a public cloud environment in an Active/Backup high availability (HA) configuration. HA in the public cloud implements a stateless Active/Backup solution that allows for a failure of the active ASAv to trigger an automatic failover of the system to the backup ASAv.

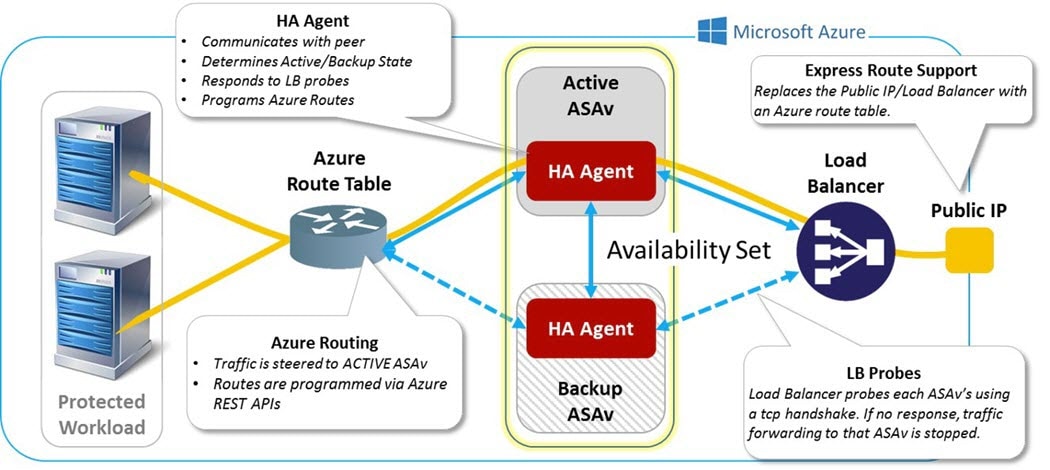
The following list describes the primary components in the HA public cloud solution:

  • Active ASAv—The ASAv in the HA pair that is set up to handle the firewall traffic for the HA peers.

  • Backup ASAv—The ASAv in the HA pair that is not handling firewall traffic and takes over as the active ASAv in the event of an active ASAv failure. It is referred to as a Backup rather than a Standby because it is does not take on the identify of its peer in the event of a failover.

  • HA Agent—A lightweight process that runs on the ASAv and determines the HA role (active/backup) of an ASAv, detects failures of its HA peer, and performs actions based on its HA role.

On the physical ASA and the non-public cloud virtual ASA, the system handles failover conditions using gratuitous ARP requests where the backup ASA sends out a gratuitous ARP indicating it is now associated with the active IP and MAC addresses. Most public cloud environments do not allow broadcast traffic of this nature. For this reason, an HA configuration in the public cloud requires ongoing connections be restarted when failover happens.

The health of the active unit is monitored by the backup unit to determine if specific failover conditions are met. If those conditions are met, failover occurs. The failover time can vary from a few seconds to over a minute depending on the responsiveness of the public cloud infrastructure.

About Active/Backup Failover

In Active/Backup failover, one unit is the active unit. It passes traffic. The backup unit does not actively pass traffic or exchange any configuration information with the active unit. Active/Backup failover lets you use a backup ASAv device to take over the functionality of a failed unit. When the active unit fails, it changes to the backup state while the backup unit changes to the active state.

Primary/Secondary Roles and Active/Backup Status

When setting up Active/Backup failover, you configure one unit to be primary and the other as secondary. At this point, the two units act as two separate devices for device and policy configuration, as well as for events, dashboards, reports, and health monitoring.

The main differences between the two units in a failover pair are related to which unit is active and which unit is backup, namely which unit actively passes traffic. Although both units are capable of passing traffic, only the primary unit responds to Load Balancer probes and programs any configured routes to use it as a route destination. The backup unit's primary function is to monitor the health of the primary unit. The primary unit always becomes the active unit if both units start up at the same time (and are of equal operational health).

Failover Connection

The backup ASAv monitors the health of the active ASAv using a failover connection established over TCP:

  • The active ASAv acts as a connection server by opening a listen port.

  • The backup ASAv connects to the active ASAv using connect port.

  • Typically the listen port and the connect port are the same, unless your configuration requires some type of network address translation between the ASAv units.

The state of the failover connection detects the failure of the active ASAv. When the backup ASAv sees the failover connection come down, it considers the active ASAv as failed. Similarly, if the backup ASAv does not receive a response to a keepalive message sent to the active unit, it considers the active ASAv as failed

Related Topics

Polling and Hello Messages

The backup ASAv sends Hello messages over the failover connection to the active ASAv and expects a Hello Response in return. Message timing uses a polling interval, the time period between the receipt of a Hello Response by the backup ASAv unit and the sending of the next Hello message. The receipt of the response is enforced by a receive timeout, called the hold time. If the receipt of the Hello Response times out, the active ASAv is considered to have failed.

The polling and hold time intervals are configurable parameters; see Configure Active/Backup Failover.

Active Unit Determination at Startup

The active unit is determined by the following:

  • If a unit boots and detects a peer already running as active, it becomes the backup unit.

  • If a unit boots and does not detect a peer, it becomes the active unit.

  • If both units boot simultaneously, then the primary unit becomes the active unit, and the secondary unit becomes the backup unit.

Failover Events

In Active/Backup failover, failover occurs on a unit basis. The following table shows the failover action for each failure event. For each failure event, the table shows the failover policy (failover or no failover), the action taken by the active unit, the action taken by the backup unit, and any special notes about the failover condition and actions.

Table 1. Failover Events

Failure Event

Policy

Active Action

Backup Action

Notes

Backup unit sees a failover connection close

Failover

n/a

Become active

Mark active as failed

This is the standard failover use case.

Active unit sees a failover connection close

No failover

Mark backup as failed

n/a

Failover to an inactive unit should never occur.

Active unit sees a TCP timeout on failover link

No failover

Mark backup as failed

No action

Failover should not occur if the active unit is not getting a reponse from the backup unit.

Backup unit sees a TCP timeout on failover link

Failover

n/a

Become active

Mark active as failed

Try to send failover command to active unit

The backup unit assumes that the active unit is unable to continue operation and takes over.

In case the active unit is still up, but fails to send a response in time, the backup unit sends the failover command to the active unit.

Active Authentication failed

No failover

No action

No action

Because the backup unit is changing the route tables, it is the only unit that needs to be authenticated to Azure.

It does not matter if the active unit is authenticated to Azure or not.

Backup Authentication failed

No failover

Mark backup as unauthenticated

No action

Failover cannot happen if the backup unit is not authenticated to Azure.

Active unit initiates intentional failover

Failover

Become backup

Become active

The active unit initiates failover by closing the Failover Link Connection.

The backup unit sees the connection close and becomes the active unit.

Backup unit initiates intentional failover

Failover

Become backup

Become active

The backup unit initiates failover by sending a failover message to the active unit.

When the active unit sees the message, it closes the connection and becomes the backup unit.

The backup unit sees the connection close and becomes the active unit.

Formerly active unit recovers

No failover

Become backup

Mark mate as backup

Failover should not occur unless absolutely necessary.

Active unit sees failover message from backup unit

Failover

Become backup

Become active

Can occur if a manual failover was initiated by a user; or the backup unit saw the TCP timeout, but the active unit is able to receive messages from the backup unit.

Guidelines and Limitations

This section includes the guidelines and limitations for this feature.

ASAv Failover for High Availability in the Public Cloud

To ensure redundancy, you can deploy the ASAv in a public cloud environment in an Active/Backup high availability (HA) configuration.

  • Supported only on the Microsoft Azure public cloud, using the Standard D3_v2 instance.

  • Implements a stateless Active/Backup solution that allows for a failure of the active ASAv to trigger an automatic failover of the system to the backup ASAv.

Limitations

  • Failover is on the order of seconds rather than milliseconds.

  • The HA role determination and the ability to participate as an HA unit depends on TCP connectivity between HA peers and between an HA unit and the Azure infrastructure. There are several situations where an ASAv will not be able participate as an HA unit:

    • The inability to establish a failover connection to its HA peer.

    • The inability to retrieve an authentication token from Azure.

    • The inability to authenticate with Azure.

  • There is no synching of the configuration from the Active unit to the Backup unit. Each unit must be configured individually with similar configurations for handling failover traffic.

  • Failover route-table limitations

    With respect to route-tables for HA in the public cloud:

    • You can configure a maximum of 16 route-tables.

    • Within a route-table, you can configure a maximum of 64 routes.

    In each case the system alerts you when you have reached the limit, with the recommendation to remove a route-table or route and retry.

  • No ASDM support.

  • No IPSec Remote Access VPN support.


    Note

    See the Cisco Adaptive Security Virtual Appliance (ASAv) Quick Start Guide for information about supported VPN topologies in the public cloud.


  • ASAv Virtual Machine instances must be in the same availability set. If you are a current ASAv user in Azure, you will not be able to upgrade to HA from an existing deployment. You have to delete your instance and deploy the ASAv 4 NIC HA offering from the Azure Marketplace.

Licensing for Failover in the Public Cloud

The ASAv uses Cisco Smart Software Licensing. A smart license is required for regular operation. Each ASAv must be licensed independently with an ASAv platform license. Until you install a license, throughput is limited to 100 Kbps so you can perform preliminary connectivity tests. See the Cisco ASA Series Feature Licenses page to find precise licensing requirements for ASAv.

Defaults for Failover in the Public Cloud

By default, the failover policy consists of the following:

  • Stateless failover only.

  • Each unit must be configured individually with similar configurations for handling failover traffic.

  • The failover TCP control port number is 44442.

  • The Azure Load Balancer health probe port number is 44441.

  • The unit poll time is 5 seconds.

  • The unit hold time is 15 seconds.

  • The ASAv responds to health probes on the primary interface (Management 0/0).


Note

See Configure Optional Failover Parameters for options to change the failover port number, health probe port number, poll times, and primary interface.


About ASAv High Availability in Microsoft Azure

The following figure shows a high-level view of an ASAv HA deployment in Azure. A protected workload sits behind two ASAv instances in an Active/Backup failover configuration. An Azure Load Balancer probes both of the ASAv units using a three-way TCP handshake. The active ASAv completes the three way handshake indicating that it is healthy, while the backup ASAv intentionally does not respond. By not responding to the Load Balancer, the backup ASAv appears unhealthy to the Load Balancer, which in turn does not send traffic to it.

On failover, the active ASAv stops responding to the Load Balancer probes and the backup ASAv starts responding, causing all new connections to be sent to the backup ASAv. The backup ASAv sends API requests to the Azure Fabric to modify the route table, redirecting traffic from the active unit to the backup unit. At this point, the backup ASAv becomes the active unit and the active unit becomes the backup unit or is offline, depending on the reason for the failover.

Figure 1. ASAv HA Deployment in Azure
ASAv HA Deployment in Azure

To be able to automatically make API calls to modify Azure route tables, the ASAv HA units need to have Azure Active Directory credentials. Azure employs the concept of a Service Principal which, in simple terms, is a service account. A Service Principal allows you to provision an account with only enough permissions and scope to run a task within a predefined set of Azure resources.

There are two steps to enable your ASAv HA deployment to manage your Azure subscription using a Service Principal:

  1. Create an Azure Active Directory application and Service Principal; see About the Azure Service Principal.

  2. Configure the ASAv instances to authenticate with Azure using a Service Principal; see Configure Active/Backup Failover.

Related Topics

See the Azure documentation for more informaion about the Load Balancer.

About the Azure Service Principal

When you have an application that needs to access or modify Azure resources, such as route tables, you must set up an Azure Active Directory (AD) application and assign the required permissions to it. This approach is preferable to running the application under your own credentials because:

  • You can assign permissions to the application identity that are different than your own permissions. Typically, these permissions are restricted to exactly what the application needs to do.

  • You do not have to change the application's credentials if your responsibilities change.

  • You can use a certificate to automate authentication when executing an unattended script.

When you register an Azure AD application in the Azure portal, two objects are created in your Azure AD tenant: an application object, and a service principal object.

  • Application object—An Azure AD application is defined by its one and only application object, which resides in the Azure AD tenant where the application was registered, known as the application's "home" tenant.

  • Service principal object—The service principal object defines the policy and permissions for an application's use in a specific tenant, providing the basis for a security principal to represent the application at run-time.

Azure provides instructions on how to create an Azure AD application and service principal in the Azure Resource Manager Documentation. See the following topics for complete instructions:


Note

After you set up the service principal, obtain the Directory ID, Application ID, and Secret key. These are required to configure Azure authentication credentials; see Configure Active/Backup Failover.


Configuration Requirements for ASAv High Availability in Azure

To deploy a configuration similar to the one described in ASAv HA Deployment in Azure you need the following :


Note

Configure basic failover settings on both the primary and secondary units. There is no synching of configuration from the primary unit to the secondary unit. Each unit must be configured individually with similar configurations for handling failover traffic.


Configure Active/Backup Failover

To configure Active/Backup failover, configure basic failover settings on both the primary and secondary units. There is no synching of configuration from the primary unit to the secondary unit. Each unit must be configured individually with similar configurations for handling failover traffic.

Before you begin

  • Deploy your ASAv HA pair in an Azure Availability Set.

  • Have your Azure environment information available, including your Azure Subscription ID and Azure authentication credentials for the Service Principal.

Procedure


Step 1

Choose Configuration > Device Management > High Availability and Scalability > Failover.

Step 2

On the Cloud tab, check the Unit check box to expand the Failover Unit drop-down options.

Step 3

From the Failover Unit drop-down menu, choose primary.

The primary unit will assume the active HA role when both HA units come up at the same time.

Step 4

(Optional) Check the Port check box to expand the Control and Probe fields.

  1. Enter a valid TCP control port in the Control field; or keep the default, port 44442.

    The control port establishes the TCP failover connection established between the active ASAv and the backup ASAv.

  2. Enter a valid TCP probe port in the Probe field; or keep the default, port 44441.

    The probe port is the TCP port used as the destination port for Azure Load Balancer probes.

Step 5

(Optional) Check the Time check box to expand the Poll Time and Hold Time fields.

  1. Enter a valid time (in seconds) in the Poll Time field; or keep the default, 5 seconds.

    The poll time range is between 1 and 15 seconds. With a faster poll time, the ASA can detect failure and trigger failover faster. However, faster detection can cause unnecessary switchovers when the network is temporarily congested.

  2. Enter a valid time (in seconds) in the Hold Time field; or keep the default, 15 seconds.

    The hold time determines how long it takes from the time a hello packet is missed to when the unit is marked as failed. The hold time range is between 3 and 60 seconds.You cannot enter a holdtime value that is less than 3 times the unit poll time.

Step 6

Check the Peer check box to expand the Peer IP-Address and Peer Port fields.

  1. Enter the IP address used to establish a TCP failover control connection to the HA peer in the Peer IP-Address field.

  2. (Optional) Enter a valid TCP control port in the Peer Port field; or keep the default, port 44442..

    The peer port establishes the TCP failover connection established between the active ASAv and the backup ASAv.

Step 7

Check the Authentication check box to expand the Application-id, Directory-id, and Key fields.

You can configure authentication credentials for an Azure Service Principal that allows your ASAv HA peers to access or modify Azure resources, such as route tables. Service Principals allow you to provision an Azure account that possesses the minimum permissions to perform a task within a predefined set of Azure resources. In the case of ASAv HA, it is limited to the permissions needed to modify user-defined routes; see About the Azure Service Principal.

  1. Enter the Azure application ID for the Azure Service Principal in the Application-id field.

    You need this application ID when you request an access key from the Azure infrastructure.

  2. Enter the Azure directory ID for the Azure Service Principal in the Directory-id field.

    You need this directory ID when you request an access key from the Azure infrastructure.

  3. Enter the Azure secret key for the Azure Service Principal in the Key field.

    You need this secret key when requesting an access key from the Azure infrastructure. If the Encrypt field is checked, the secret key is encrypted in the running configuration.

Step 8

Check the Subscription check box to expand the Sub-id field.

This is the Subscription ID for the account to which the route tables that require updating belong.

Step 9

Check the Enable Cloud Failover check box.

Step 10

Click Apply.

Failover is not actually enabled until you apply your changes to the device.

Step 11

If you know the secondary unit is not yet failover-enabled, connect to the secondary ASAv from the Device List, or start a new ASDM session using the IP address of the ASAv: https://asa_ip_address/admin.

Step 12

Repeat steps 1 through 10 to configure Active/Backup failover on the secondary unit.

There is no synching of configuration from the primary unit to the secondary unit. Each unit must be configured individually with similar configurations for handling failover traffic.

Failover is not actually enabled until you apply your changes to the device.


What to do next

Configure additional parameters as needed:

Configure Optional Failover Parameters

You can customize failover settings as necessary.

Configure Azure Route Tables

The route table configuration consists of information about Azure user-defined routes that need to be updated when an ASAv assumes the active role. On failover, you want to direct internal routes to the active unit, which uses the configured route table information to automatically direct the routes to itself.


Note

You need to configure any Azure route table information on both the active and backup units.

Before you begin

  • Configure these settings on both the primary and secondary units. There is no synching of configuration from the primary unit to the secondary unit.

  • Have your Azure environment information available, including your Azure Subscription ID and Azure authentication credentials for the Service Principal.

Procedure


Step 1

Choose Configuration > Device Management > High Availability and Scalability > Failover.

Step 2

Click the Route-Table tab and click Add.

  1. In the Route Table Name field, enter a name for the route table.

    You can configure up to 16 route tables. Alternately, you can edit or delete entries to the Route Table list.

  2. (Optional) In the Sub-id field, enter an Azure Subscription ID.

    You can update user-defined routes in more than one Azure subscription by specifying the corresponding Azure Subscription ID here. If you enter the Route Table Name without specifying an Azure Subscription ID, the global parameter is used.

    Note 
    You enter the Azure Subscription ID when you configure Active/Backup failover from Configuration > Device Management > High Availability and Scalability > Failover; see Configure Active/Backup Failover.
Step 3

Click Route-Table-Mode. You can add, edit, or delete route entries to the route tables.

Step 4

Click Add.

Enter the following values for Azure user-defined routes:

  1. From the Route Table drop-down list, choose a route table.

  2. In the Azure Resource Group field, enter the name of the Azure Resource Group that contains the Azure route table.

  3. In the Route Name field, enter a unique name for the route.

  4. In the Prefix Address/Mask field, enter the IP address prefix in CIDR notation.

  5. In the Next Hop Address field, enter the next-hop address. This is an interface IP address on the ASAv.

Note 
You can configure up to 64 routes.
Step 5

Click Apply to save your changes.


Manage Failover in the Public Cloud

This section describes how to manage Failover units in the Cloud after you enable failover, including how to change to force failover from one unit to another.

Force Failover

To force the standby unit to become active, perform the following command.

Before you begin

Use this command in the system execution space in single context mode.

Procedure


Step 1

Choose Monitoring > Properties > Failover > Status.

Step 2

To force failover at the unit level, click one of the following buttons:

  • Click Make Active to make this unit the active unit.

  • Click Make Standby to make this unit the standby unit.


Update Routes

If the state of the routes in Azure is inconsistent with the ASAv in the active role, you can force route updates on the ASAv:

Before you begin

Use this command in the system execution space in single context mode.

Procedure


Step 1

Choose Monitoring > Properties > Failover > Status.

Step 2

Click Update Route.

This command is only valid on the ASAv in the active role. If authentication fails the output will be Route changes failed.


Validate Azure Authentication

For a successful ASAv HA deployment in Azure, the Service Principal configuration must be complete and accurate. Without proper Azure authorization, the ASAv units will be unable to access resources to handle failover and to perform route updates. You can test your failover configuration to detect errors related to the following elements of your Azure Service Principal:

  • Directory ID

  • Application ID

  • Authentication Key

Before you begin

Use this command in the system execution space in single context mode.

Procedure


Step 1

Choose Monitoring > Properties > Failover > Status.

Step 2

Click Test Authentication.

If authentication fails the command output will be Authentication Failed.

If the Directory ID or Application ID is not configured properly, Azure will not recognize the resource addressed in the REST request to obtain an authentication token. The event history for this condition entry will read:

Error Connection - Unexpected status in response to access token request: Bad Request

If the Directory ID or Application ID are correct, but the authentication key is not configured properly, Azure will not grant permission to generate the authentication token. The event history for this condition entry will read:

Error Connection - Unexpected status in response to access token request: Unauthorized

Monitor Failover in the Public Cloud

This section explains how you monitor the failover status.

Failover Status


Note

After a failover event you should either re-launch ASDM or switch to another device in the Devices pane and then come back to the original ASA to continue monitoring the device. This action is necessary because the monitoring connection does not become re-established when ASDM is disconnected from and then reconnected to the device.


  • Choose Monitoring > Properties > Failover > Status and click Failover Status to monitor Active/Backup failover status.

  • Choose Monitoring > Properties > Failover > History to display failover event history with a timestamp, severity level, event type, and event text.

Failover Messages

Failover Syslog Messages

The ASA issues a number of syslog messages related to failover at priority level 2, which indicates a critical condition. To view these messages, see the syslog messages guide. Syslog messages are in the ranges of 1045xx and 1055xx.


Note

During failover, the ASA logically shuts down and then brings up interfaces, generating syslog messages. This is normal activity.


The following are sample syslogs generated during a switchover:

%ASA-3-105509: (Primary) Error sending Hello message to peer unit 10.22.3.5, error: Unknown error
%ASA-1-104500: (Primary) Switching to ACTIVE - switch reason: Unable to send message to Active unit
%ASA-5-105522: (Primary) Updating route-table wc-rt-inside
%ASA-5-105523: (Primary) Updated route-table wc-rt-inside
%ASA-5-105522: (Primary) Updating route-table wc-rt-outside
%ASA-5-105523: (Primary) Updated route-table wc-rt-outside
%ASA-5-105542: (Primary) Enabling load balancer probe responses
%ASA-5-105503: (Primary) Internal state changed from Backup to Active no peer
%ASA-5-105520: (Primary) Responding to Azure Load Balancer probes

Each syslog related to a Public Cloud deployment is prefaced with the unit role: (Primary) or (Secondary).

Failover Debug Messages

To see debug messages, enter the debug fover command. See the command reference for more information.


Note

Because debugging output is assigned high priority in the CPU process, it can drastically affect system performance. For this reason, use the debug fover commands only to troubleshoot specific problems or during troubleshooting sessions with Cisco TAC.


SNMP Failover Traps

To receive SNMP syslog traps for failover, configure the SNMP agent to send SNMP traps to SNMP management stations, define a syslog host, and compile the Cisco syslog MIB into your SNMP management station.

History for Failover in the Public Cloud

Feature Name

Releases

Feature Information

Active/Backup failover on Microsoft Azure

7.9(1)

This feature was introduced.