EtherChannel and Redundant Interfaces

This chapter tells how to configure EtherChannels and redundant interfaces.


Note

For multiple context mode, complete all tasks in this section in the system execution space. To change from the context to the system execution space, enter the changeto system command.

For ASA cluster interfaces, which have special requirements, see ASA Cluster.


Note

For Firepower 9300 chassis, EtherChannel interfaces are configured in the FXOS operating system. Redundant interfaces are not supported. See the configuration or getting started guide for your chassis for more information.


About EtherChannels and Redundant Interfaces

This section describes EtherChannels and Redundant Interfaces.

About Redundant Interfaces (ASA Platform Only)

A logical redundant interface consists of a pair of physical interfaces: an active and a standby interface. When the active interface fails, the standby interface becomes active and starts passing traffic. You can configure a redundant interface to increase the ASA reliability. This feature is separate from device-level failover, but you can configure redundant interfaces as well as device-level failover if desired.

You can configure up to 8 redundant interface pairs.

Redundant Interface MAC Address

The redundant interface uses the MAC address of the first physical interface that you add. If you change the order of the member interfaces in the configuration, then the MAC address changes to match the MAC address of the interface that is now listed first. Alternatively, you can assign a manual MAC address to the redundant interface, which is used regardless of the member interface MAC addresses. When the active interface fails over to the standby, the same MAC address is maintained so that traffic is not disrupted.

About EtherChannels

An 802.3ad EtherChannel is a logical interface (called a port-channel interface) consisting of a bundle of individual Ethernet links (a channel group) so that you increase the bandwidth for a single network. A port channel interface is used in the same way as a physical interface when you configure interface-related features.

You can configure up to 48 EtherChannels, depending on how many interfaces your model supports.

Channel Group Interfaces

Each channel group can have up to 16 active interfaces. For switches that support only 8 active interfaces, you can assign up to 16 interfaces to a channel group: while only 8 interfaces can be active, the remaining interfaces can act as standby links in case of interface failure. For 16 active interfaces, be sure that your switch supports the feature (for example, the Cisco Nexus 7000 with F2-Series 10 Gigabit Ethernet Module).

All interfaces in the channel group must be the same type and speed. The first interface added to the channel group determines the correct type and speed.

The EtherChannel aggregates the traffic across all the available active interfaces in the channel. The interface is selected using a proprietary hash algorithm, based on source or destination MAC addresses, IP addresses, TCP and UDP port numbers and VLAN numbers.

Connecting to an EtherChannel on Another Device

The device to which you connect the ASA EtherChannel must also support 802.3ad EtherChannels; for example, you can connect to the Catalyst 6500 switch or the Cisco Nexus 7000.

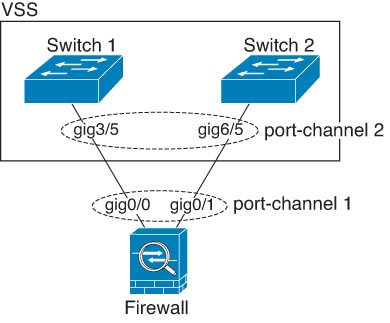
When the switch is part of a Virtual Switching System (VSS) or Virtual Port Channel (vPC), then you can connect ASA interfaces within the same EtherChannel to separate switches in the VSS/vPC. The switch interfaces are members of the same EtherChannel port-channel interface, because the separate switches act like a single switch.

Figure 1. Connecting to a VSS/vPC

Note

If the ASA is in transparent firewall mode, and you place the ASA between two sets of VSS/vPC switches, then be sure to disable Unidirectional Link Detection (UDLD) on any switch ports connected to the ASA with an EtherChannel. If you enable UDLD, then a switch port may receive UDLD packets sourced from both switches in the other VSS/vPC pair. The receiving switch will place the receiving interface in a down state with the reason "UDLD Neighbor mismatch".


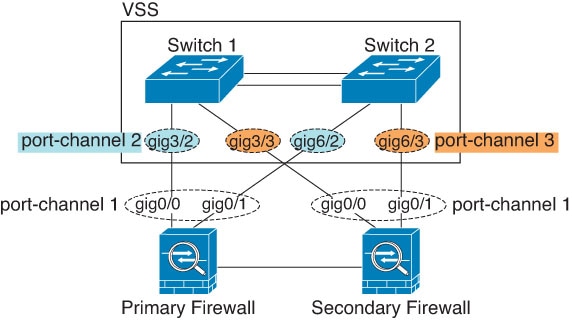
If you use the ASA in an Active/Standby failover deployment, then you need to create separate EtherChannels on the switches in the VSS/vPC, one for each ASA. On each ASA, a single EtherChannel connects to both switches. Even if you could group all switch interfaces into a single EtherChannel connecting to both ASA (in this case, the EtherChannel will not be established because of the separate ASA system IDs), a single EtherChannel would not be desirable because you do not want traffic sent to the standby ASA.

Figure 2. Active/Standby Failover and VSS/vPC

Link Aggregation Control Protocol

The Link Aggregation Control Protocol (LACP) aggregates interfaces by exchanging the Link Aggregation Control Protocol Data Units (LACPDUs) between two network devices.

You can configure each physical interface in an EtherChannel to be:

  • Active—Sends and receives LACP updates. An active EtherChannel can establish connectivity with either an active or a passive EtherChannel. You should use the active mode unless you need to minimize the amount of LACP traffic.

  • Passive—Receives LACP updates. A passive EtherChannel can only establish connectivity with an active EtherChannel. Not supported on Firepower hardware models.

  • On—The EtherChannel is always on, and LACP is not used. An “on” EtherChannel can only establish a connection with another “on” EtherChannel. Not supported on Firepower hardware models.

LACP coordinates the automatic addition and deletion of links to the EtherChannel without user intervention. It also handles misconfigurations and checks that both ends of member interfaces are connected to the correct channel group. “On” mode cannot use standby interfaces in the channel group when an interface goes down, and the connectivity and configurations are not checked.

Load Balancing

The ASA distributes packets to the interfaces in the EtherChannel by hashing the source and destination IP address of the packet (this criteria is configurable). The resulting hash is divided by the number of active links in a modulo operation where the resulting remainder determines which interface owns the flow. All packets with a hash_value mod active_links result of 0 go to the first interface in the EtherChannel, packets with a result of 1 go to the second interface, packets with a result of 2 go to the third interface, and so on. For example, if you have 15 active links, then the modulo operation provides values from 0 to 14. For 6 active links, the values are 0 to 5, and so on.

For a spanned EtherChannel in clustering, load balancing occurs on a per ASA basis. For example, if you have 32 active interfaces in the spanned EtherChannel across 8 ASAs, with 4 interfaces per ASA in the EtherChannel, then load balancing only occurs across the 4 interfaces on the ASA.

If an active interface goes down and is not replaced by a standby interface, then traffic is rebalanced between the remaining links. The failure is masked from both Spanning Tree at Layer 2 and the routing table at Layer 3, so the switchover is transparent to other network devices.

EtherChannel MAC Address

All interfaces that are part of the channel group share the same MAC address. This feature makes the EtherChannel transparent to network applications and users, because they only see the one logical connection; they have no knowledge of the individual links.

The port-channel interface uses the lowest numbered channel group interface MAC address as the port-channel MAC address. Alternatively you can manually configure a MAC address for the port-channel interface. In multiple context mode, you can automatically assign unique MAC addresses to shared interfaces, including an EtherChannel port interface. We recommend manually, or in multiple context mode for shared interfaces, automatically configuring a unique MAC address in case the group channel interface membership changes. If you remove the interface that was providing the port-channel MAC address, then the port-channel MAC address changes to the next lowest numbered interface, thus causing traffic disruption.

Guidelines for EtherChannels and Redundant Interfaces

Failover

  • When you use a redundant or EtherChannel interface as a Failover link, it must be pre-configured on both units in the Failover pair; you cannot configure it on the primary unit and expect it to replicate to the secondary unit because the Failover link itself is required for replication.

  • If you use a redundant or EtherChannel interface for the state link, no special configuration is required; the configuration can replicate from the primary unit as normal. For the Firepower 9300 chassis, all interfaces, including EtherChannels, need to be pre-configured on both units.

  • You can monitor redundant or EtherChannel interfaces for Failover using the monitor-interface command; be sure to reference the logical redundant interface name. When an active member interface fails over to a standby interface, this activity does not cause the redundant or EtherChannel interface to appear to be failed when being monitored for device-level Failover. Only when all physical interfaces fail does the redundant or EtherChannel interface appear to be failed (for an EtherChannel interface, the number of member interfaces allowed to fail is configurable).

  • If you use an EtherChannel interface for a Failover or state link, then to prevent out-of-order packets, only one interface in the EtherChannel is used. If that interface fails, then the next interface in the EtherChannel is used. You cannot alter the EtherChannel configuration while it is in use as a Failover link. To alter the configuration, you need to temporarily disable Failover, which prevents Failover from occurring for the duration.

Model Support

  • You cannot add EtherChannels in ASA for the Firepower 4100/9300, ASASM, or the ASAv. The Firepower 4100/9300 supports EtherChannels, but you must perform all hardware configuration of EtherChannels in FXOS on the chassis.

  • Redundant interfaces are only supported on the ASA 5500-X platform; they are not supported on the Firepower 4100/9300, ASASM, and ASAv.

Clustering

  • When you use a redundant or EtherChannel interface as the Cluster Control Link, it must be pre-configured on all units in the cluster; you cannot configure it on the primary unit and expect it to replicate to member units because the Cluster Control Link itself is required for replication.

  • To configure a spanned EtherChannel or an individual cluster interface, see the clustering chapter.

General Redundant Interface Guidelines

  • You can configure up to 8 redundant interface pairs.

  • All ASA configuration refers to the logical redundant interface instead of the member physical interfaces.

  • You cannot use a redundant interface as part of an EtherChannel, nor can you use an EtherChannel as part of a redundant interface. You cannot use the same physical interfaces in a redundant interface and an EtherChannel interface. You can, however, configure both types on the ASA if they do not use the same physical interfaces.

  • If you shut down the active interface, then the standby interface becomes active.

  • Redundant interfaces do not support Management slot/port interfaces as members. You can, however, set a redundant interface comprised of non-Management interfaces as management-only.

General EtherChannel Guidelines

  • You can configure up to 48 EtherChannels, depending on how many interfaces are available on your model.

  • Each channel group can have up to 16 active interfaces. For switches that support only 8 active interfaces, you can assign up to 16 interfaces to a channel group: while only 8 interfaces can be active, the remaining interfaces can act as standby links in case of interface failure. For 16 active interfaces, be sure that your switch supports the feature (for example, the Cisco Nexus 7000 with F2-Series 10 Gigabit Ethernet Module).

  • All interfaces in the channel group must be the same media type and capacity, and must be set to the same speed and duplex. The media type can be either RJ-45 or SFP; SFPs of different types (copper and fiber) can be mixed. You cannot mix interface capacities (for example 1GB and 10GB interfaces) by setting the speed to be lower on the larger-capacity interface.

  • The device to which you connect the ASA EtherChannel must also support 802.3ad EtherChannels.

  • The ASA does not support LACPDUs that are VLAN-tagged. If you enable native VLAN tagging on the neighboring switch using the Cisco IOS vlan dot1Q tag native command, then the ASA will drop the tagged LACPDUs. Be sure to disable native VLAN tagging on the neighboring switch. In multiple context mode, these messages are not included in a packet capture, so that you cannot diagnose the issue easily.

  • ASA 5500-X models do not support LACP rate fast; LACP always uses the normal rate. This setting is not configurable. Note that the Firepower 4100/9300, which configures EtherChannels in FXOS, has the LACP rate set to fast by default; on these platforms, the rate is configurable.

  • In Cisco IOS software versions earlier than 15.1(1)S2, the ASA did not support connecting an EtherChannel to a switch stack. With default switch settings, if the ASA EtherChannel is connected cross stack, and if the primary switch is powered down, then the EtherChannel connected to the remaining switch will not come up. To improve compatibility, set the stack-mac persistent timer command to a large enough value to account for reload time; for example, 8 minutes or 0 for indefinite. Or, you can upgrade to more a more stable switch software version, such as 15.1(1)S2.

  • All ASA configuration refers to the logical EtherChannel interface instead of the member physical interfaces.

  • You cannot use a redundant interface as part of an EtherChannel, nor can you use an EtherChannel as part of a redundant interface. You cannot use the same physical interfaces in a redundant interface and an EtherChannel interface. You can, however, configure both types on the ASA if they do not use the same physical interfaces.

Default Settings for EtherChannels and Redundant Interfaces

This section lists default settings for interfaces if you do not have a factory default configuration.

Default State of Interfaces

The default state of an interface depends on the type and the context mode.

In multiple context mode, all allocated interfaces are enabled by default, no matter what the state of the interface is in the system execution space. However, for traffic to pass through the interface, the interface also has to be enabled in the system execution space. If you shut down an interface in the system execution space, then that interface is down in all contexts that share it.

In single mode or in the system execution space, interfaces have the following default states:

  • Physical interfaces—Disabled.

  • Redundant Interfaces—Enabled. However, for traffic to pass through the redundant interface, the member physical interfaces must also be enabled.

  • EtherChannel port-channel interfaces—Enabled. However, for traffic to pass through the EtherChannel, the channel group physical interfaces must also be enabled.

Configure a Redundant Interface

A logical redundant interface consists of a pair of physical interfaces: an active and a standby interface. When the active interface fails, the standby interface becomes active and starts passing traffic. You can configure a redundant interface to increase the ASA reliability. This feature is separate from device-level failover, but you can configure redundant interfaces as well as failover if desired.

This section describes how to configure redundant interfaces.

Configure a Redundant Interface

This section describes how to create a redundant interface. By default, redundant interfaces are enabled.

Before you begin

  • You can configure up to 8 redundant interface pairs.

  • Redundant interface delay values are configurable, but by default the ASA inherits the default delay values based on the physical type of its member interfaces.

  • Both member interfaces must be of the same physical type. For example, both must be GigabitEthernet.

  • You cannot add a physical interface to the redundant interface if you configured a name for it. You must first remove the name using the no nameif command.

  • For multiple context mode, complete this procedure in the system execution space. To change from the context to the system execution space, enter the changeto system command.


Caution

If you are using a physical interface already in your configuration, removing the name will clear any configuration that refers to the interface.


Procedure


Step 1

Add the logical redundant interface:

interface redundant number

Example:


ciscoasa(config)# interface redundant 1

The number argument is an integer between 1 and 8.

You need to add at least one member interface to the redundant interface before you can configure logical parameters for it such as a name.

Step 2

Add the first member interface to the redundant interface:

member-interface physical_interface

Example:


ciscoasa(config-if)# member-interface gigabitethernet 0/0

Redundant interfaces do not support Management slot/port interfaces as members.

After you add the interface, any configuration for it (such as an IP address) is removed.

Step 3

Add the second member interface to the redundant interface:

member-interface physical_interface

Example:


ciscoasa(config-if)# member-interface gigabitethernet 0/1

Make sure the second interface is the same physical type as the first interface.

To remove a member interface, enter the no member-interface physical_interface command. You cannot remove both member interfaces from the redundant interface; the redundant interface requires at least one member interface.


Examples

The following example creates two redundant interfaces:


ciscoasa(config)# interface redundant 1
ciscoasa(config-if)# member-interface gigabitethernet 0/0
ciscoasa(config-if)# member-interface gigabitethernet 0/1
ciscoasa(config-if)# interface redundant 2
ciscoasa(config-if)# member-interface gigabitethernet 0/2
ciscoasa(config-if)# member-interface gigabitethernet 0/3


Change the Active Interface

By default, the active interface is the first interface listed in the configuration, if it is available.

Procedure


Step 1

To view which interface is active, enter the following command :

show interface redundant number detail | grep Member

Example:


ciscoasa# show interface redundant1 detail | grep Member
      Members GigabitEthernet0/3(Active), GigabitEthernet0/2

Step 2

Change the active interface:

redundant-interface redundant number active-member physical_interface

The redundantnumber argument is the redundant interface ID, such as redundant1 .

The physical_interface is the member interface ID that you want to be active.


Configure an EtherChannel

This section describes how to create an EtherChannel port-channel interface, assign interfaces to the EtherChannel, and customize the EtherChannel.

Add Interfaces to the EtherChannel

This section describes how to create an EtherChannel port-channel interface and assign interfaces to the EtherChannel. By default, port-channel interfaces are enabled.

Before you begin

  • You can configure up to 48 EtherChannels, depending on how many interfaces your model has.

  • Each channel group can have up to 16 active interfaces. For switches that support only 8 active interfaces, you can assign up to 16 interfaces to a channel group: while only eight interfaces can be active, the remaining interfaces can act as standby links in case of interface failure.

  • To configure a spanned EtherChannel for clustering, see the clustering chapter instead of this procedure.

  • All interfaces in the channel group must be the same media type and capacity, and must be set to the same speed and duplex. The media type can be either RJ-45 or SFP; SFPs of different types (copper and fiber) can be mixed. You cannot mix interface capacities (for example 1GB and 10GB interfaces) by setting the speed to be lower on the larger-capacity interface.. Note that for interfaces that you can configure to use either the RJ-45 or SFP connector, you can include both RJ-45 and SFP interfaces in the same EtherChannel.

  • You cannot add a physical interface to the channel group if you configured a name for it. You must first remove the name using the no nameif command.

  • For multiple context mode, complete this procedure in the system execution space. To change from the context to the system execution space, enter the changeto system command.


Caution

If you are using a physical interface already in your configuration, removing the name will clear any configuration that refers to the interface.


Procedure


Step 1

Specify the interface you want to add to the channel group:

interface physical_interface

Example:


ciscoasa(config)# interface gigabitethernet 0/0

The physical_interface ID includes the type, slot, and port number as type[slot/] port. This first interface in the channel group determines the type and speed for all other interfaces in the group.

In transparent mode, if you create a channel group with multiple Management interfaces, then you can use this EtherChannel as the management-only interface.

Step 2

Assign this physical interface to an EtherChannel:

channel-group channel_id mode {active | passive | on}

Example:


ciscoasa(config-if)# channel-group 1 mode active

The channel_id is an integer between 1 and 48. If the port-channel interface for this channel ID does not yet exist in the configuration, one will be added:

interface port-channel channel_id

We recommend using active mode.

Step 3

(Optional) Set the priority for a physical interface in the channel group:

lacp port-priority number

Example:


ciscoasa(config-if)# lacp port-priority 12345

The priority number is an integer between 1 and 65535. The default is 32768. The higher the number, the lower the priority. The ASA uses this setting to decide which interfaces are active and which are standby if you assign more interfaces than can be used. If the port priority setting is the same for all interfaces, then the priority is determined by the interface ID (slot/port). The lowest interface ID is the highest priority. For example, GigabitEthernet 0/0 is a higher priority than GigabitEthernet 0/1.

If you want to prioritize an interface to be active even though it has a higher interface ID, then set this command to have a lower value. For example, to make GigabitEthernet 1/3 active before GigabitEthernet 0/7, then make the lacp port-priority value be 12345 on the 1/3 interface vs. the default 32768 on the 0/7 interface.

If the device at the other end of the EtherChannel has conflicting port priorities, the system priority is used to determine which port priorities to use. See the lacp system-priority command.

Step 4

(Optional) Set the Ethernet properties for the port-channel interface to override the properties set on the individual interfaces.

interface port-channel channel_id

See Enable the Physical Interface and Configure Ethernet Parameters for Ethernet commands. This method provides a shortcut to set these parameters because these parameters must match for all interfaces in the channel group.

Step 5

Repeat Steps 1 through 3 for each interface you want to add to the channel group.

Each interface in the channel group must be the same type and speed. Half duplex is not supported. If you add an interface that does not match, it will be placed in a suspended state.


Customize the EtherChannel

This section describes how to set the maximum number of interfaces in the EtherChannel, the minimum number of operating interfaces for the EtherChannel to be active, the load balancing algorithm, and other optional parameters.

Procedure


Step 1

Specify the port-channel interface:

interface port-channel channel_id

Example:


ciscoasa(config)# interface port-channel 1

This interface was created automatically when you added an interface to the channel group. If you have not yet added an interface, then this command creates the port-channel interface.

You need to add at least one member interface to the port-channel interface before you can configure logical parameters for it such as a name.

Step 2

Specify the maximum number of active interfaces allowed in the channel group:

lacp max-bundle number

Example:


ciscoasa(config-if)# lacp max-bundle 6

The number is between 1 and 16. The default is 16. If your switch does not support 16 active interfaces, be sure to set this command to 8 or fewer.

Step 3

Specify the minimum number of active interfaces required for the port-channel interface to become active:

port-channel min-bundle number

Example:


ciscoasa(config-if)# port-channel min-bundle 2

The number is between 1 and 16. The default is 1. If the active interfaces in the channel group falls below this value, then the port-channel interface goes down, and could trigger a device-level failover.

Step 4

Configure the load-balancing algorithm:

port-channel load-balance {dst-ip | dst-ip-port | dst-mac | dst-port | src-dst-ip | src-dst-ip-port | src-dst-mac | src-dst-port | src-ip | src-ip-port | src-mac | src-port | vlan-dst-ip | vlan-dst-ip-port | vlan-only | vlan-src-dst-ip | vlan-src-dst-ip-port | vlan-src-ip | vlan-src-ip-port}

Example:


ciscoasa(config-if)# port-channel load-balance src-dst-mac

By default, the ASA balances the packet load on interfaces according to the source and destination IP address (src-dst-ip) of the packet. If you want to change the properties on which the packet is categorized, use this command. For example, if your traffic is biased heavily towards the same source and destination IP addresses, then the traffic assignment to interfaces in the EtherChannel will be unbalanced. Changing to a different algorithm can result in more evenly distributed traffic.

Step 5

Set the LACP system priority:

lacp system-priority number

Example:


ciscoasa(config)# lacp system-priority 12345

The number is between 1 and 65535. The default is 32768. The higher the number, the lower the priority. This command is global for the ASA.

If the device at the other end of the EtherChannel has conflicting port priorities, the system priority is used to determine which port priorities to use. For interface priorities within an EtherChannel, see the lacp port-priority command.


Monitoring EtherChannel and Redundant Interfaces

See the following commands:


Note

For the Firepower 9300, some statistics are not shown using the ASA commands. You must view more detailed interface statistics using FXOS commands.

  • /eth-uplink/fabric# show interface

  • /eth-uplink/fabric# show port-channel

  • /eth-uplink/fabric/interface# show stats

See the FXOS troubleshooting guide for more information.


  • show interface

    Displays interface statistics.

  • show interface ip brief

    Displays interface IP addresses and status.

  • show lacp {[channel_group_number] {counters | internal | neighbor} | sys-id}

    For EtherChannel, displays LACP information such as traffic statistics, system identifier and neighbor details.

  • show port-channel [channel_group_number] [brief | detail | port | protocol | summary]

    For EtherChannel, displays EtherChannel information in a detailed and one-line summary form. This command also displays the port and port-channel information.

  • show port-channel channel_group_number load-balance [hash-result {ip | ipv6 | l4port | mac | mixed | vlan-only} parameters]

    For EtherChannel, displays port-channel load-balance information along with the hash result and member interface selected for a given set of parameters.

Examples for EtherChannel and Redundant Interfaces

The following example configures three interfaces as part of an EtherChannel. It also sets the system priority to be a higher priority, and GigabitEthernet 0/2 to be a higher priority than the other interfaces in case more than eight interfaces are assigned to the EtherChannel.


lacp system-priority 1234
interface GigabitEthernet0/0
  channel-group 1 mode active
interface GigabitEthernet0/1
  channel-group 1 mode active
interface GigabitEthernet0/2
  lacp port-priority 1234
  channel-group 1 mode passive
interface Port-channel1
  lacp max-bundle 4
  port-channel min-bundle 2
  port-channel load-balance dst-ip

History for EtherChannels and Redundant Interfaces

Table 1. History for EtherChannels and Redundant Interfaces

Feature Name

Releases

Feature Information

Redundant interfaces

8.0(2)

A logical redundant interface pairs an active and a standby physical interface. When the active interface fails, the standby interface becomes active and starts passing traffic. You can configure a redundant interface to increase the ASA reliability. This feature is separate from device-level failover, but you can configure redundant interfaces as well as failover if desired. You can configure up to eight redundant interface pairs.

EtherChannel support

8.4(1)

You can configure up to 48 802.3ad EtherChannels of eight active interfaces each.

We introduced the following commands: channel-group, lacp port-priority, interface port-channel, lacp max-bundle, port-channel min-bundle, port-channel load-balance, lacp system-priority, clear lacp counters, show lacp, show port-channel.

Note 

EtherChannel is not supported on the ASA 5505.

Support for 16 active links in an EtherChannel

9.2(1)

You can now configure up to 16 active links in an EtherChannel. Previously, you could have 8 active links and 8 standby links. Be sure that your switch can support 16 active links (for example the Cisco Nexus 7000 with F2-Series 10 Gigabit Ethernet Module).

Note 

If you upgrade from an earlier ASA version, the maximum active interfaces is set to 8 for compatibility purposes (the lacp max-bundle command).

We modified the following commands: lacp max-bundle and port-channel min-bundle.