Forwarding and QoS

Forwarding is the transmitting of data packets from one router to another.

Quality of Service (QoS) is synonymous with class of service (CoS). You can enable QoS with localized data policies, which control the flow of data traffic into and out of the interfaces of edge devices.

Cisco SD-WAN Forwarding and QoS Overview

Forwarding takes the data packet and sends it over the transport to the remote side, specifying what to do with the packet. It specifies the interface through which packets are sent to reach the service side of a remote router.

Once the control plane connections of the Cisco SD-WAN overlay network are up and running, data traffic flows automatically over the IPsec connections between the routers. Because data traffic never goes to or through the centralized vSmart controller, forwarding only occurs between the Cisco vEdge devices as they send and receive data traffic.

While the routing protocols running in the control plane provide a router the best route to reach the network that is on the service side of a remote router, there will be situations where it is beneficial to select more specific routes. Using forwarding, there are ways you can affect the flow of data traffic. Forwarding takes the data packet and sends it over the transport to the remote side, specifying what to do with the packet. It specifies the interface through which packets are sent to reach the service side of a remote router.

To modify the default data packet forwarding flow, you create and apply a centralized data policy or a localized data policy. With a centralized data policy, you can manage the paths along which traffic is routed through the network, and you can permit or block traffic based on the address, port, and DSCP fields in the packet's IP header. With a localized data policy, you can control the flow of data traffic into and out of the interfaces of a router, enabling features such as quality of service (QoS) and mirroring.

Traffic Behavior With and Without QoS

Default Behavior without Data Policy

When no centralized data policy is configured on the vSmart controller, all data traffic is transmitted from the local service-side network to the local router, and then to the remote router and the remote service-side network, with no alterations in its path. When no access lists are configured on the local router to implement QoS or mirroring, the data traffic is transmitted to its destination with no alterations to its flow properties.

Let's follow the process that occurs when a data packet is transmitted from one site to another when no data policy of any type is configured:

  • A data packet arriving from the local service-side network and destined for the remote service-side network comes to the router-1. The packet has a source IP address and a destination IP address.

  • The router looks up the outbound SA in its VPN route table,​ and the packet is encrypted with SA and gets the local TLOC. (The router previously received its SA from the vSmart controller. There is one SA per TLOC. More specifically, each TLOC has two SAs, an outbound SA for encryption and an inbound SA for decryption.)

  • ESP adds an IPsec tunnel header to the packet.

  • An outer header is added to the packet. At this point, the packet header has these contents:​ TLOC source address, TLOC destination address, ESP header, destination IP address, and source IP address.

  • The router checks the local route table to determine which interface the packet should use to reach its destination.

  • The data packet is sent out on the specified interface, onto the network, to its destination. At this point, the packet is being transported within an IPsec connection.

  • When the packet is received by the router on the remote service-side network, the TLOC source address and TLOC destination address header fields are removed, and the inbound SA is used to decrypt the packet.

  • The remote router looks up the destination IP address in its VPN route table to determine the interface to use to reach to the service-side destination.


Note

Cisco vEdge devices do not support forwarding IPv6 packet with Authentication Header (AH) or Encapsulating Security Payload (ESP) header. When there are IPv6 packets with AH or ESP header, Cisco vEdge device identifies them as unsupported IPv6 extension headers and drops the packets. The rx_ucast_pkts_unsupported_options_drop counter increments when there are unsupported packets.


​​The figure below details this process.

Figure 1. Data Packet Transmission without Policy

Behavior Changes with QoS Data Policy

When you want to modify the default packet forwarding flow, you design and provision QoS policy. To activate the policy, you apply it to specific interfaces in the overlay network in either the inbound or the outbound direction. The direction is with respect to the routers in the network. You can have policies for packets coming in on an interface or for packets going out of an interface.

The figure below illustrates the QoS policies that you can apply to a data packet as it is transmitted from one branch to another. The policies marked Input are applied on the inbound interface of the router, and the policies marked Output are applied on the outbound interface of the router, before the packets are transmitted out the IPSec tunnel.

The table below describes each of the above steps.

Step

Description

Command

1

Define class map to classify packets, by importance, into appropriate forwarding classes. Reference the class map in an access list.

class-map

2

Define policer to specify the rate at which traffic is sent on the interface. Reference the policer in an access list. Apply the access list on an inbound interface.

policer

3

The router checks the local route table to determine which interface the packet should use to reach its destination.

N/A

4

Define policer and reference the policer in an access list. Apply the access list on an outbound interface.

policer

5

Define QoS map to define the priority of data packets. Apply the QoS map on the outbound interface.

qos-map

6

Define rewrite-rule to overwrite the DSCP field of the outer IP header. Apply the rewrite-rule on the outbound interface.

rewrite-rule

How QoS Works

The QoS feature on the Cisco IOS XE SD-WAN devices and Cisco vEdge devices works by examining packets entering at the edge of the network. With localized data policy, also called access lists, you can provision QoS to classify incoming data packets into multiple forwarding classes based on importance, spread the classes across different interface queues, and schedule the transmission rate level for each queue. Access lists can be applied either in the outbound direction on the interface (as the data packet travels from the local service-side network into the IPsec tunnel toward the remote service-side network) or in the inbound direction (as data packets are exiting from the IPsec tunnel and being received by the local router.

To provision QoS, you must configure each router in the network. Generally, each router on the local service-side network examines the QoS settings of the packets that enter it, determines which class of packets are transmitted first, and processes the transmission based on those settings. As packets leave the network on the remote service-side network, you can rewrite the QoS bits of the packets before transmitting them to meet the policies of the targeted peer router.

Classify Data Packets

You can classify incoming traffic by associating each packet with a forwarding class. Forwarding classes group data packets for transmission to their destination. Based on the forwarding class, you assign packets to output queues. The routers service the output queues according to the associated forwarding, scheduling, and rewriting policies you configure.​

Schedule Data Packets

You can configure a QoS map for each output queue to specify the bandwidth, delay buffer size, and packet loss priority (PLP) of output queues. This enables you to determine how to prioritize data packets for transmission to the destination. Depending on the priority of the traffic, you can assign packets higher or lower bandwidth, buffer levels, and drop profiles. Based on the conditions defined in the QoS map, packets are forwarded to the next hop.

On Cisco vEdge devices and Cisco IOS XE SD-WAN devices, each interface has eight queues, which are numbered 0 to 7. Queue 0 is reserved, and is used for both control traffic and low-latency queuing (LLQ) traffic. For LLQ, any class that is mapped to queue 0 must also be configured to use LLQ. Queues 1 to 7 are available for data traffic, and the default scheduling for these seven queues is weighted round-robin (WRR). For these queues, you can define the weighting according to the needs of your network. When QoS is not configured for data traffic, queue 2 is the default queue.

Rewrite Data Packets

You can configure and apply rewrite rules on the egress interface to overwrite the Differentiated Services Code Point (DSCP) value for packets entering the network. Rewrite rules allow you to map traffic to code points when the traffic exits the system. Rewrite rules use the forwarding class information and packet loss priority (PLP) used internally by the Cisco IOS XE SD-WAN devices and Cisco vEdge devices to establish the DSCP value on outbound packets. You can then configure algorithms such as RED/WRED to set the probability that packets will be dropped based on their DSCP value.

Police Data Packets

You can configure policers to control the maximum rate of traffic sent or received on an interface, and to partition a network into multiple priority levels.

Traffic that conforms to the policer rate is transmitted, and traffic that exceeds the policer rate is sent with a decreased priority or is dropped.

You can apply a policer to inbound or outbound interface traffic. Policers applied to inbound interface traffic allow you to conserve resources by dropping traffic that does not need to be routed through the network. Policers applied to outbound interface traffic control the amount of bandwidth used.


Note

The burst value configured for low-latency queuing (LLQ) policer via Cisco vManage GUI is applicable to only Cisco vEdge devices.


Shaping Rate

You can configure shaping to control the maximum rate of traffic sent. You can configure the aggregate traffic rate on an interface to be less than the line rate so that the interface transmits less traffic than it is capable of transmitting. You can apply shaping to outbound interface traffic.


Note

Shaping rate below 2M is not supported on the following Cisco vEdge devices: Cisco vEdge100b, Cisco vEdge100m, Cisco vEdge 1000, and Cisco vEdge 2000.


Note

In releases before Cisco SD-WAN Release 20.6.1, the shaping rate configured on a port is applied to the main interface only if the main interface has a tunnel configuration.

From Cisco SD-WAN Release 20.6.1, the shaping rate configured on a port is applied to the main interface even if any of the subinterfaces of the port have a tunnel configuration.


Workflow to Configure QoS Using Cisco vManage

  1. Map each forwarding class to an output queue.

  2. Create localized policy.

    1. Enable Cloud QoS and Cloud QoS on service side.

    2. Configure QoS scheduler.

    3. (Optional) Create re-write policy.

  3. Apply localized policy to device template.

  4. Apply QoS map and re-write policy (optional) to WAN interface feature template.

  5. Define centralized Traffic Data QoS policy to classify traffic into proper queue.

  6. Apply centralized policy.

Map Each Forwarding Class to an Output Queue

  1. From the Cisco vManage menu, choose Configuration > Policies.

  2. From the Custom Options drop-down, select Lists under Localized Policy.

  3. Select the Class Map from the list types.

  4. Click the New Class List. The Class List pop-up page is displayed.

  5. Enter a name for the class. Select a required queue from the Queue drop-down list.

  6. Click Save.

  7. Repeat the last three steps to add more class lists as required. The following are example class lists and queue mappings:

    Table 1. Class List and Queue Mappings
    Class Queue

    VOICE

    0

    CRTICAL_DATA

    1

    BULK

    2

    CLASS_DEFAULT

    3

    INTERACTIVE_VIDEO

    4

    CONTROL SIGNALING

    5

Configure Localized Policy

Enable Cloud QoS

  1. From the Cisco vManage menu, choose Configuration > Policies.

  2. Click Localized Policy.

  3. For the desired policy, click and choose Edit.

    (Optionally) If the desired policy is not available in the list, you may create a customized localized policy following the steps below:

    1. Click Add Policy.

    2. In the Add Policy page, continue to click Next till you navigate to Policy Overview page.

    3. In the Policy Overview page, enter Policy Name and Description for your localized policy.

  4. In the Policy Overview page, select the Cloud QoS checkbox to enable QoS on the transport side, and select the Cloud QoS Service side checkbox to enable QoS on the service side.

Configure QoS Scheduler

  1. Click Forwarding Class/QoS. When you navigate to the Forwarding Classes/QoS page, QoS Map is selected by default.

  2. Click Add QoS Map, and then click Create New.

  3. Enter the name and description for the QoS mapping.

  4. Queue 0 has already been defined by default and cannot be modified. Click the Add Queue.

  5. Select a required queue from the Queue drop-down.

  6. Slide the Bandwidth% and Buffer% bar and set the value as required.

  7. From the Drops drop-down, select the required drop type.

  8. Click Save Queue.

  9. Repeat the last three steps to add more queue as required. The following are the examples for queue and sample Bandwidth/Buffer configurations:

    Table 2. Bandwidth and buffer values and drop algorithm
    Queue Bandwidth/Buffer Drops

    1

    30/30

    Random Early (RED)

    2

    10/10

    Random Early (RED)

    3

    20/20

    Random Early (RED)

    4

    20/20

    Random Early (RED)

    5

    10/10

    Tail Drop

  10. QoS queue 0 should now be left at 10% Bandwidth and Buffer.

  11. Click Save Policy.

Create Re-write Policy

  1. (Optional) Click Policy Rewrite to add a rewrite policy.

  2. From the Add Rewrite Policy drop-down, select Create New.

  3. Enter a name and description for the rewrite rule.

  4. Click Add Rewrite Rule.

  5. In the Add Rule pop-up page:

    1. Select a class from the Class drop-down.

    2. Select the priority (Low or High) from the Priority drop-down.

      Low priority is supported only for Cisco IOS XE SD-WAN devices.

    3. Enter the DSCP value (0 through 63) in the DSCP field.

    4. Enter the class of service (CoS) value (0 through 7) in the Layer 2 Class of Service field.

  6. Click Save Rule.

  7. Repeat the previous 5 and 6 steps to add more QoS Rewrite rules as required. The following are example rewrite rule information:

    Table 3. QoS Rewrite Information
    Class Priority DSCP Layer 2 Class of Service

    BULK

    Low

    10

    1

    BULK

    High

    10

    1

    DEFAULT

    Low

    0

    0

    DEFAULT

    High

    0

    0

    CONTROL_SIGNALING

    Low

    18

    2

    CONTROL_SIGNALING

    High

    18

    2

    CRITICAL_DATA

    Low

    18

    2

    CRITICAL_DATA

    High

    18

    2

    INTERACTIVE_VIDEO

    Low

    34

    4

    INTERACTIVE_VIDEO

    High

    34

    4

  8. Click Save Policy.

  9. Click Save Policy Changes to save the changes to the localized master policy.

Apply Localized Policy to the Device Template


Note

The first step in utilizing the Localized Policy that is created is to attach it to the device template.


  1. From the Cisco vManage menu, choose Configuration > Templates.

  2. Click Device Templates and select the desired template.


    Note

    In Cisco vManage 20.7.x and earlier releases, Device Templates is called Device.


  3. Click , and click Edit.

  4. Click Additional Templates.

  5. From the Policy drop-down, choose the Localized Policy that is created in the previous steps.

  6. Click Update.


    Note

    Once the localized policy has been added to the device template, selecting the Update option immediately pushes a configuration change to all of the devices that are attached to this device template. If more than one device is attached to the device template, you will receive a warning that you are changing multiple devices.


  7. Click Next, and then Configure Devices.

  8. Wait for the validation process and push configuration from Cisco vManage to the device.

Apply QoS and Re-write Policy to WAN Interface Feature Template

  1. From the Cisco vManage menu, choose Configuration > Templates.

  2. Click Feature Templates.


    Note

    In Cisco vManage 20.7.x and earlier releases, Feature Templates is called Feature.


  3. Choose a feature template from the list. Click ..., and click Edit.

  4. Click ACL/QoS.

  5. From the QoS Map drop-down, select Global and enter a name in the field.

  6. From the Rewrite Rule drop-down, select Global and enter a name in the field.

  7. To save the feature template changes, click Update.


    Note

    The configuration does not take effect till the feature template is attached to the device template.


  8. In the left pane, choose the device to view the configuration in the right pane.

  9. Click Configure Devices to push the policy map. In the pop up page, select the check box and confirm changes on multiple devices. Click OK.

Define Centralized Traffic Data QoS Policy to Classify Traffic into Proper Queue

  1. From the Cisco vManage menu, choose Configuration > Policies.

  2. Click Centralized Policy.

  3. For the desired policy in the list, click ..., and select Edit.

    (Optionally) If the desired policy is not available in the list, then you may create the customized centralized policy following the steps below:

    1. Click Add Policy.

    2. In the Add Policy page, continue to click Next till you navigate to Configure Traffic Rules page.

  4. Click Traffic Rules, then click Traffic Data.

  5. Click Add Policy drop-down.

  6. Click Create New. The Add Data Policy window displays.

  7. Enter a Name and the Description.

  8. Click Sequence Type. The Add Data Policy popup opens.

  9. Select QoS type of data policy.

  10. Click Sequence Rule. The Match/Action page opens, with Match selected by default.

  11. From the Match box, select the desired policy match type. Then select or enter the value for that match condition. Configure additional match conditions for the sequence rule, as desired.

  12. To select actions to take on matching data traffic, click Actions box.

  13. By default, Accept is enabled. Select Forwarding Class from actions.

  14. In the Forwarding Class field, and enter the class value (maximum of 32 characters).

  15. Click Save Match and Actions.

  16. Click Save Data Policy.

  17. If your are creating a new centralized policy, then click Next and navigate to Add policies to Sites and VPNs page.

    1. Enter a Policy Name and Description for your centralized policy.

    2. Click Save Data Policy.

Apply Centralized Policy

  1. Click Policy Application to apply the centralized policy.

  2. Click Traffic Data.

  3. Click New Site List and VPN list.

  4. Choose the direction for applying the policy (From Service, From Tunnel, or All), choose one or more site lists, and choose one or more VPN lists.

  5. Click Add.

  6. Click Save Policy Changes.

  7. A window pops up indicating the policy will be applied to the Cisco vSmart controller.

  8. Click Activate.

  9. Cisco vManage pushes the configuration to the Cisco vSmart controller and indicates success.

Forwarding and QoS Configuration Using the CLI

This section shows examples of how you can use access lists to configure quality of service (QoS), classifying data packets and prioritizing the transmission properties for different classes. Note that QoS is synonymous with class of service (CoS).

This example shows how to configure class of service (CoS) to classify data packets and control how traffic flows out of and into the interfaces on Cisco vEdge devices on the interface queues. To configure a QoS policy:

  1. Map each forwarding class to an output queue.

  2. Configure the QoS scheduler for each forwarding class.

  3. Group the QoS schedulers into a QoS map.

  4. Define an access list to specify match conditions for packet transmission and apply it to a specific interface.

  5. Apply the queue map and the rewrite rule to the egress interface.

The sections below show examples of each of these steps.

Map Each Forwarding Class to Output Queue

This example shows a data policy that classifies incoming traffic by mapping each forwarding class to an output queue. Here, traffic classified as "be" (Best Effort) is mapped to queue 2, traffic classified as "af1" (Assured Forwarding) is mapped to queue 3, and so on.

policy
 class-map
  class be queue 2
  class af1 queue 3
  class af2 queue 4
  class af3 queue 5
 !
!

Configure QoS Scheduler for Each Forwarding Class

This example illustrates how to configure the QoS scheduler for each queue to define the importance of data packets.

Depending on the priority of the traffic, you assign the bandwidth, buffer level, and random early detection (RED) drop profile associated with the queue. Here, "af3" traffic has higher priority over other traffic classes and so is configured to have 40% bandwidth and 40% buffer. Traffic in class "af2" has 30% bandwidth and 30% buffer; traffic in class "af1" class has 20% bandwidth and 20% buffer and traffic in class "be" has 10% bandwidth and 10% buffer size reflecting the respective priority of the traffic on the network. All traffic classes are configured with a drop profile of RED, meaning that instead of waiting for the queue to be full, packets are dropped randomly based on the thresholds defined.

policy
 qos-scheduler af1
  class             af1
  bandwidth-percent 20
  buffer-percent    20
  drops             red-drop
 !
 qos-scheduler af2
  class             af2
  bandwidth-percent 30
  buffer-percent    30
  drops             red-drop
 !
 qos-scheduler af3
  class             af3
  bandwidth-percent 40
  buffer-percent    40
  drops             red-drop
 !
 qos-scheduler be
  class             be
  bandwidth-percent 10
  buffer-percent    10
  drops             red-drop
 !

Group QoS Schedulers into a QoS Map

This example illustrates the grouping of "qos scheduler af1," "qos scheduler af2," and "qos scheduler be" into a single QoS map called "test."

qos-map test
  qos-scheduler af1
  qos-scheduler af2
  qos-scheduler be
 !
!

Note

The sum of bandwidth-percent for qos-scheduler configured under the QoS map should not exceed 100.

The sum of buffer-percent for qos-scheduler configured under the QoS map should not exceed 100.


Create Access Lists to Classify Data Packets

Classify Data Packets into Appropriate Classes

This example shows how to classify data packets into appropriate forwarding classes based on match conditions. Here "access-list acl1" classifies data packets originating from the host at source address 10.10.10.1 and going to the destination host at 20.20.20.1 into the "be" class. Data packets with a DSCP value of 10 in the IP header field are classified in the "af1" class, TCP packets are classified in the "af3" class, and packets going to destination port 23, which carries Telnet mail traffic, are classified in the "af2" class. All other traffic is dropped.

policy
 access-list acl1
  sequence 1
   match
    source-ip      10.10.10.1/32
    destination-ip 10.20.20.1/32
   !
   action accept
    class be
   !
  !
  sequence 2
   match
    dscp 10
   !
   action accept
    class af1
   !
  !
  sequence 3
   match
    protocol 6
   !
   action accept
    class af3
   !
  !
  sequence 4
   match
    destination-port 23
   !
   action accept
    class af2
   !
  !
  default-action drop
 !
!

Apply Access Lists

Apply Access List to Specific Interface

This example illustrates how to apply the access list defined above on the input of a service interface. Here "access-list acl1" is applied on the input of interface ge0/4 in VPN 1.

vpn 1
 interface ge0/4
  ip address 10.20.24.15/24
  no shutdown
  access-list acl1 in
 !
!

Configure and Apply Rewrite Rule

Configure Rewrite Rule

This example shows how to configure the rewrite rule to overwrite the DSCP field of the outer IP header. Here the rewrite rule "transport" overwrites the DSCP value for forwarding classes based on the drop profile. Since all classes are configured with RED drop, they can have one of two profiles: high drop or low drop. The rewrite rule is applied only on the egress interface, so on the way out, packets classified as "af1" and a Packet Loss Priority (PLP) level of low are marked with a DSCP value of 3 in the IP header field, while "af1" packets with a PLP level of high are marked with 4. Similarly, "af2" packets with a PLP level of low are marked with a DSCP value of 5, while "af2" packets with a PLP level of high are marked with 6, and so on.

policy
 rewrite-rule transport
  class af1 low dscp 3
  class af1 high dscp 4
  class af2 low dscp 5
  class af2 high dscp 6
  class af3 low dscp 7
  class af3 high dscp 8
  class be low dscp 1
  class be high dscp 2
 !
!

Apply the Queue Map and Rewrite Rule on an Interface

This example applies the queue map "test" and the rewrite rule "transport" to the egress interface ge0/0 in VPN 0. (Note that you can apply QOS maps to VLAN interfaces, also called subinterfaces, on Cisco IOS XE SD-WAN devices (not on Cisco vEdge devices), using Cisco IOS XE SD-WAN Release 16.12.x or later, or Cisco SD-WAN Release 19.1.x or later.)

vpn 0
 interface ge0/0
  ip address 10.1.15.15/24
  tunnel-interface
   preference 10
   weight     10
   color      lte
   allow-service dhcp
   allow-service dns
   allow-service icmp
   no allow-service sshd
   no allow-service ntp
   no allow-service stun
  !
  no shutdown
  qos-map  test
  rewrite-rule transport
 !
!

Police Data Packets on Cisco vEdge Devices

This section shows two examples of policing data packets.

The first example illustrates how to configure a policer to rate limit traffic received on an interface. After you configure the policer, include it in an access list. Here "policer p1" is configured to have a maximum traffic rate of 1,000,000 bits per second and a maximum burst-size limit of 15000 bytes. Traffic exceeding these rate limits is dropped. The policer is then included in the access list "acl1," which is configured to accept all TCP or UDP traffic originating from the host at source 2.2.0.0 and going to the destination host at 10.1.1.0 on port 20 or 100.1.1.0 on port 30. You can use "access-list acl1" on the input or output of the interface to do flow-based policing.

policy
 policer p1
  rate   1000000 
  burst  15000 
  exceed drop
 !
 access-list acl1
  sequence 1
   match
    source-ip        2.2.0.0/16
    destination-ip   10.1.1.0/24 100.1.1.0/24
    destination-port 20 30
    protocol         6 17 23
   !
   action accept
    policer p1
   !
  !
  default-action drop
 !
!
vpn 1
 interface ge0/4
  ip address 10.20.24.15/24
  no shutdown
  access-list acl1 in
 !
!

You can also apply a policer directly on an inbound or an outbound interface when you want to police all traffic ingressing or egressing this interface:

policy
 policer p1
  rate   1000000 
  burst  15000 
  exceed drop
 !
!
vpn 1
 interface ge0/4
  ip address 10.20.24.15/24
  no shutdown
  policer p1 in
 !
!

vpn 2
 interface ge0/0
  ip address 10.1.15.15/24
  no shutdown
  policer p1 out
 !
!

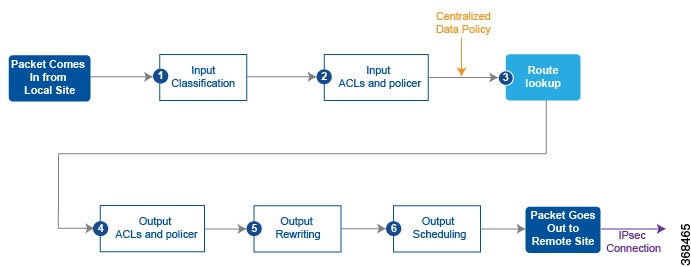
In the second example, we have a Cisco vEdge device with two WAN interfaces in VPN 0. The ge0/0 interface connects to a 30-MB link, and we want to always have 10 MB available for very high priority traffic. When lower-priority traffic bursts exceed 20 MB, we want to redirect that traffic to the second WAN interface, ge0/1.

Implementing this traffic redirection requires two policies:

  • You apply an access list to the service-side interface that polices the incoming data traffic.

  • You apply a data policy to the ge0/0 WAN interface that directs bursty traffic to the second WAN interface, ge0/1.

For the access list, the configuration snippet below is for interface ge1/0, in VPN 1. The policer monitors incoming traffic on the interface. When traffic exceeds 20 MB (configured in the policer burst command), we change the PLP from low to high (configured by the policer exceed remark command). You configure the following on the Cisco vEdge device:

policy
  policer bursty-traffic
    rate 1000000
    burst 20000
    exceed remark
  access-list policer-bursty-traffic
    sequence 10
      match
        source-ip 56.0.1.0/24
      action accept
        policer bursty-traffic
    default-action accept
vpn 1
  interface ge1/0
    ip address 56.0.1.14/24
    no shutdown
    access-list policer-bursty-traffic in

To display a count of the packets that have been remarked, issue the show interface detail or the show system statistics command on the Cisco vEdge device. The count is reported in the rx-policer-remark field.

The centralized data policy directs burst traffic away from the ge0/0 interface (color: internet) to interface ge0/1 (color: red). You apply this data policy to all the routers at a particular site, specifying the direction from-service so that the policy is applied only to traffic originating from the service side of the router. You configure the following on the vSmart controller:

policy
  lists
    site-list highest-priority-routers
      site-id 100
    vpn-list wan-vpn
      vpn 0
  data-policy highest-priority
    vpn-list wan-vpn
      sequence 10
        match
          plp high
          source-ip 56.0.1.0/24
        action accept
          count bursty-counter
          set local-tloc color red
    default-action accept
apply-policy
  site-list highest-priority-routers
    data-policy highest-priority from-service

DSCP to Input Queue Mapping in Cisco vEdge 2000 Router

If a Differentiated Services Code Point (DSCP) value is present in an incoming IP packet entering the network, the DSCP value is used by the Cisco vEdge devices to put it in one of the ingress queues. The DSCP to queue mapping is done based on a 7-queue system, as shown below.

Table 4. DSCP to Input Queue Mapping

DSCP Values

Queue

48-63

1

40-47

2

32-39

3

24-31

4

16-23

5

8-15

6

0-7

7

In this mapping, queue 1 is assigned the highest priority and queue 7 the lowest priority. The high-priority packets are processed ahead of the low-priority packets. Therefore, we recommend that you set the correct DSCP marking for the incoming packets so that the packets are given the correct treatment based on the assigned priority.

Reference: Forwarding and QoS CLI Commands

Configuration Commands

Use the following commands to configure forwarding and QoS on a vEdge router.

policy
  class-map
    class class-name queue number
  cloud-qos
  cloud-qos-service-side
  mirror mirror-name
    remote-dest ip-address source ip-address
  policer policer-name
    rate bandwidth
    burst types
    exceed action
  qos-map map-name
    qos-scheduler scheduler-name
  qos-scheduler scheduler-name
    class class-name
    bandwidth-percent percentage
    buffer-percent percentage
    drops (red-drop | tail-drop)
    scheduling (llq | wrr)
  rewrite-rule rule-name
policy
  access-list acl-name
    default-action action
    sequence number
      match
        class class-name
        destination-ip prefix/length
        destination-port number
        dscp number
        protocol number
        source-ip prefix-length
        source-port number
      action
        drop
          count counter-name
        accept
          class class-name
          count counter-name
          mirror mirror-name
          policer policer-name
          set dscp value
vpn vpn-id
  interface interface-name
    access-list acl-name (in | out)  
  interface interface-name
    policer policer-name (in | out)

Monitoring Commands

Use the following commands to monitor forwarding and QoS on a Cisco vEdge device:

show policy access-list-associations
show policy access-list-counters
show policy access-list-names
show policy access-list-policers
​show policy data-policy-filter
show policy qos-map-info
show policy qos-scheduler-info

Monitoring Commands

Use the following commands to monitor forwarding and QoS on a Cisco IOS XE SD-WAN device:

show sdwan policy access-list-associations
show sdwan policy access-list-counters
show sdwan policy access-list-names
show sdwan policy access-list-policers
​show sdwan policy data-policy-filter
show sdwan policy rewrite-associations
show policy-map interface GigabitEthernet0/0/2