Configure Controllers

There are six types of controllers for Cisco NCS 1020. The controllers are the OTS, OTS-OCH, OSC, OCH, and OMS controllers. This chapter describes the tasks that are used to configure and view these controllers.

Table 1. Controllers

Controller Types

Description

Optical Transport Section (OTS)

The OTS controller holds all the optical parameters for the OTS optical interfaces.

OTS-OCH

The OTS-OCH controller is created on the LINE side of the OLT nodes using the hw-module command in Flex-Grid configuration. OTS-OCH controller supports optical cross-connection between the LINE side and ADD/DROP side of the OLT nodes only. The channel IDs must be the same for both LINE side and COM side OTS-OCH controllers.

Optical Service Channel (OSC)

The OSC controller represents the optical layer of the OSC channel. Line ports host the OSC controller.

Optical Channel (OCH)

By default, the OCH controllers are automatically configured when Mux/Demux panels and breakout panels are brought up. These controllers are on the CCMD cards.

Optical Multiplex Section (OMS)

By default, the OMS controllers are automatically configured when Mux/Demux panels and breakout panels are brought up. These controllers are on the CCMD cards.

OTS Controllers

OLT Controller Model

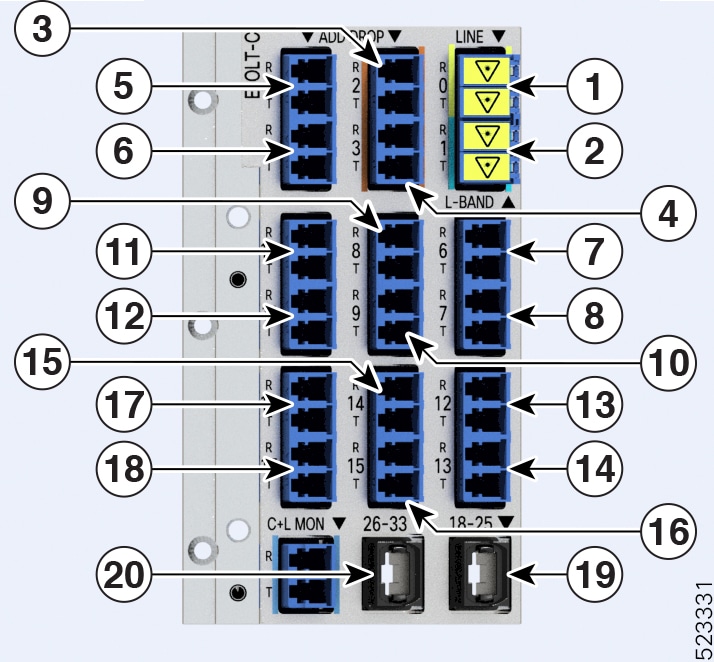
When the NCS1K-E-OLT-C and NCS1K-OLT-C cards are brought up, 34 OTS controllers are created by default.

  • LINE 0 port: ots 0/0/0/0 (C band line OTS controller)

  • L-BAND 1 port: ots 0/0/0/1 (L band line OTS controller)

  • LC port: ots 0/0/0/2 ( Add1 Rx/Drop1 Tx OTS controller)

  • LC port: ots 0/0/0/3 ( Add2 Rx/Drop2 Tx OTS controller)

  • MPO ports: ots 0/0/0/4 to ots 0/0/0/11

  • MPO ports: ots 0/0/0/12 to ots 0/0/0/19

  • MPO ports: ots 0/0/0/20 to ots 0/0/0/27

  • MPO ports: ots 0/0/0/28 to ots 0/0/0/33

For the NCS1K-E-OLT-Cvariant, the following lists the Add/Drop ports that are mapped to the OTS controllers:

  • LINE 0 port: ots 0/0/0/0 (C band line OTS controller)

  • L-BAND 1 port: ots 0/0/0/1 (L band line OTS controller)

  • LC port: ots 0/0/0/2…17 ( Add1…16 Rx/Drop1…16 Tx OTS controller)

  • MPO ports: ots 0/0/0/18 to ots 0/0/0/25

  • MPO ports: ots 0/0/0/26 to ots 0/0/0/33

The following figures and tables show the OLT card variants and the mapping between physical ports and controllers:

Figure 1. NCS1K-OLT-C
NCS1K-OLT-C Port Mapping
Table 2. NCS1K-OLT-C Port Mapping

1

Parent Controller: OTS0/0/0/0

Child Controller: OSC0/0/0/0, Line OTS-OCH 0/0/0/0/x

2

Parent Controller: OTS0/0/0/1

3

Parent Controller: OTS0/0/0/2

Child Controller: COM OTS-OCH 0/0/0/2/x

4

Parent Controller: OTS0/0/0/3

Child Controller: COM OTS-OCH 0/0/0/3/x

5

Parent Controller: OTS0/0/0/4-11

Child Controller: COM OTS-OCH 0/0/0/4-11/x

6

Parent Controller: OTS0/0/0/12-19

Child Controller: COM OTS-OCH 0/0/0/12-19/x

7

Parent Controller: OTS0/0/0/20-27

Child Controller: COM OTS-OCH 0/0/0/20-27/x

8

Parent Controller: OTS0/0/0/28-33

Child Controller: COM OTS-OCH 0/0/0/28-33/x

Figure 2. NCS1K-E-OLT-C
NCS1K-E-OLT-C Port Mapping
Table 3. NCS1K-E-OLT-C Port Mapping

1

Parent Controller: OTS0/0/0/0

Child Controller: OSC0/0/0/0, Line OTS-OCH 0/0/0/0/x

2

Parent Controller: OTS0/0/0/1

3

Parent Controller: OTS0/0/0/2

Child Controller: COM OTS-OCH 0/0/0/2/x

4

Parent Controller: OTS0/0/0/3

Child Controller: COM OTS-OCH 0/0/0/3/x

5

Parent Controller: OTS0/0/0/4

Child Controller: COM OTS-OCH 0/0/0/4/x

6

Parent Controller: OTS0/0/0/5

Child Controller: COM OTS-OCH 0/0/0/5/x

7

Parent Controller: OTS0/0/0/6

Child Controller: COM OTS-OCH 0/0/0/6/x

8

Parent Controller: OTS0/0/0/7

Child Controller: COM OTS-OCH 0/0/0/7/x

9

Parent Controller: OTS0/0/0/8

Child Controller: COM OTS-OCH 0/0/0/8/x

10

Parent Controller: OTS0/0/0/9

Child Controller: COM OTS-OCH 0/0/0/9/x

11

Parent Controller: OTS0/0/0/10

Child Controller: COM OTS-OCH 0/0/0/10/x

12

Parent Controller: OTS0/0/0/11

Child Controller: COM OTS-OCH 0/0/0/11/x

13

Parent Controller: OTS0/0/0/12

Child Controller: COM OTS-OCH 0/0/0/12/x

14

Parent Controller: OTS0/0/0/13

Child Controller: COM OTS-OCH 0/0/0/13/x

15

Parent Controller: OTS0/0/0/14

Child Controller: COM OTS-OCH 0/0/0/14/x

16

Parent Controller: OTS0/0/0/15

Child Controller: COM OTS-OCH 0/0/0/15/x

17

Parent Controller: OTS0/0/0/16

Child Controller: COM OTS-OCH 0/0/0/16/x

18

Parent Controller: OTS0/0/0/17

Child Controller: COM OTS-OCH 0/0/0/17/x

19

Parent Controller: OTS0/0/0/18-25

Child Controller: COM OTS-OCH 0/0/0/18-25/x

20

Parent Controller: OTS0/0/0/26-33

Child Controller: COM OTS-OCH 0/0/0/26-33/x

To view the platform information, use the following command:

RP/0/RP0/CPU0:ios#show platform

The following output highlights the NCS1K-OLT-C card type for the OLT controller model.

Tue Apr 30 12:02:48.807 IST
Node              Type                     State                    Config state
--------------------------------------------------------------------------------
0/RP0/CPU0        NCS1010-CTR2-B-K9(Active) IOS XR RUN               NSHUT,NMON
0/FT0             NCS1010-FAN              OPERATIONAL              NSHUT,NMON
0/FT1             NCS1010-FAN              OPERATIONAL              NSHUT,NMON
0/FT4             NCS1020-FAN              OPERATIONAL              NSHUT,NMON
0/FT5             NCS1020-FAN              OPERATIONAL              NSHUT,NMON
0/FT6             NCS1020-FAN              OPERATIONAL              NSHUT,NMON
0/FT7             NCS1020-FAN              OPERATIONAL              NSHUT,NMON
0/0/NXR0          NCS1K-OLT-C              OPERATIONAL              NSHUT,NMON
0/1/NXR0          NCS1010-FLR-P            PRESENT                  NSHUT,NMON
0/2/NXR0          NCS1K14-CCMD-16-C        OPERATIONAL              NSHUT,NMON
0/PM0             NCS1K4-AC-PSU-2          OPERATIONAL              NSHUT,NMON
0/PM1             NCS1K4-AC-PSU-2          OPERATIONAL              NSHUT,NMON

The following output highlights the NCS1K-E-OLT-C card type for the OLT controller model.

Fri Jun  9 07:04:19.710 UTC
Node              Type                     State                    Config state
--------------------------------------------------------------------------------
0/RP0/CPU0        NCS1010-CTR2-B-K9(Active) IOS XR RUN               NSHUT,NMON
0/FT0             NCS1010-FAN              OPERATIONAL              NSHUT,NMON
0/FT1             NCS1010-FAN              OPERATIONAL              NSHUT,NMON
0/FT4             NCS1020-FAN              OPERATIONAL              NSHUT,NMON
0/FT5             NCS1020-FAN              OPERATIONAL              NSHUT,NMON
0/FT6             NCS1020-FAN              OPERATIONAL              NSHUT,NMON
0/FT7             NCS1020-FAN              OPERATIONAL              NSHUT,NMON
0/0/NXR0          NCS1K-E-OLT-C            OPERATIONAL              NSHUT,NMON
0/1/NXR0          NCS1010-FLR-P            PRESENT                  NSHUT,NMON
0/2/NXR0          NCS1K14-CCMD-16-C        OPERATIONAL              NSHUT,NMON
0/PM0             NCS1K4-AC-PSU-2          OPERATIONAL              NSHUT,NMON
0/PM1             NCS1K4-AC-PSU-2          OPERATIONAL              NSHUT,NMON

To view the OTS controller status on the NCS1K-OLT-C line card, use the show controller description command.

RP/0/RP0/CPU0:ios#show controller description

The following output highlights the status of the OTS controller interfaces (ots0/0/0/0…ots0/0/0/33) on the OLT cards

Wed Jun 29 16:03:59.914 UTC

Interface                   Status          Description
--------------------------------------------------------------------------------
Osc0/0/0/0                  up
Ots0/0/0/0                  up
Ots0/0/0/1                  up
Ots0/0/0/2                  up
.
.
Output snipped
.
.
Ots0/0/0/30                 up
Ots0/0/0/31                 up
Ots0/0/0/32                 up
Ots0/0/0/33                 up
.
.
Output snipped

To view the parameters of the LINE 0 OTS controller, use the following command:

RP/0/RP0/CPU0:ios#show controllers ots 0/0/0/0

The following output displays the parameters of the LINE 0 OTS controller ots 0/0/0/0.

Tue May 21 18:45:55.382 UTC

 Controller State: Up

 Transport Admin State: In Service

 LED State: Green

         Alarm Status:
         -------------
         Detected Alarms: None


         Alarm Statistics:
         -----------------
         RX-LOS-P = 0
         RX-LOC = 0
         TX-POWER-FAIL-LOW = 0
         INGRESS-AUTO-LASER-SHUT = 0
         INGRESS-AUTO-POW-RED = 0
         INGRESS-AMPLI-GAIN-LOW = 0
         INGRESS-AMPLI-GAIN-HIGH = 0
         EGRESS-AUTO-LASER-SHUT = 0
         EGRESS-AUTO-POW-RED = 0
         EGRESS-AMPLI-GAIN-LOW = 0
         EGRESS-AMPLI-GAIN-HIGH = 0
         HIGH-TX-BR-PWR = 0
         HIGH-RX-BR-PWR = 0
         SPAN-TOO-SHORT-TX = 0
         SPAN-TOO-SHORT-RX = 0

         Parameter Statistics:
         ---------------------
         Total Rx Power(C+L) = -10.00 dBm
         Total Tx Power(C+L) = 20.00 dBm
         Total Rx Power = 20.01 dBm
         Total Tx Power = 20.02 dBm
         Rx Signal Power = 20.00 dBm
         Tx Signal Power = 20.00 dBm
         Tx Voa Attenuation = 15.0 dB
         Ingress Ampli Mode = Gain
         Ingress Ampli Gain = 12.0 dB
         Ingress Ampli Tilt = 0.0 dB
         Ingress Ampli Gain Range = Normal
         Ingress Ampli Safety Control mode = auto
         Ingress Ampli OSRI = OFF
         Ingress Ampli Force Apr = OFF
         Egress Ampli Mode = Gain
         Egress Ampli Gain = 16.0 dB
         Egress Ampli Tilt = 0.0 dB
         Egress Ampli Safety Control mode = auto
         Egress Ampli OSRI = OFF
         Egress Ampli Force APR = OFF
         Egress Ampli BR = ENABLE
         Egress Ampli BR Power = -30.00 dBm
         Egress Ampli BR Ratio = -20.00 dB


         Configured Parameters:
         -------------
         Tx Voa Attenuation = 15.0 dB
         Ingress Ampli Mode = Gain
         Ingress Ampli Gain = 12.0 dB
         Ingress Ampli Power = -1.0 dBm
         Ingress Ampli Tilt = 0.0 dB
         Ingress Ampli Gain Range = Normal
         Ingress Ampli Safety Control mode = auto
         Ingress Ampli OSRI = OFF
         Ingress Ampli Force Apr = OFF
         Egress Ampli Mode = Gain
         Egress Ampli Gain = 16.0 dB
         Egress Ampli Power = 5.0 dBm
         Egress Ampli Tilt = 0.0 dB
         Egress Ampli Safety Control mode = auto
         Egress Ampli OSRI = OFF
         Egress Ampli Force APR = OFF
         Egress Ampli BR = ENABLE
         BR High Threshold = -17.0 dBm 

To view the parameters on OTS port 2 or 3, use the following command:

RP/0/RP0/CPU0:ios#show controllers ots 0/0/0/2

The following output displays the parameters of the OTS port 2 controller ots 0/0/0/2.

Tue May 21 19:01:02.675 UTC

 Controller State: Up

 Transport Admin State: In Service

 LED State: Green

         Alarm Status:
         -------------
         Detected Alarms: None


         Alarm Statistics:
         -----------------
         RX-LOS-P = 0
         RX-LOC = 0
         TX-POWER-FAIL-LOW = 0
         INGRESS-AUTO-LASER-SHUT = 0
         INGRESS-AUTO-POW-RED = 0
         INGRESS-AMPLI-GAIN-LOW = 0
         INGRESS-AMPLI-GAIN-HIGH = 0
         EGRESS-AUTO-LASER-SHUT = 0
         EGRESS-AUTO-POW-RED = 0
         EGRESS-AMPLI-GAIN-LOW = 0
         EGRESS-AMPLI-GAIN-HIGH = 0
         HIGH-TX-BR-PWR = 0
         HIGH-RX-BR-PWR = 0
         SPAN-TOO-SHORT-TX = 0
         SPAN-TOO-SHORT-RX = 0

         Parameter Statistics:
         ---------------------
         Total Rx Power = 10.00 dBm
         Total Tx Power = -10.49 dBm
         Ingress Ampli Mode = Gain
         Ingress Ampli Gain = 16.0 dB
         Ingress Ampli Tilt = 0.0 dB


         Configured Parameters:
         -------------
         Ingress Ampli Gain = 16.0 dB
         Ingress Ampli Tilt = 0.0 dB
RP/0/RP0/CPU0:ios#show controllers ots 0/0/0/1
Wed Mar 23 06:17:57.475 UTC

 Controller State: Down

 Transport Admin State: In Service

 LED State: Red

         Alarm Status:
         -------------
         Detected Alarms:
                 RX-LOS-P
                 TX-POWER-FAIL-LOW

         Alarm Statistics:
         -----------------
         LOW-TX-PWR = 0
         RX-LOS-P = 1
         RX-LOC = 0
         TX-POWER-FAIL-LOW = 1
         INGRESS-AUTO-LASER-SHUT = 0
         INGRESS-AUTO-POW-RED = 0
         INGRESS-AMPLI-GAIN-LOW = 0
         INGRESS-AMPLI-GAIN-HIGH = 0
         EGRESS-AUTO-LASER-SHUT = 0
         EGRESS-AUTO-POW-RED = 0
         EGRESS-AMPLI-GAIN-LOW = 0
         EGRESS-AMPLI-GAIN-HIGH = 0
         HIGH-TX-BR-PWR = 0
         HIGH-RX-BR-PWR = 0
         SPAN-TOO-SHORT-TX = 0
         SPAN-TOO-SHORT-RX = 0

         Parameter Statistics:
         ---------------------


         Configured Parameters:
         -------------
RP/0/RP0/CPU0:OLT-C-14#sh controllers ots 0/0/0/1
Mon Feb 27 20:34:00.257 UTC

Controller State: Up

Transport Admin State: In Service

LED State: Green

Alarm Status:
-------------
Detected Alarms: None


Alarm Statistics:
-----------------
RX-LOS-P = 1
RX-LOC = 0
TX-POWER-FAIL-LOW = 2
INGRESS-AUTO-LASER-SHUT = 0
INGRESS-AUTO-POW-RED = 0
INGRESS-AMPLI-GAIN-LOW = 0
INGRESS-AMPLI-GAIN-HIGH = 0
EGRESS-AUTO-LASER-SHUT = 0
EGRESS-AUTO-POW-RED = 0
EGRESS-AMPLI-GAIN-LOW = 0
EGRESS-AMPLI-GAIN-HIGH = 0
HIGH-TX-BR-PWR = 0
HIGH-RX-BR-PWR = 0
SPAN-TOO-SHORT-TX = 0
SPAN-TOO-SHORT-RX = 0

Parameter Statistics:
---------------------
Total Rx Power = 19.39 dBm
Total Tx Power = 3.99 dBm


Configured Parameters:
-------------

RP/0/RP0/CPU0:OLT-C-14#

To view the parameters on the MPO port, use the following command:

RP/0/RP0/CPU0:ios#show controllers ots 0/0/0/33

The following output displays the paramters for the MPO port ots 0/0/0/33.

Sun Apr 10 14:04:40.513 UTC

 Controller State: Up

 Transport Admin State: In Service

 LED State: Green

         Alarm Status:
         -------------
         Detected Alarms: None


         Alarm Statistics:
         -----------------
         RX-LOS-P = 0
         RX-LOC = 0
         TX-POWER-FAIL-LOW = 0
         INGRESS-AUTO-LASER-SHUT = 0
         INGRESS-AUTO-POW-RED = 0
         INGRESS-AMPLI-GAIN-LOW = 0
         INGRESS-AMPLI-GAIN-HIGH = 0
         EGRESS-AUTO-LASER-SHUT = 0
         EGRESS-AUTO-POW-RED = 0
         EGRESS-AMPLI-GAIN-LOW = 0
         EGRESS-AMPLI-GAIN-HIGH = 0
         HIGH-TX-BR-PWR = 0
         HIGH-RX-BR-PWR = 0
         SPAN-TOO-SHORT-TX = 0
         SPAN-TOO-SHORT-RX = 0

         Parameter Statistics:
         ---------------------
         Total RX Power = -5.00 dBm
         Total TX Power = -10.50 dBm


         Configured Parameters:
         -------------

Configure OTS Controllers

The Optical Transport Section (OTS) controller holds all the optical parameters for the OTS optical interfaces. The optical interface has different capabilities depending on its hardware components such as photodiode, VOA, amplifier, and OCM.

There are multiple parameters for the OTS controllers. You can configure the parameters that are required for the different configuration for an OTS controller on an OLT node by using the following commands in the Ots controller configuration mode:

  • tx-voa-attenuation value

  • egress-ampli-gain value

  • egress-ampli-tilt value

  • egress-ampli-osri {on | off}

  • egress-ampli-safety-control-mode {auto | disabled}

  • egress-ampli-force-apr {on | off}

  • egress-channel-slice channel-slice attn attenuation-value

  • ingress-ampli-gain-range {normal | extended}

  • ingress-ampli-gain value

  • ingress-ampli-tilt value

  • ingress-ampli-osri {on | off}

  • ingress-ampli-safety-control-mode {auto | disabled}

  • ingress-ampli-force-apr {on | off}

  • ingress-channel-slice channel-slice attn attenuation-value

OTS Controller Configuration Parameters

Table 4. OTS Controller Configuration Parameters

Parameter

Description

Hardware Capability

Range

Default

Notes

tx-voa- attenuation

TX VOA attenuation set point

VOA

  • 0–20 dB

0.0

ampli- safety-control-mode

(ingress/egress)

Amplifier control mode

Amplifier

auto and disabled

automatic

ampli-gain-range

(ingress/egress)

Amplifier gain range

Amplifier

normal and extended

normal

If you change the gain range from Normal to Extended or the opposite way, without updating the proper gain value for the new gain range, then the following may happen:

  • The EDFA switches to the preconfigured or default value of the gain causing a mismatch between the operational and configured gain.

  • The gain configuration is lost during the reload of software or line card, as the configured gain mismatches with the latest gain-range. This may result in traffic interruption during these reload operations.

Hence, we recommend that you explicitly configure the gain range mode as normal or extended, and the corresponding gain values for each mode to get the expected results.

The following are a few example scenarios that may not work as expected:

  • Scenario 1:

    Current running config:

    controller Ots R/S/I/P
     egress-ampli-gain-range extended
     egress-ampli-gain <gain value in extended mode>
      

    New applied config:

    controller Ots R/S/I/P
     no egress-ampli-gain-range extended
     commit
  • Scenario 2:

    Current running config:

    controller Ots R/S/I/P
     egress-ampli-gain-range extended
     egress-ampli-gain <gain value in extended mode>
      

    New applied config:

    controller Ots R/S/I/P
     egress-ampli-gain-range Normal
     commit
    
  • Scenario 3:

    Current running config:

    controller Ots R/S/I/P
    egress-ampli-gain <gain value in normal mode>

    New applied config:

    controller Ots R/S/I/P
    egress-ampli-gain-range extended
    commit
    

The following is another example scenario that involves commit-replace command where you replace the existing gain configuration that does not have explicitly configured gain-range, with new gain-range and gain value.

Scenario 4:

Current running config:

controller Ots R/S/I/P
egress-ampli-gain <gain value in normal mode>

New applied config:

…………..
controller Ots R/S/I/P
egress-ampli-gain-range extended
egress-ampli-gain <gain value in extended mode>
commit replace

ampli-gain

(ingress/egress)

Amplifier gain set point

Amplifier

80–380

ingress: 12, egress: 16

The actual range of amplifier gain set point depends on amplifier gain range.

ampli-tilt

(ingress/egress)

Amplifier tilt

Amplifier

–5 to +5

0.0

osri

(ingress/egress)

Optical safety remote interlock

Amplifier

on and off

off

When osri is on, the EDFA is in shut state and vice versa.

ampli-force-apr

(ingress/egress)

Amplifier

on and off

off

When ampli-force-apr is set to on, the EDFA output power is clamped to 8 dBm.

channel-slice channel-slice attn attenuation

(ingress/egress)

Channel slice attenuation set point

1–1548 (channel slice)

OLT: 0–250 (attenuation value in 0.1 dB)

0.0

Channel Slice Attenuation

The attenuation for the channel slices is automatically configured by APC.

To view the channel slice attenuation information, use the following command:

RP/0/RP0/CPU0:ios#show controllers ots 0/0/0/0 channel-slice-attenuation-info

The following sample output shows the channel slice attenuation information:


Sun Mar 27 15:27:27.600 UTC

 Attenuation Slices spacing     :            3.125 GHz
 Attenuation Slices Range       :            1 - 1548
 Slice start wavelength         :            1566.82 nm
 Slice start frequency          :            191337.50 GHz

 Sub Channel Attenuation information :
 Ingress Channel Slice Attenuation :
 ----------------------------------------------------------------------------------
 spectrum-slice num                 Attenuation values (dB)
 ----------------------------------------------------------------------------------
   1 - 12     25.0   25.0   25.0   25.0   25.0   25.0   25.0   25.0   25.0   25.0   25.0   25.0
  13 - 24     25.0   25.0   25.0   25.0   25.0   25.0   25.0   25.0   25.0   25.0   25.0   25.0
  25 - 36     25.0   25.0   25.0   25.0   25.0   25.0   25.0   25.0   25.0   25.0   25.0   25.0
  37 - 48     25.0   25.0   25.0   25.0   25.0   25.0   25.0   25.0   25.0   25.0   25.0   25.0
  49 - 60     25.0   25.0   25.0   25.0   25.0   25.0   25.0   25.0   25.0   25.0   25.0   25.0
  61 - 72     25.0   25.0   25.0   25.0   25.0   25.0   25.0   25.0   25.0   25.0   25.0   25.0
  .
  .
  output snipped
  .
  .
 1501 - 1512   25.0   25.0   25.0   25.0   25.0   25.0   25.0   25.0   25.0   25.0   25.0   25.0
 1513 - 1524   25.0   25.0   25.0   25.0   25.0   25.0   25.0   25.0   25.0   25.0   25.0   25.0
 1525 - 1536   25.0   25.0   25.0   25.0   25.0   25.0   25.0   25.0   25.0   25.0   25.0   25.0
 1537 - 1548   25.0   25.0   25.0   25.0   25.0   25.0   25.0   25.0   25.0   25.0   25.0   25.0
 ----------------------------------------------------------------------------------
 Egress Channel Slice Attenuation :
 ----------------------------------------------------------------------------------
 spectrum-slice num                        Attenuation values (dB)
 ----------------------------------------------------------------------------------
   1 - 12     25.0   25.0   25.0   25.0   25.0   25.0   25.0   25.0   25.0   25.0   25.0   25.0
  13 - 24     25.0   25.0   25.0   25.0   25.0   25.0   25.0   25.0   25.0   25.0   25.0   25.0
  25 - 36     25.0   25.0   25.0   25.0   25.0   25.0   25.0   25.0   25.0   25.0   25.0   25.0
  37 - 48     25.0   25.0   25.0   25.0   25.0   25.0   25.0   25.0   25.0   25.0   25.0   25.0
  49 - 60     25.0   25.0   25.0   25.0   25.0   25.0   25.0   25.0   25.0   25.0   25.0   25.0
  61 - 72     25.0   25.0   25.0   25.0   25.0   25.0   25.0   25.0   25.0   25.0   25.0   25.0
  .
  .
  output snipped
  .
  .
 1501 - 1512   25.0   25.0   25.0   25.0   25.0   25.0   25.0   25.0   25.0   25.0   25.0   25.0
 1513 - 1524   25.0   25.0   25.0   25.0   25.0   25.0   25.0   25.0   25.0   25.0   25.0   25.0
 1525 - 1536   25.0   25.0   25.0   25.0   25.0   25.0   25.0   25.0   25.0   25.0   25.0   25.0
 1537 - 1548   25.0   25.0   25.0   25.0   25.0   25.0   25.0   25.0   25.0   25.0   25.0   25.0

To modify the attenuation values manually, APC must be disabled first using the following commands:

RP/0/RP0/CPU0:ios#config
RP/0/RP0/CPU0:ios(config)#optical-line-control controller ots 0/0/0/0 apc disable
RP/0/RP0/CPU0:ios(config)#commit

For more information on APC commands, see the section, "Configure APC".

To modify the attenuation value for an egress channel slice, use the following commands:


Note


The OTS controller commands do not support decimal inputs. The OTS controller commands consider the inputs to one decimal place for the parameter values. In the following example, the attn value for the egress-channel-slice 10 is provided as 100 to configure the attn value for the egress-channel-slice 10 to 10.0 dB.


RP/0/RP0/CPU0:ios(config)#controller ots 0/0/0/0 egress-channel-slice 10 attn 100
RP/0/RP0/CPU0:ios(config)#commit
Sun Apr 10 14:47:37.849 UTC
RP/0/RP0/CPU0:ios(config)#end

To view the modified attenuation value for egress channel slice 10, use the following command:

RP/0/RP0/CPU0:ios#show controllers ots 0/0/0/0 channel-slice-attenuation-info

The following output highlights the modified attenuation value for egress channel slice 10 that is set to 10.0 dB.

Sun Apr 10 14:47:47.050 UTC

 Attenuation Slices spacing     :            3.125 GHz
 Attenuation Slices Range       :            1 - 1548
 Slice start wavelength         :            1566.82 nm
 Slice start frequency          :            191337.50 GHz

 Sub Channel Attenuation information :
 Ingress Channel Slice Attenuation :
 ----------------------------------------------------------------------------------
 spectrum-slice num                 Attenuation values (dB)
 ----------------------------------------------------------------------------------
   1 - 12     25.0   25.0   25.0   25.0   25.0   25.0   25.0   25.0   25.0   25.0   25.0   25.0
  13 - 24     25.0   25.0   25.0   25.0   25.0   25.0   25.0   25.0   25.0   25.0   25.0   25.0
  25 - 36     25.0   25.0   25.0   25.0   25.0   25.0   25.0   25.0   25.0   25.0   25.0   25.0
  37 - 48     25.0   25.0   25.0   25.0   25.0   25.0   25.0   25.0   25.0   25.0   25.0   25.0
  49 - 60     25.0   25.0   25.0   25.0   25.0   25.0   25.0   25.0   25.0   25.0   25.0   25.0
  61 - 72     25.0   25.0   25.0   25.0   25.0   25.0   25.0   25.0   25.0   25.0   25.0   25.0
  .
  .
  output snipped
  .
  . 
 1501 - 1512   25.0   25.0   25.0   25.0   25.0   25.0   25.0   25.0   25.0   25.0   25.0   25.0
 1513 - 1524   25.0   25.0   25.0   25.0   25.0   25.0   25.0   25.0   25.0   25.0   25.0   25.0
 1525 - 1536   25.0   25.0   25.0   25.0   25.0   25.0   25.0   25.0   25.0   25.0   25.0   25.0
 1537 - 1548   25.0   25.0   25.0   25.0   25.0   25.0   25.0   25.0   25.0   25.0   25.0   25.0
 ----------------------------------------------------------------------------------
 Egress Channel Slice Attenuation :
 ----------------------------------------------------------------------------------
 spectrum-slice num                        Attenuation values (dB)
 ----------------------------------------------------------------------------------
   1 - 12     25.0   25.0   25.0   25.0   25.0   25.0   25.0   25.0   25.0   10.0   25.0   25.0
  13 - 24     25.0   25.0   25.0   25.0   25.0   25.0   25.0   25.0   25.0   25.0   25.0   25.0
  25 - 36     25.0   25.0   25.0   25.0   25.0   25.0   25.0   25.0   25.0   25.0   25.0   25.0
  37 - 48     25.0   25.0   25.0   25.0   25.0   25.0   25.0   25.0   25.0   25.0   25.0   25.0
  49 - 60     25.0   25.0   25.0   25.0   25.0   25.0   25.0   25.0   25.0   25.0   25.0   25.0
  61 - 72     25.0   25.0   25.0   25.0   25.0   25.0   25.0   25.0   25.0   25.0   25.0   25.0
  .
  .
  output snipped
  .
  . 
 1501 - 1512   25.0   25.0   25.0   25.0   25.0   25.0   25.0   25.0   25.0   25.0   25.0   25.0
 1513 - 1524   25.0   25.0   25.0   25.0   25.0   25.0   25.0   25.0   25.0   25.0   25.0   25.0
 1525 - 1536   25.0   25.0   25.0   25.0   25.0   25.0   25.0   25.0   25.0   25.0   25.0   25.0
 1537 - 1548   25.0   25.0   25.0   25.0   25.0   25.0   25.0   25.0   25.0   25.0   25.0   25.0
RP/0/RP0/CPU0:ios#

Examples

In the following example, the tx-voa-attenuation is set to 10 dB.

RP/0/RP0/CPU0:ios#config
RP/0/RP0/CPU0:ios(config)#controller ots 0/0/0/0
RP/0/RP0/CPU0:ios(config-Ots)#tx-voa-attenuation 100
RP/0/RP0/CPU0:ios(config-Ots)#commit

In the following example, the egress-ampli-gain is set to 20 dB.

RP/0/RP0/CPU0:ios#config
RP/0/RP0/CPU0:ios(config)#controller ots 0/0/0/0
RP/0/RP0/CPU0:ios(config-Ots)#egress-ampli-gain 200
RP/0/RP0/CPU0:ios(config-Ots)#commit

In the following example, the egress-ampli-tilt is set to 2.5 dB.

RP/0/RP0/CPU0:ios#config
RP/0/RP0/CPU0:ios(config)#controller ots 0/0/0/0
RP/0/RP0/CPU0:ios(config-Ots)#egress-ampli-tilt 25
RP/0/RP0/CPU0:ios(config-Ots)#commit

In the following examples, the egress-ampli-gain-range is set to extended and Normal.

RP/0/RP0/CPU0:ios#config
RP/0/RP0/CPU0:ios(config)#controller ots 0/0/0/0
RP/0/RP0/CPU0:ios(config-Ots)#egress-ampli-gain-range extended
RP/0/RP0/CPU0:ios(config-Ots)#egress-ampli-gain 360
RP/0/RP0/CPU0:ios(config-Ots)#commit
RP/0/RP0/CPU0:ios#config
RP/0/RP0/CPU0:ios(config)#controller ots 0/0/0/0
RP/0/RP0/CPU0:ios(config-Ots)#egress-ampli-gain-range normal
RP/0/RP0/CPU0:ios(config-Ots)#egress-ampli-gain 150
RP/0/RP0/CPU0:ios(config-Ots)#commit

In the following example, the egress-ampli-safety-control-mode is set to auto.

RP/0/RP0/CPU0:ios#config
RP/0/RP0/CPU0:ios(config)#controller ots 0/0/0/0
RP/0/RP0/CPU0:ios(config-Ots)#egress-ampli-safety-control-mode auto
RP/0/RP0/CPU0:ios(config-Ots)#commit

In the following example, the egress-ampli-osri is set to on.

RP/0/RP0/CPU0:ios#config
RP/0/RP0/CPU0:ios(config)#controller ots 0/0/0/0
RP/0/RP0/CPU0:ios(config-Ots)#egress-ampli-osri on
RP/0/RP0/CPU0:ios(config-Ots)#commit

In the following example, the egress-ampli-force-apr is set to on.

RP/0/RP0/CPU0:ios#config
RP/0/RP0/CPU0:ios(config)#controller ots 0/0/0/0
RP/0/RP0/CPU0:ios(config-Ots)#egress-ampli-force-apr on
RP/0/RP0/CPU0:ios(config-Ots)#commit

In the following example, the egress-channel-slice attenuation is set to 20 dB.

RP/0/RP0/CPU0:ios#config
RP/0/RP0/CPU0:ios(config)#controller ots 0/0/0/0
RP/0/RP0/CPU0:ios(config-Ots)#egress-channel-slice 1 attn 200
RP/0/RP0/CPU0:ios(config-Ots)#commit

In the following example, to establish connection using the existing GRPC framework.

RP/0/RP0/CPU0:ios#config
RP/0/RP0/CPU0:ios(config)#optical-line-control
RP/0/RP0/CPU0:ios(config)#controller ots 0/0/0/0
RP/0/RP0/CPU0:ios(config-Ots)#partner-band-port ipv4 address 10.10.1.2
RP/0/RP0/CPU0:ios(config-Ots)#controller Ots0/0/0/0
RP/0/RP0/CPU0:ios(config-Ots)#commit

OTS-OCH Controllers

The OTS-OCH controllers are not created by default when the cards are brought up. The LINE OTS-OCH controllers can be created using the hw-module command.

Optical Cross Connections

Optical Cross Connections can be configured only on OLT nodes. In these nodes, the OTS-OCH controller is not created automatically on the Add/Drop ports (COM side). The optical cross connect configuration defines the line side OTS-OCH channel as the source and creates an OTS-OCH controller on the Add/Drop port to which the cross connection is made. The channel ID must be the same for both the LINE side and COM side OTS-OCH controllers.

Flex Grid Validation

The following validations are performed before the hw-module configurations are committed:

  • The channel ID is any value 1–194.

  • The center frequency must be within the C-band spectrum , for the OLT-C cards. The frequency range is 191.3375-196.1750 THz.

  • The supported channel width range is 25.000GHz to 4837.500 GHz. Overlap of channels is permitted as Nyquist channels are supported. See ASE Loading.

  • You can set the channel centre frequency and width with 1MHz resolution.

Create OTS-OCH Controllers

To create the OTS-OCH controller on the LINE side of the OLT-C node, use the following commands in the configuration mode:

  • hw-module location location terminal-ampli grid-mode mode

  • channel-id channel-id centre-freq frequency width channel-width

To configure the optical cross-connect, use the following command in the configuration mode:

controller ots-och Rack/Slot/Instance/Port/Channel-id-number add-drop-channel ots-och Rack/Slot/Instance/Port/Channel-id-number

To create the OTS-OCH controller on the LINE side of an OLT-C node, use the following commands:

RP/0/RP0/CPU0:ios#config
RP/0/RP0/CPU0:ios(config)#hw-module location 0/0/nxr0 terminal-ampli grid-mode flex
RP/0/RP0/CPU0:ios(config-hwmod-olt-flexi)#channel-id 1 centre-freq 196.1 width 75
RP/0/RP0/CPU0:ios(config-hwmod-olt-flexi)#commit

To view the OTS-OCH controller that is created on the LINE side, use the following command:

RP/0/RP0/CPU0:ios#show controllers ots-och ?

The following output highlights the OTS-OCH controller that is created on the LINE side.

  0/0/0/0/1             Ots-Och Interface Instance
  R/S/I/P/B or R/S/I/P  Forward interface in Rack/Slot/Instance/Port/Breakout format or R/S/I/P format

To configure the optical cross-connect, use the following commands:

RP/0/RP0/CPU0:ios#configure
Mon Apr  4 14:54:32.834 UTC
RP/0/RP0/CPU0:ios(config)#controller ots-och 0/0/0/0/1 add-drop-channel ots-och 0/0/0/33/1
RP/0/RP0/CPU0:ios(config)#commit

The OTS-OCH controller is created on the Add/Drop port to which the cross-connection is made on the COM side. To view the OTS-OCH controller, use the following command:

RP/0/RP0/CPU0:ios#show controller ots-och ?

The following output highlights the OTS-OCH controller that is created on the Add/Drop port to which the cross-connection is made on the COM side.

  0/0/0/0/1             Ots-Och Interface Instance
  0/0/0/33/1            Ots-Och Interface Instance
  R/S/I/P/B or R/S/I/P  Forward interface in Rack/Slot/Instance/Port/Breakout format or R/S/I/P format

To view the OTS-OCH controllers, use the following command:

RP/0/RP0/CPU0:ios#show controllers ots-och ?

The following output displays the OTS-OCH controller interfaces:

  0/0/0/0/1             Ots-Och Interface Instance
  0/0/0/0/10            Ots-Och Interface Instance
  .
  .
  output snipped
  .
  .
  0/0/0/0/29            Ots-Och Interface Instance
  0/0/0/0/3             Ots-Och Interface Instance
  0/0/0/0/49            Ots-Och Interface Instance
  0/0/0/0/5             Ots-Och Interface Instance
  .
  .
  output snipped
  .
  .
  0/0/0/0/64            Ots-Och Interface Instance
  0/0/0/0/7             Ots-Och Interface Instance
  0/0/0/0/8             Ots-Och Interface Instance
  0/0/0/0/9             Ots-Och Interface Instance
  R/S/I/P/B or R/S/I/P  Forward interface in Rack/Slot/Instance/Port/Breakout format or R/S/I/P format
  

To view the flex grid information on the OLT node, use the following command:

RP/0/RP0/CPU0:ios#show hw-module location 0/0/NXR0 terminal-ampli

The following output displays the flex grid information on the OLT node.

Tue May 21 19:39:43.303 UTC

Legend:
NXC      - Channel not cross-connected
ACTIVE - Channel cross-connected to data port
ASE        - Channel filled with ASE
FAILED - Data channel failed, pending transition to ASE

Location:             0/0/NXR0

Status:               Provisioned

Flex Grid Info

Channel Number      Centre Frequency(THz)       Channel Width(GHz)    Channel Status    Overlapping Channels
1                   191.375000                  75.000                NXC                 - ,   -
2                   191.450000                  75.000                NXC                 - ,   -
3                   191.525000                  75.000                NXC                 - ,   -
4                   191.600000                  75.000                NXC                 - ,   -
5                   191.675000                  75.000                NXC                 - ,   -
6                   191.750000                  75.000                NXC                 - ,   -
7                   191.825000                  75.000                NXC                 - ,   -
8                   191.900000                  75.000                NXC                 - ,   -
9                   191.975000                  75.000                NXC                 - ,   -
10                  192.050000                  75.000                NXC                 - ,   -
11                  192.125000                  75.000                NXC                 - ,   -
12                  192.200000                  75.000                NXC                 - ,   -
13                  192.275000                  75.000                NXC                 - ,   -
14                  192.350000                  75.000                NXC                 - ,   -
15                  192.425000                  75.000                NXC                 - ,   -
16                  192.500000                  75.000                NXC                 - ,   -
17                  192.575000                  75.000                NXC                 - ,   -
18                  192.650000                  75.000                NXC                 - ,   -
19                  192.725000                  75.000                NXC                 - ,   -
20                  192.800000                  75.000                NXC                 - ,   -
21                  192.875000                  75.000                NXC                 - ,   -
22                  192.950000                  75.000                NXC                 - ,   -
23                  193.025000                  75.000                NXC                 - ,   -
24                  193.100000                  75.000                NXC                 - ,   -
25                  193.175000                  75.000                NXC                 - ,   -
26                  193.250000                  75.000                NXC                 - ,   -
27                  193.325000                  75.000                NXC                 - ,   -
28                  193.400000                  75.000                NXC                 - ,   -
29                  193.475000                  75.000                NXC                 - ,   -
30                  193.550000                  75.000                NXC                 - ,   -
31                  193.625000                  75.000                NXC                 - ,   -
32                  193.700000                  75.000                NXC                 - ,   -
33                  193.775000                  75.000                NXC                 - ,   -
34                  193.850000                  75.000                NXC                 - ,   -
35                  193.925000                  75.000                NXC                 - ,   -
36                  194.000000                  75.000                NXC                 - ,   -
37                  194.075000                  75.000                NXC                 - ,   -
38                  194.150000                  75.000                NXC                 - ,   -
39                  194.225000                  75.000                NXC                 - ,   -
40                  194.300000                  75.000                NXC                 - ,   -
41                  194.375000                  75.000                NXC                 - ,   -
42                  194.450000                  75.000                NXC                 - ,   -
43                  194.525000                  75.000                NXC                 - ,   -
44                  194.600000                  75.000                NXC                 - ,   -
45                  194.675000                  75.000                NXC                 - ,   -
46                  194.750000                  75.000                NXC                 - ,   -
47                  194.825000                  75.000                NXC                 - ,   -
48                  194.900000                  75.000                NXC                 - ,   -
49                  194.975000                  75.000                NXC                 - ,   -
50                  195.050000                  75.000                NXC                 - ,   -
51                  195.125000                  75.000                NXC                 - ,   -
52                  195.200000                  75.000                NXC                 - ,   -
53                  195.275000                  75.000                NXC                 - ,   -
54                  195.350000                  75.000                NXC                 - ,   -
55                  195.425000                  75.000                NXC                 - ,   -
56                  195.500000                  75.000                NXC                 - ,   -
57                  195.575000                  75.000                NXC                 - ,   -
58                  195.650000                  75.000                NXC                 - ,   -
59                  195.725000                  75.000                NXC                 - ,   -
60                  195.800000                  75.000                NXC                 - ,   -
61                  195.875000                  75.000                NXC                 - ,   -
62                  195.950000                  75.000                NXC                 - ,   -
63                  196.025000                  75.000                NXC                 - ,   -
64                  196.100000                  75.000                NXC                 - ,   -

Note


The legend provides information about the channel's status. By default, the channels are brought up with NXC channel status.

The channel's status is preserved after HA events.


To view the parameters of the OTS-OCH controller (LINE side), use the following command:

RP/0/RP0/CPU0:ios#show controllers ots-och 0/0/0/0/1

The following output displays the parameters of the OTS-OCH controller on the LINE side.

Tue Apr  5 06:32:29.696 UTC

 Controller State: Up

 Transport Admin State: In Service

         Alarm Status:
         -------------
         Detected Alarms: None


         Alarm Statistics:
         -----------------
         RX-LOS-P = 0
         TX-POWER-FAIL-LOW = 0

         Parameter Statistics:
         ---------------------
         Total RX Power = -10.50 dBm
         Total TX Power = -10.50 dBm


         Cross Connect Info:
         ---------------------
         Add-Drop Channel  = Ots-Och0/0/0/33/1


         Configured Parameters:
         -------------

Note


The Add/Drop channel that is cross-connected to the line port, 0/0/0/0/1 is displayed in the output.


To view the parameters of the OTS-OCH controller, use the following command:

RP/0/RP0/CPU0:ios#show controllers ots-och 0/0/0/0/1

OSC Controllers

The Optical Service Channel (OSC) controller is used to represent the optical capabilities, configuration, and monitoring of the OSC laser. The corresponding Gigabit Ethernet interface is the child interface that represents Ethernet capabilities, configuration, and monitoring.

OSC provides a communication channel for traffic coming from a UDC port. OSC serves as a channel probe to check fiber continuity between two nodes. OSC provides remote node management functionality. OSC is generated and terminated on each line side. OSC-C operates at a frequency of 198.50 THz and OSC-L operates at a frequency of 184.450 THz.

Nodes with NCS1K-OLT-C cards have one OSC controller. To view the status of the OSC controller, use the following command:

RP/0/RP0/CPU0:ios#show controller description

The following output highlights the status of the OSC controller for the NCS1K-OLT-C cards.

Tue Apr 12 17:17:51.306 UTC

Interface                   Status          Description
--------------------------------------------------------------------------------
Osc0/0/0/0                  up
Ots0/0/0/0                  up
Ots0/0/0/1                  up
Ots0/0/0/2                  up
 .
 .
 output snipped
 .
 .
Ots0/0/0/31                 up
Ots0/0/0/32                 up
Ots0/0/0/33                 up

To view the parameters of the LINE 0 OSC controller, use the following command:

RP/0/RP0/CPU0:ios#show controllers osc 0/0/0/0

The following output shows the parameters of the LINE 0 OSC controller.

Wed Mar 23 06:04:18.565 UTC

 Controller State: Down

 Transport Admin State: In Service

 Laser State: Off

         Alarm Status:
         -------------
         Detected Alarms:
                 RX-LOS-P

         Alarm Statistics:
         -----------------
         RX-LOS-P = 369
         TX-POWER-FAIL-LOW = 0

         Parameter Statistics:
         ---------------------
         Total TX Power = -50.00 dBm
         Total RX Power = -50.00 dBm


         Configured Parameters:
         -------------

Configure OSC Controllers

There are multiple parameters for the OSC controllers. You can configure the parameters that are required for the different configuration for an OSC controller on an OLT node by using the following commands in the configuration mode:

  • transmit-power value

  • sec-admin-state {normal | maintenance}

  • tx-low-threshold

  • shutdown

Examples

In the following example, the transmit-power is set to 2 dBm. The OSC Tx power can be changed by configuring the OSC transmit power attribute. This attribute internally regulates the OSC Tx VOA.


Note


The OSC controller commands do not support decimal inputs. The OSC controller commands consider the inputs to one decimal place for the parameter values. In this example, the transmit-power parameter is provided as 20 to configure the transmit-power parameter to 2 dBm.


RP/0/RP0/CPU0:ios(config)#controller osc 0/0/0/0 transmit-power 20
Fri May 13 11:26:53.445 UTC
WARNING! Changing TX power can impact traffic
RP/0/RP0/CPU0:ios(config)#commit
Fri May 13 11:26:55.127 UTC
RP/0/RP0/CPU0:ios(config)#end

To view the parameters of the OSC controller, use the following command:

RP/0/RP0/CPU0:ios#show controllers osc 0/0/0/0

The following output shows the parameters of the OSC controller.

Fri May 13 11:26:59.542 UTC

Controller State: Up

Transport Admin State: In Service

Laser State: On

Alarm Status:
-------------
Detected Alarms: None


Alarm Statistics:
-----------------
RX-LOS-P = 0
TX-POWER-FAIL-LOW = 0

Parameter Statistics:
---------------------
Total TX Power = 1.89 dBm
Total RX Power = -17.30 dBm


Configured Parameters:
-------------

In the following example, the sec-admin-state is set to maintenance.

RP/0/RP0/CPU0:ios#config
RP/0/RP0/CPU0:ios(config)#controller osc 0/0/0/0 sec-admin-state maintenance
RP/0/RP0/CPU0:ios(config)#commit
RP/0/RP0/CPU0:ios(config)#end

To view the parameters of the OSC controller, use the following command:

RP/0/RP0/CPU0:ios#show controllers osc 0/0/0/0

The following output highlights the Transport Admin State of the OSC controller that is set to Maintenance.

Fri Apr 22 15:55:36.324 UTC

 Controller State: Up

 Transport Admin State: Maintenance

 Laser State: On

         Alarm Status:
         -------------
         Detected Alarms: None


         Alarm Statistics:
         -----------------
         RX-LOS-P = 0
         TX-POWER-FAIL-LOW = 0

         Parameter Statistics:
         ---------------------
         Total TX Power = -10.00 dBm
         Total RX Power = -30.00 dBm


         Configured Parameters:
         -------------

In the following example, the OSC controller is shut down.

P/0/RP0/CPU0:ios#config
RP/0/RP0/CPU0:ios(config)#controller osc 0/0/0/0 shutdown
RP/0/RP0/CPU0:ios(config)#commit
RP/0/RP0/CPU0:ios(config)#end

To view the parameters of the OSC controller that is shut down, use the following command:

RP/0/RP0/CPU0:ios#show controllers osc 0/0/0/0

The following output highlights the Controller State, Transport Admin State, and Laser State of the OSC controller that is shut down.

Tue Apr 12 17:33:12.998 UTC

 Controller State: Administratively Down

 Transport Admin State: Out Of Service

 Laser State: Off

         Alarm Status:
         -------------
         Detected Alarms: None


         Alarm Statistics:
         -----------------
         RX-LOS-P = 0
         TX-POWER-FAIL-LOW = 0

         Parameter Statistics:
         ---------------------
         Total TX Power = -50.00 dBm 
         Total RX Power = -30.00 dBm


         Configured Parameters:
         -------------

Gigabit Ethernet Interfaces

A Gigabit Ethernet interface represents the packet layer of an OSC channel.

To view the parameters of a Gigabit Ethernet interface, use the following command:

RP/0/RP0/CPU0:ios#show interfaces gigabitEthernet 0/0/0/0

The following output shows the parameters of a Gigabit Ethernet interface.

Tue Apr 19 10:57:18.251 UTC
GigabitEthernet0/0/0/0 is up, line protocol is up
  Interface state transitions: 1
  Hardware is GigabitEthernet, address is 38fd.f866.096c (bia 38fd.f866.096c)  - IP of the OSC controller
  Internet address is 10.7.1.1/24
  MTU 1514 bytes, BW 1000000 Kbit (Max: 1000000 Kbit)
     reliability 255/255, txload 0/255, rxload 0/255
  Encapsulation ARPA,
  Full-duplex, 1000Mb/s, unknown, link type is force-up
  output flow control is off, input flow control is off
  loopback not set,
  Last link flapped 01:14:28
  ARP type ARPA, ARP timeout 04:00:00
  Last input Unknown, output Unknown
  Last clearing of "show interface" counters Unknown
  5 minute input rate 0 bits/sec, 0 packets/sec
  5 minute output rate 0 bits/sec, 0 packets/sec


To view the IPv4 address of a Gigabit Ethernet interface, use the following command:

RP/0/RP0/CPU0:ios#show ipv4 interface brief

The following output highlights the interface, IPv4 address (IP-Address), status, operational status of the routing protocol (Protocol), VPN routing and forwarding (VRF) instance name (Vrf-Name) of the Gigabit Ethernet interface.

Tue Apr 19 10:58:02.951 UTC

Interface                      IP-Address      Status          Protocol Vrf-Name
Loopback0                      10.3.3.11       Up              Up       default
Loopback3                      10.1.1.1        Up              Up       default
GigabitEthernet0/0/0/0         10.7.1.1        Up              Up       default
MgmtEth0/RP0/CPU0/0            10.33.0.61      Up              Up       default
PTP0/RP0/CPU0/0                unassigned      Shutdown        Down     default
MgmtEth0/RP0/CPU0/1            unassigned      Shutdown        Down     default
PTP0/RP0/CPU0/1                unassigned      Shutdown        Down     default
MgmtEth0/RP0/CPU0/2            unassigned      Shutdown        Down     default

The Gigabit Ethernet interface must be in Up state for the OSC laser to turn up. When the node comes up, the Gigabit Ethernet interface turns to Down state. Run the following commands on the Gigabit Ethernet interface to bring it up.

RP/0/RP0/CPU0:ios#config
RP/0/RP0/CPU0:ios(config)#no interface gigabitEthernet 0/0/0/0 shutdown
RP/0/RP0/CPU0:ios(config)#commit

The UDC ports on the OLT nodes carry 100 Mbps traffic. To see the port parameters, use the following command:

RP/0/RP0/CPU0:ios#show controllers switch summary

The following output highlights the UDC0 and UDC1 ports values including their 100 Mbps traffic speed.

Mon May  9 07:30:03.726 UTC

Rack  Card  Switch   Rack Serial Number
-------------------------------------------
  0   RP0   RP-SW    FCB2546B08L

         Phys      Admin      Port          Protocol    Forward
Port     State     State      Speed         State       State       Connects To
-------------------------------------------------------------------------------
0          Up       Up     10-Gbps            -      Forwarding     CPU0
1          Up       Up     10-Gbps            -      Forwarding     CPU1
2        Down     Down      1-Gbps            -      Forwarding     DEWEY
3        Down     Down     Unknown            -      Forwarding     UnUsed
4          Up       Up      1-Gbps            -      Forwarding     MGMT0
5        Down       Up      1-Gbps            -      Forwarding     MGMT1
6        Down       Up      1-Gbps            -      Forwarding     MGMT2
7        Down     Down      1-Gbps            -      Forwarding     UnUsed
8        Down       Up      1-Gbps            -      Forwarding     PTP0
9        Down       Up      1-Gbps            -      Forwarding     PTP1
10         Up       Up    100-Mbps            -      Forwarding     UDC0
11         Up       Up    100-Mbps            -      Forwarding     UDC1
12         Up       Up    100-Mbps            -      Forwarding     OSC0
13         Up       Up    100-Mbps            -      Forwarding     OSC1
14       Down     Down     10-Mbps            -      Forwarding     UnUsed
15       Down     Down     Unknown            -      Forwarding     UnUsed

The Tx and Rx drops counters do not increment on the node when the fiber is removed from the UDC0 or UDC1 port of the neighboring node. To view the statistics, use the following command:

RP/0/RP0/CPU0:ios#show controllers switch statistics 

The following output highlights the Tx and Rx drops counters on the node when the fiber is removed from the UDC0 and UDC1 ports.

Mon May  9 07:30:10.164 UTC

Rack  Card  Switch   Rack Serial Number
-----------------------------------------
  0   RP0   RP-SW    FCB2546B08L

                                                                 Tx             Rx    
          Phys      State          Tx             Rx             Drops/         Drops/
Port      State     Changes        Packets        Packets        Errors         Errors  Connects To
0       Up            1        8250025        3171592             0              0        CPU0
1       Up            1        6380049       10790031             0              0        CPU1
2     Down            0              0              0             0              0        DEWEY
3     Down            0              0              0             0              0        UnUsed
4       Up            2        3171749        8319773            49              0        MGMT0
5     Down            0              0              0             0              0        MGMT1
6     Down            0              0              0             0              0        MGMT2
7     Down            0              0              0             0              0        UnUsed
8     Down            2              0              0             0              0        PTP0
9     Down            2              0              0             0              0        PTP1
10      Up            0              0              0             0              0        UDC0
11      Up            0      497065830     3937555205             0              0        UDC1
12      Up            0              0              0             0              0        OSC0
13      Up            0      508219613      503446049    3440127611           1218        OSC1
14    Down            0              0              0             0              0        UnUsed
15    Down            0              0              0             0              0        UnUsed

Headless Mode

The headless mode of operation allows Cisco NCS 1020 to operate errorless during software upgrades and when the controller card is either physically absent or in a failed state. For example, NCS 1020 operates in headless mode for up to 72 hours, during process restarts, controller reload, line card warm reload, line card FPD upgrade, or removal of the controller (Online Insertion and Removal (OIR)). During this time, traffic is not impacted, although the control plane is not up and running. However, you cannot provision anything nor view operational data with a nonfunctional controller. Performance monitoring data based on 15 minutes and 24-hour intervals are not supported with a nonfunctional controller.

OIR is done during the upgrade or replacement of controller cards. When you initiate an OIR, you cannot reach the NCS 1020 through any medium. When the OIR completes, the NCS 1020 becomes reachable.

You can initiate OIR on the controller unit for the following scenarios:

  • FPD upgrade failure

  • Software image update failure

  • Bootup failure

ASE Loading

The OLT card includes a Noise Loader (NL) EDFA, which acts as an Amplified Spontaneous Emission (ASE) or noise source. The NL connected to the 2x33 ports Wavelength Selective Switch (WSS) loads optical noise. The optical noise fills the Line-TX optical spectrum, when the provisioned optical channels are not available on the ADD- 1 RX, ADD- 2 RX, or COM (OTS0/0/0/2 - OTS0/0/0/33) ports. For more details about the ports, see OLT Functional Layout.

The CHANNEL-NOISE-LOADED alarm is raised when an OTS-OCH controller channel fails and the missing carrier power in the channel is replaced with internally generated ASE noise. The alarm is cleared automatically when the original traffic channel is restored and the temporary ASE noise is removed. For more details about the alarm, see CHANNEL-NOISE-LOADED.

Benefits of ASE Loading:

  • Completely populates the transmission spectrum at LINE-TX independent of the actual system traffic load, thereby easing the system regulation starting from the Day-1 of the installation.

  • The same channel load is maintained during channel failures or channel deletion, which makes the system tolerant to power transients.

  • System performances can be verified efficiently because the ASE pattern emulates the full spectrum load also for the nonlinear interaction in the fibers, such as Four Wave Mixing (FWM), Cross Phase Modulations (XPM), and Stimulated Raman Scattering (SRS). Also, gradual fiber degradation that affects utilization of full-fiber capacity can be tracked.

  • Keeps the system running the full-channel configuration, which makes the system be intrinsically stable and provide optimal performance.

Nyquist Channels

Nyquist Channels

Nyquist channels are supported on OLT-C cards. The Nyquist channels can overlap on each other.

The following image depicts a sample of four normal channels and four Nyquist (overlapping) channels:

Figure 3. Normal Channels and Nyquist Channels

While creating the overlapping channels, consider the following conditions.

  • If two channels share at least one slice, then it is considered as overlap.

  • For the Nyquist overlapped channels, the channels must be cross connected to the same A/D port of the OLT card. If tried to cross-connect to a different port, the NCS 1020 software rejects the configuration with an error message​.

  • The center frequency of a channel must be outside the spectral range of any other channel​.

  • The Nyquist channels must have a minimum width of 25GHz of nonoverlapping region.

How ASE Operates

The following is the list of operations that are performed as part of the ASE loading:

  1. The NL emits a total power of 16 dBm, and generates a power-spectral density (PSD) that is approximately equal to –10 dBm/12.5 GHz at the WSS input port. The OCM7 port monitors profile of the generated ASE channel. A Variable Optical Attenuator (VOA) available between the NL and the WSS input port regulates the ASE channel level properly.

  2. The controller sets a predefined value for the VOA so that the ASE channels that are obtained at the COM TX-1 port are equalized to the actual traffic channels to fill out the spectrum at the input of the fixed gain amplifier.

  3. When the controller detects a missing channel, for example any failure on the ADD/ EXP ports, it sends an updated attenuation value to the OLT. The OLT applies this value as a new attenuation setpoint and executes the transition from ADDs/EXPs path to ASE in the impacted wavelengths, thus ensuring fast recovery of the initial total optical power on the LINE-TX port.

  4. When the optical power is restored, the controller sends a restoration command to the OLT. The OLT executes the transition from ASE to ADDs/EXPs in the impacted wavelengths ensuring minimal total optical power disturbance on the LINE-TX port, thus allowing a smooth fade-out of the ASE.

How ASE Is Managed

The default target ASE Load Spectral Density (AL_SD) is set to 81% for the OLT-C card. This default AL_SD is defined based on the frequency grid at 75 GHz with the first channel centered at 191.375 THz. The spectrum is allocated through logical bins with 3.125-GHz width such that each physical slice is associated to two bins. Based on the above, the first ASE channel for the OLT-C card has:

  • Bins 1 and 2 blocked (frequency range 191.33750 – 191.34375 THz)

  • Bins 3–22 opened (frequency range 191.34375 to 191.40625 THz)

  • Bins 23 and 24 blocked (frequency range 191.40625 – 191.4125 THz)

All the other ASE channels are defined similarly by shifting all the settings by 75 GHz (24 bins).


Note


The ASE channels on the bins 1537–1548 and 1-12 are retained as blocked for Automatic VOA Shutdown (AVS). In this AVS mode, the VOA is set at maximum attenuation value, when the channel is not provisioned to ensure the system reliability in case power is accidentally inserted.


Static ASE—At the system startup, without any channel provisioned, the complete ASE Load pattern is forwarded to the OLT LINE-TX port.

Figure 4. Static ASE

Dynamic ASE—When a traffic channel fails (for example, the PSD within the set of slices that are dedicated to the traffic channel is below a given threshold) an equivalent temporary ASE channel is inserted to maintain the spectral density on the line port. This dynamic ASE channel fills the original traffic channel with only a single slice guard band, at the beginning and the end. When the original traffic channel is restored, the temporary ASE channel is removed, and the original routing on the WSS is reestablished.

Dynamic ASE—With the Nyquist channels, dynamic ASE has the following behavior changes:

  • A minimum guard band of 6.25GHz is maintained between the active channel and the dynamic ASE, so the guard band of dynamic ASE will be 6.25 GHz + unused portion of the next user channel.

  • When there are two channels, and if channel 1 has failed and channel 2 overlaps channel 1, the dynamic ASE is filled in the slices other than the overlapping slices while leaving at least one slice as guard band.

  • If both channel 1 and channel 2 are overlapping and both have failed, dynamic ASE fills both the channels without leaving any guardband.

  • Static ASE and Dynamic ASE cannot overlap.

Figure 5. Dynamic ASE with Nyquist Channels

Optical Channel Monitoring

The Optical Channel Monitor (OCM) blocks in the OLT cards provide per-channel optical power monitoring.

The OLT-C card has a single OCM device with 37 OCM measuring points (OCM1 - OCM37). You can read the OCM data for the all the OCM blocks through the IOS-XR commands, except OCM1, OCM4, and OCM7.

The measuring points in the OLT-C card are:

  • LINE-TX

  • LINE-RX

  • 2x33 ports of WSS in the multiplexer section of the OLT-C card

See OLT Functional Layout for details of the ports.

Table 5. Optical Specifications for OCM in OLT-C
Parameter Unit Minimum Typical Maximum Note
Dynamic ranges dBm/12.5GHz –10 10 Ports: LINE-TX, COM-RX-1 and internal Noise Loader port
–30 0 Port LINE-RX
–35 0 Ports: ADD-RX-1 and ADD-RX-2
–35 5

Ports ADD/DROP-i (i=3..32)

(on DROP ports OCM is virtual)

Accuracy dB ± 0.5 ± 2 Depending on the adjacent channel relative power
Frequency range THz

191.175

191.150

196.175 Out-of-band channel frequency 191.150 - 191.3375 THz are available only as row-data values.
Frequency accuracy (absolute) GHz ± 5
Frequency accuracy (relative) GHz +/-3
Resolution Bandwidth GHz 12.5
Frequency step GHz 3.125
Scan Time ms 250 Single port

View OCM Data

You can view the raw OCM data (slice level channel power) using the following commands:

RP/0/RP0/CPU0:ios#sh controllers ots 0/0/0/0 spectrum-info 
Fri Feb 4 13:12:49.841UTC​
Spectrum Slices spacing        :            3.125 GHz​
Spectrum Slices Range          :            1 - 1548​
Slice start wavelength         :            1566.82 nm​
Slice start frequency          :            191337.50 GHz​
Spectrum power information :​
Rx power :​
----------------------------------------------------------------------------------​
spectrum-slice num                        Rx-power values (dBm)​
----------------------------------------------------------------------------------​
   1 - 12               -88.8  -88.8  -88.8  -88.8      -88.8  -88.8  -88.8  -88.8      -88.8  -88.8  -88.8  -88.8​
  13 - 24               -88.8  -88.8  -88.8  -88.8      -88.8  -88.8  -88.8  -88.8      -88.8  -88.8  -88.8  -88.8​
…....​
…....​
…....​
1537 - 1548             -88.8  -88.8  -88.8  -88.8      -88.8  -88.8  -88.8  -88.8      -88.8  -88.8  -88.8  -88.8​
----------------------------------------------------------------------------------​
Tx power :​
----------------------------------------------------------------------------------​
spectrum-slice num                        Tx-power values (dBm)​
----------------------------------------------------------------------------------​
1 - 12                -9.5   -7.3   -6.0   -5.2       -4.9   -4.8   -4.6   -4.4       -4.4   -4.4   -4.4   -4.4​
13 - 24                -4.4   -4.5   -4.6   -4.8       -5.1   -5.5   -6.4   -7.7       -9.6  -12.0  -13.2  -11.4​
25 - 36                -9.2   -7.7   -6.7   -6.2       -6.0   -5.9   -5.7   -5.6       -5.6   -5.5   -5.4   -5.4​
37 - 48                -5.3   -5.3   -5.4   -5.5       -5.8   -6.1   -6.6   -7.3       -8.6  -10.4  -12.2  -11.8​
…...​
…...​
…...​
1525 - 1536              -2.4   -2.4   -2.4   -2.4       -2.4   -2.3   -2.3   -3.0       -4.2   -6.5  -10.3  -14.9​
1537 - 1548             -19.3  -22.6  -24.3  -25.3      -26.1  -26.6  -27.1  -27.6      -27.9  -28.2  -28.4  -28.6​
​

The preceding sample displays the Rx-power values (OCM3 raw data) and Tx-power values (OCM2 raw data) at the line sides. Similarly, you can view the OCM raw data for the COM side controllers OTS0/0/0/2 to 0/0/0/33.

You can also view the grid OCM data (per channel power level) for a particular channel in the OLT-C cards. By default, the channels are not created. Create a channel using the following commands:

configure

hw-module location location terminal-ampli grid-mode mode

channel-id channel id centre-freq frequency width channel-width

commit

The following is a sample to configure the channel on an OLT-C card:

RP/0/RP0/CPU0:ios#config
Fri Feb 4 13:14:49.841 UTC
RP/0/RP0/CPU0:ios(config)#
RP/0/RP0/CPU0:ios(config)#hw-module location 0/0/NXR0 terminal-ampli grid-mode flex
RP/0/RP0/CPU0:ios(config-hwmod-olt-flexi)#channel-id 1 centre-freq 196.1 width 75
RP/0/RP0/CPU0:ios(config-hwmod-olt-flexi)# commit
Fri Feb 4 13:15:12.841 UTC

RP/0/RP0/CPU0:ios(config-hwmod-olt-flexi)#end

The following sample shows the OTS OCH controller channel parameters such as Total Rx power and Total Tx power.

RP/0/RP0/CPU0:ios#sh controllers ots-och 0/0/0/0/1
Fri Feb 4 13:15:59.125 UTC
Controller State: Up
Transport Admin State: In Service
LED State: Yellow
Parameter Statistics:
---------------------
Total RX Power = -10.50 dBm
Total TX Power = -10.50 dBm
Configured Parameters:
-------------
RP/0/RP0/CPU0:ios#

The following sample shows the OTS OCH controller channel parameters such as Total Rx power and Total Tx power.

RP/0/RP0/CPU0:ios#sh controllers ots-och 0/0/0/2/1
Fri Feb 4 13:15:59.125 UTC
Controller State: Up
Transport Admin State: In Service
Alarm Status:
-------------
Detected Alarms: None
Alarm Statistics:
-----------------
RX-LOS-P = 0
TX-POWER-FAIL-LOW = 0
Parameter Statistics:
---------------------
Total RX Power = -10.50 dBm
Total TX Power = -10.50 dBm
Configured Parameters:
-------------
RP/0/RP0/CPU0:ios#

CCMD-16 Controllers

The NCS1K14-CCMD-16-C cards have two types of controllers. The controllers are OMS and OCH controllers. When the NCS1K14-CCMD-16-C cards become operational, both the OMS and OCH controllers are automatically created by default.

To view the OCH controllers, run the following command:

Command
RP/0/RP0/CPU0:ios#show controllers och 0/2/0/0

The following output shows the active OCH controllers in Slot 2 from port 1 to 16.

Output Example
0/2/0/1               Och Interface Instance
  0/2/0/10              Och Interface Instance
  0/2/0/11              Och Interface Instance
  0/2/0/12              Och Interface Instance
  0/2/0/13              Och Interface Instance
  0/2/0/14              Och Interface Instance
  0/2/0/15              Och Interface Instance
  0/2/0/16              Och Interface Instance
  0/2/0/2               Och Interface Instance
  0/2/0/3               Och Interface Instance
  0/2/0/4               Och Interface Instance
  0/2/0/5               Och Interface Instance
  0/2/0/6               Och Interface Instance
  0/2/0/7               Och Interface Instance
  0/2/0/8               Och Interface Instance
  0/2/0/9               Och Interface Instance

To view the OMS controllers, run the following command:

Command
RP/0/RP0/CPU0:ios#show controllers oms 0/2/0/0

The following output shows the active OMS controller in Slot 0.

Output Example
0/2/0/0               Oms Interface Instance

OCH Controller

When you bring up the nodes with NCS1K14-CCMD-16-C cards, the OCH controllers are automatically created by default. The OCH controllers for the NCS1K14-CCMD-16-C cards are:

Table 6. Supported Interfaces

Card

Port Type

OCH Ports

Interfaces

NCS1K14-CCMD-16-C

LC Ports

16

och R/S/I/1 to och R/S/I/16


Note


R/S/I/P stands for Rack/Slot/Instance/Port.


To view the parameters of an OCH controller, use the following command:

Command Example
RP/0/RP0/CPU0:ios#show controllers och 0/1/0/1

The following output shows the parameters of the OCH controller.

Output Example
Thu Oct 12 09:26:38.555 UTC

 Controller State: Up 

 Transport Admin State: In Service 

 LED State: Green 

         Alarm Status:
         -------------
         Detected Alarms: None


         Alarm Statistics:
         -----------------
         RX-LOS-P = 0          
         TX-POWER-FAIL-LOW = 0 

         Parameter Statistics:
         ---------------------
         Tx Power = -2.30 dBm 
         Rx Power = -0.70 dBm 

OMS Controller

When you bring up the nodes with NCS1K14-CCMD-16-C cards, the OMS controllers are automatically created by default. The OMS controllers for the NCS1K14-CCMD-16-C cards are:

Table 7. Supported Interfaces

Card

Port Type

OMS Ports

Interfaces

NCS1K14-CCMD-16-C

LC Ports

1

oms R/S/I/0


Note


R/S/I/P stands for Rack/Slot/Instance/Port.


To view the parameters of an OMS controller, use the following command:

Command Example
RP/0/RP0/CPU0:ios#show controllers oms 0/1/0/0

The following output shows the parameters of an OMS controller.

Output Example
Thu Oct 12 09:23:35.297 UTC

 Controller State: Up 

 Transport Admin State: In Service 

 LED State: Red 

         Alarm Status:
         -------------
         Detected Alarms: 
                 HI-TX-BR-PWR    

         Alarm Statistics:
         -----------------
         RX-LOS-P = 3          
         TX-POWER-FAIL-LOW = 0          
         INGRESS-AMPLI-GAIN-LOW = 0          
         INGRESS-AMPLI-GAIN-HIGH = 0          
         EGRESS-AUTO-LASER-SHUT = 0          
         EGRESS-AMPLI-GAIN-LOW = 0          
         EGRESS-AMPLI-GAIN-HIGH = 0          
         HI-TX-BR-PWR = 2          
          
          
         Parameter Statistics:
         ---------------------
         Tx Power = -3.40 dBm 
         Rx Power = -2.30 dBm 
         Rx Voa Attenuation = 5.0 dB 
         Tx Voa Attenuation = 5.0 dB 
         Ingress Ampli Mode = Gain
         Ingress Ampli Gain = 5.0 dB
         Ingress Ampli Tilt = 0.0 dB
         Ingress Ampli OSRI = OFF 
         Egress Ampli Mode = Gain
         Egress Ampli Gain = 2.0 dB
         Egress Ampli Tilt = 0.0 dB
         Egress Ampli Gain Range = Normal 
         Egress Ampli OSRI = OFF 
         Egress Ampli BR Power = -12.90 dBm 
         Egress Ampli BR Ratio = -9.39 dB 
          
          
         Configured Parameters:
         -------------
         Rx Voa Attenuation = 5.0 dB 
         Tx Voa Attenuation = 5.0 dB 
         Ingress Ampli Mode = Gain
         Ingress Ampli Gain = 5.0 dB 
         Ingress Ampli Power = -9.0 dBm
         Ingress Ampli OSRI = OFF 
         Egress Ampli Mode = Gain
         Egress Ampli Gain = 2.0 dB 
         Egress Ampli Power = 0.0 dBm
         Egress Ampli Gain Range = Normal 
         Egress Ampli OSRI = OFF 
         BR High Threshold = -17.0 dBm 

Configure Controller Parameters for NCS1K14-CCMD-16-C Card

This chapter describes the controller configuration using EDFA, VoA, optical safety, and photodiode parameters which are supported on NCS1K14-CCMD-16-C line cards.

Table 8. Basic Controller Configuration Parameters
Parameter CLI Description
EDFA-ADD Control Mode
controller Oms R/S/I/P
egress-ampli-mode power-control

Here the default mode is gain-control.

Use this command to change the mode to power-control mode.

You can delete this configuration to revert to gain-control mode.

EDFA-ADD Power
controller Oms R/S/I/P
egress-ampli-power <val in 0.1 dBm>
This is the target output power configuration for the EDFA located on COM-Tx. If the output power is not configured, then a default value is used by the system. You can find the applied target output power by using the show controller oms output.
EDFA-ADD Gain Range
controller Oms R/S/I/P
egress-ampli-gain-range <normal | 
extended>

If you change the gain range from Normal to Extended or the opposite way, without updating the proper gain value for the new gain range, then the following may happen:

  • The EDFA switches to the preconfigured or default value of the gain causing a mismatch between the operational and configured gain.

  • The gain configuration is lost during the reload of software or line card, as the configured gain mismatches with the latest gain-range. This may result in traffic interruption during these reload operations.

Hence, we recommend that you explicitly configure the gain range mode as normal or extended, and the corresponding gain values for each mode to get the expected results.

The following are a few example scenarios that may not work as expected:

  • Scenario 1:

    Current running config:

    controller Oms R/S/I/P
     egress-ampli-gain-range extended
     egress-ampli-gain <gain value in extended mode>
      

    New applied config:

    controller Oms R/S/I/P
     no egress-ampli-gain-range extended
     commit
  • Scenario 2:

    Current running config:

    controller Oms R/S/I/P
     egress-ampli-gain-range extended
     egress-ampli-gain <gain value in extended mode>
      

    New applied config:

    controller Oms R/S/I/P
     egress-ampli-gain-range Normal
     commit
    
  • Scenario 3:

    Current running config:

    controller Oms R/S/I/P
    egress-ampli-gain <gain value in normal mode>

    New applied config:

    controller Oms R/S/I/P
    egress-ampli-gain-range extended
    commit
    

The following is another example scenario that involves commit-replace command where you replace the existing gain configuration that does not have explicitly configured gain-range, with new gain-range and gain value.

Scenario 4:

Current running config:

controller Oms R/S/I/P
egress-ampli-gain <gain value in normal mode>

New applied config:

…………..
controller Oms R/S/I/P
egress-ampli-gain-range extended
egress-ampli-gain <gain value in extended mode>
commit replace
EDFA-ADD Gain
controller Oms R/S/I/P
egress-ampli-gain <val in 0.1 dB>
This is used for configuring gain for the EDFA located on the COM-Tx port. If the gain is not configured, then a default value is used by the system. The show controller oms output can be used for finding the applied gain.
EDFA-DROP Control Mode
controller Oms R/S/I/P
ingress-ampli-mode power-control

The default mode is gain-control.

Use this command to change the mode to power-control mode.

You can delete this configuration to revert to gain-control mode.

EDFA-DROP Power
controller Oms R/S/I/P
ingress-ampli-power <vale in 0.1 dBm>
This is the target output power configuration for the EDFA located on COM-Rx. If the output power is not configured, then a default value is used by the system. You can find the applied target output power by using the show controller oms output.
EDFA-DROP Gain
controller Oms R/S/I/P
ingress-ampli-gain <val in 0.1 dB>
This is used for configuring gain for the EDFA located on the COM-Rx port. If the gain is not configured, then a default value is used by the system. The show controller oms output can be used for finding the applied gain.
VoA Attenuation
controller Oms R/S/I/P
tx-voa-attenuation <val in 0.1 dB>
rx-voa-attenuation <val in 01. dB>

This is used to configure VoA attenuation for COM-Tx and COM-Rx ports. The system picks a default value if the gain is not configured. The show controller oms output can be used for finding the applied attenuation.

Shutdown (COM Port)
controller Oms R/S/I/P
shutdown

COM-Tx and Rx ports are put in Out of Service (OOS) when this command is executed. This turns off the EDFA devices on both COM-Tx and COM-Rx ports and the respective alarms are masked.

Here the default value is 'unshut'.

Shutdown

(Ch Ports)

controller Och R/S/I/P
shutdown
The channel port will be marked as out-of-service.

Configure Operational Parameters

The different operational parameters supported are given below.

Table 9. Operational Parameters
Parameter CLI Description
Photo Diodes (COM Port)

OMS Controller

Tx Power and Rx Power

Rx Power = Inband power + OOB

Tx Power = Inband power + OOB

It reports the power transmitted and received on the OMS port. The OOB power received on COM-Rx is looped back to COM-Tx with some loss due to the insertion-loss on the loop back path.
Photo Diodes (CH Ports)

OCH Controller

Tx Power and Rx Power
It reports the power transmitted and received on the channel ports.
Amplifier Parameters

OMS Controller

Ingress Ampli Mode
Ingress Ampli Gain
Ingress Ampli Tilt
Ingress Ampli OSRI
Egress Ampli Mode
Egress Ampli Gain
Egress Ampli Tilt
Egress Ampli Gain Range
Egress Ampli OSRI
Egress Ampli BR Power
Egress Ampli BR Ratio
Egress and ingress amplifier parameters.
VoA Parameters

OMS Controller

Tx VoA Attenuation and Rx VoA Attenuation
VoA attenuation parameters.

Configure Optical Safety Parameters

Use the following parameters for configuring optical safety.

Table 10. Optical Safety Parameters
Parameter CLI Description
OSRI
controller Oms R/S/I/P 
egress-ampli-osri
ingress-ampli-osri
Use this configuration to enable or Disable Optical Safety Remote Interlock (OSRI) on the amplifiers located on COM-Tx and COM-Rx ports. The default value is 'Off'. The show controller oms output can be used for finding the OSRI configuration and status.