Introdução
Este documento descreve como integrar os Catalyst 9800 Series Wireless Controllers (C9800 WLC) com Prime Infrastructure (3.x).
Pré-requisitos
Requisitos
A Cisco recomenda que você tenha conhecimento destes tópicos:
- WLC C9800
- Prime Infrastructure (PI) versão 3.5
- Simple Network Management Protocol
Componentes Utilizados
As informações neste documento são baseadas nestas versões de software e hardware:
- WLC C9800
- Cisco IOS XE Gibraltar 16.10.1 a 17.3
As informações neste documento foram criadas a partir de dispositivos em um ambiente de laboratório específico. Todos os dispositivos utilizados neste documento foram iniciados com uma configuração (padrão) inicial. Se a rede estiver ativa, certifique-se de que você entenda o impacto potencial de qualquer comando.
Observação: o Prime Infra 3.8 suporta apenas WLCs 17.x 9800. Os clientes não aparecem na Prime Infrastructure se você tentar gerenciar uma WLC 16.12 com Prime Infra 3.8.
Configurar
Para que a Prime Infrastructure configure, gerencie e monitore os Catalyst 9800 Series Wireless LAN Controllers, ela precisa ser capaz de acessar o C9800 via CLI, SNMP e Netconf. Quando você adiciona C9800 à Prime Infrastructure, é necessário especificar as credenciais de telnet/SSH, bem como a sequência de caracteres de comunidade SNMP, versão etc. A PI usa essas informações para verificar a acessibilidade e para fazer o inventário da WLC C9800. Ele também usa o SNMP para enviar modelos de configuração, bem como suporte a armadilhas para eventos de Ponto de Acesso (AP) e cliente. No entanto, para que o PI colete estatísticas de AP e Cliente, o Netconf é aproveitado. O Netconf não é ativado por padrão no C9800 WLC e precisa ser configurado manualmente via CLI na versão 16.10.1 (GUI disponível na versão 16.11.1).
Portas usadas
A comunicação entre o C9800 e a Prime Infrastructure usa portas diferentes.
- Todas as configurações e modelos disponíveis no Prime Infra são enviados via SNMP e CLI. Usa a porta UDP 161.
- Os dados operacionais da própria WLC C9800 são obtidos por SNMP. Usa a porta UDP 162.
- Os dados operacionais do AP e do cliente aproveitam a telemetria contínua.
Prime Infrastructure para WLC: porta TCP 830 - usada pelo Prime Infra para enviar a configuração de telemetria para 9.800 dispositivos (usando Netconf).
WLC para Prime Infrastructure: porta TCP 20828 (para Cisco® IOS XE 16.10 e 16.11) ou 20830 (para Cisco IOS XE 16.12,17.x e posterior).
Observação: os keepalives são enviados a cada 5 segundos mesmo quando não há telemetria para relatar.
Observação: caso haja um firewall entre a Prime Infrastructure e o C9800, abra essas portas para estabelecer a comunicação.
Configuração de SNMPv2 no WLC Cat 9800
GUI:
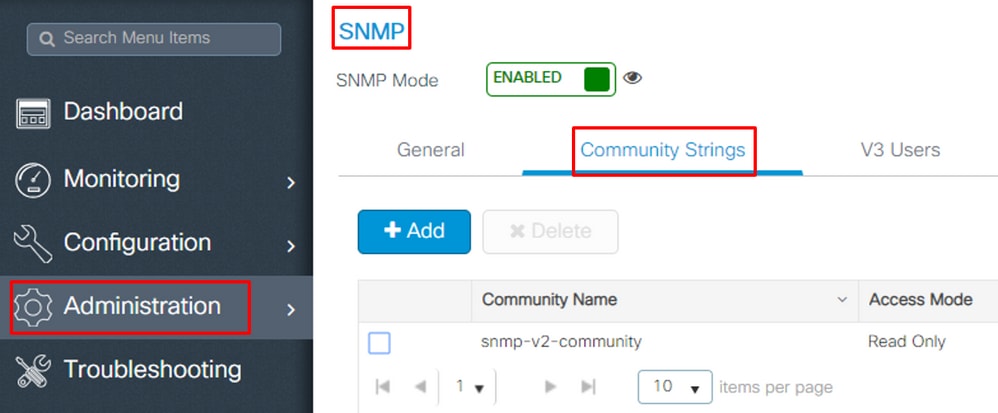
Etapa 1. Navegue até Administration > SNMP > Slide to Enable SNMP.
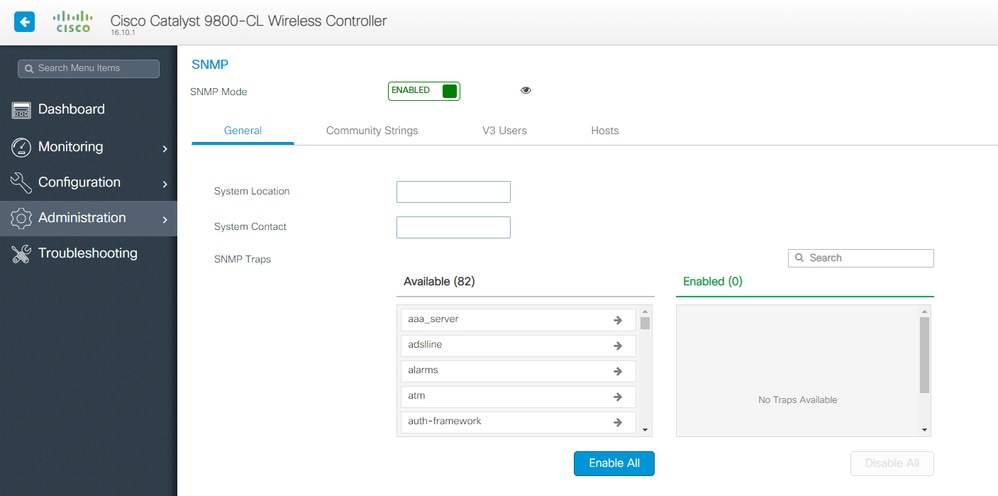
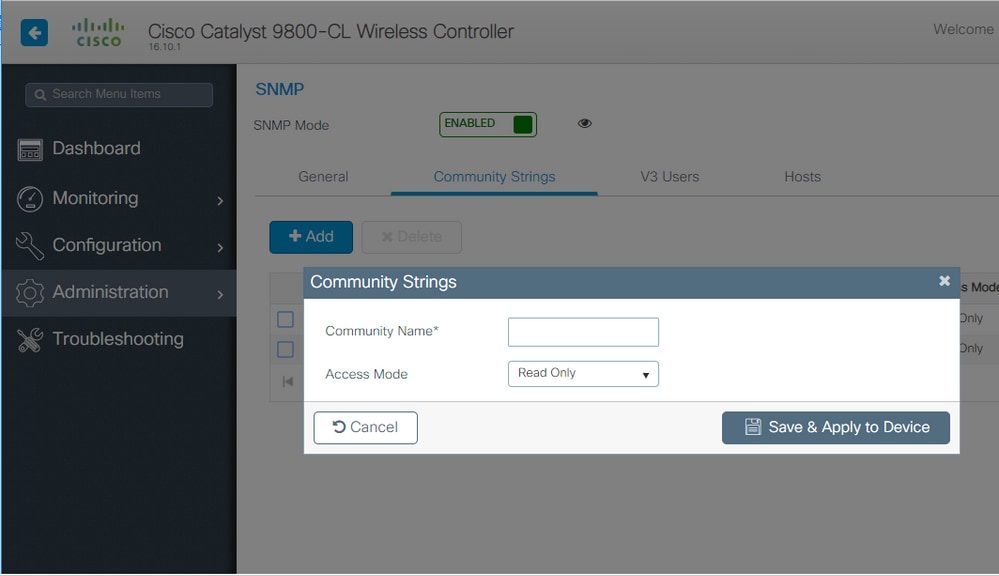
Etapa 2. Clique Community Strings e crie um nome de comunidade somente leitura e leitura-gravação.
CLI:
(config)#snmp-server community <snmpv2-community-name> (optional)(config)# snmp-server location <site-location> (optional)(config)# snmp-server contact <contact-number>
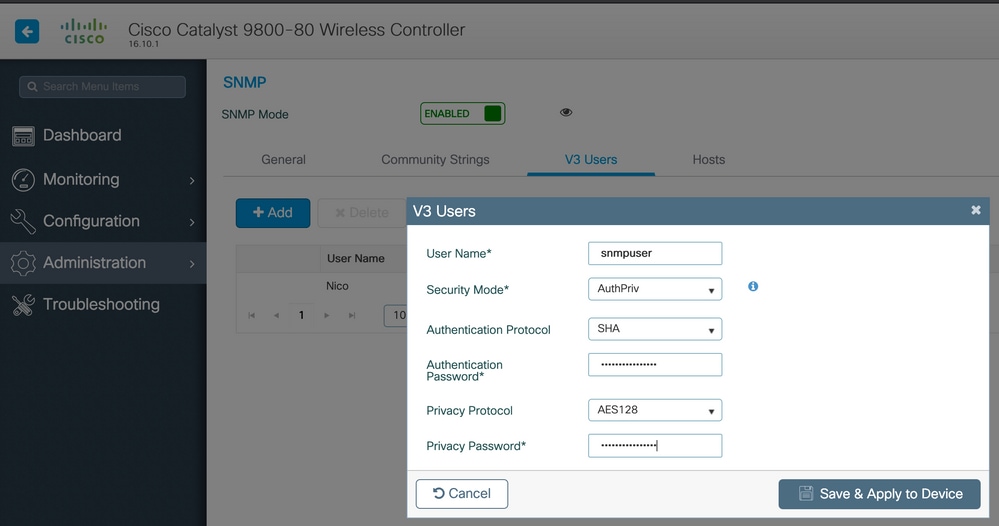
Configuração de SNMPv3 no WLC Cat 9800
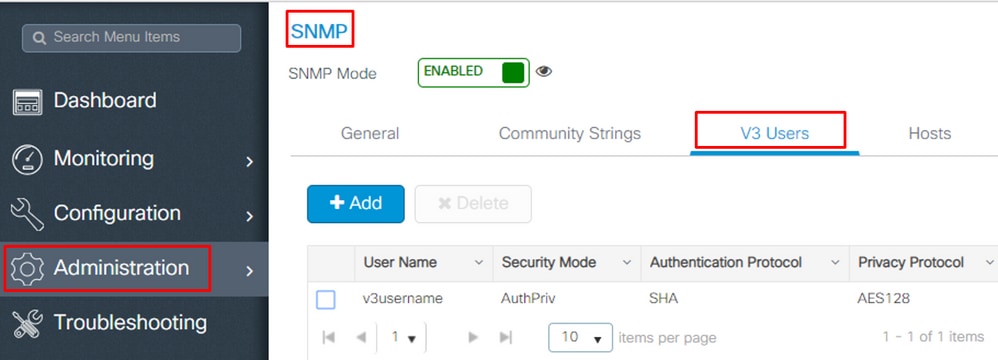
GUI:
Observação: a partir do Cisco IOS XE 17.1, a interface do usuário da Web permite apenas que você crie usuários v3 somente leitura. Você precisa executar o procedimento CLI para criar um usuário de leitura-gravação v3.
CLI:
Clique em V3 userse crie um usuário. Escolha authPriv, SHA e AES protocols, e escolha senhas longas. MD5 e DES/3DES são protocolos não seguros e, embora ainda sejam uma opção no 9800, eles não devem ser selecionados e não são mais totalmente testados.
Observação: a configuração de usuário SNMPv3 não é refletida na configuração atual. Apenas a configuração do grupo SNMPv3 é exibida.
CLI:
(config)#snmp-server view primeview iso included
(config)#snmp-server group <v3-group-name> v3 auth write primeview (config)#snmp-server user <v3username> <v3-group-name> v3 auth {md5 | sha} <AUTHPASSWORD> priv {3des | aes | des} {optional for aes 128 | 192| 256} <PRIVACYPASSWORD> 9800#show snmp user User name: Nico Engine ID: 800000090300706D1535998C storage-type: nonvolatile active Authentication Protocol: SHA Privacy Protocol: AES128 Group-name: SnmpAuthPrivGroup
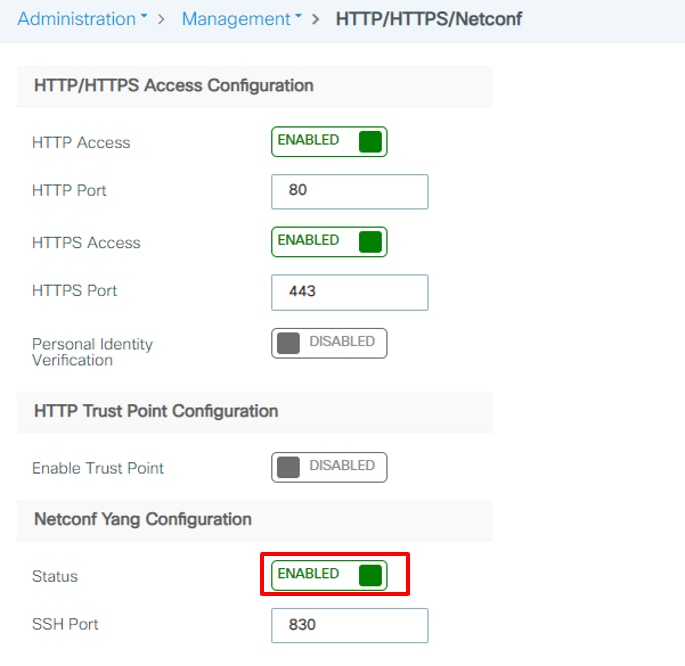
Configuração do Netconf no WLC Cat 9800
GUI (iniciando em 16.11):
Navegue até Administration > HTTP/HTTPS/Netconf.
CLI:
(config)#netconf-yang
Cuidado: se aaa new-model estiver habilitado no C9800, você também precisará configurar:
(config)#aaa authorization exec default <local or radius/tacacs group>
(config)#aaa autenticação padrão de login <local ou radius/tacacs group>
O Netconf no C9800 usa o método padrão (e você não pode alterá-lo) tanto para o login de autenticação aaa quanto para o aaa authorization exec. Caso deseje definir um método diferente para conexões SSH, você pode fazê-lo na linha de line vty comando. O Netconf continua usando os métodos padrão.
Cuidado: a infraestrutura principal, ao adicionar um controlador 9800 ao seu inventário, substitui os métodos padrão de login de autenticação aaa e de execução de autorização aaa configurados por você e os direciona para a autenticação local somente se o Netconf ainda não estiver habilitado na WLC. Se o Prime Infrastructure puder fazer login com o Netconf, ele não alterará a configuração. Isso significa que, se estiver usando o TACACS, você perderá o acesso ao CLI depois de adicionar o 9800 ao Prime. Você pode reverter esses comandos de configuração posteriormente e fazê-los apontar para o TACACS, se essa for sua preferência.

Observação: no momento, somente as chaves RSA são suportadas no ponto confiável usado por NETCONF. As teclas EC (curva elíptica) ainda não são suportadas e fazem com que o processo ncsshd falhe se usado. Você pode verificar a chave sendo usada pelo processo ncsshd usando o seguinte comando "show logging process ncsshd internal start last 1 hours | sec key name". Uma solicitação de aprimoramento está aberta para adicionar o suporte para chaves EC em versões futuras: ID de bug Cisco CSCwk02600.
Configurar (Prime Infrastructure 3.5 e posterior)
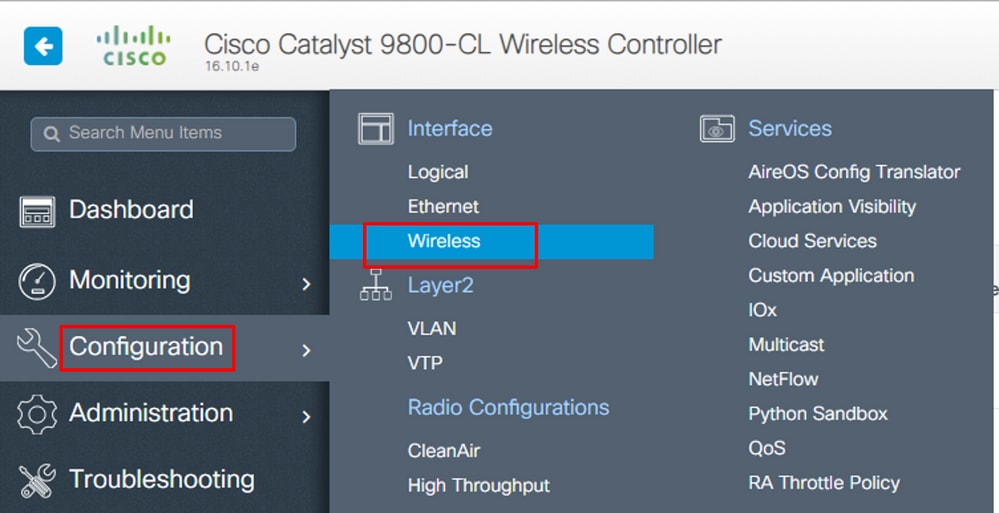
Etapa 1. Capture o endereço IP de gerenciamento sem fio configurado no Catalyst 9800 WLC.
GUI:
Navegue até Configuration > Interface: Wireless.
CLI:
# show wireless interface summary
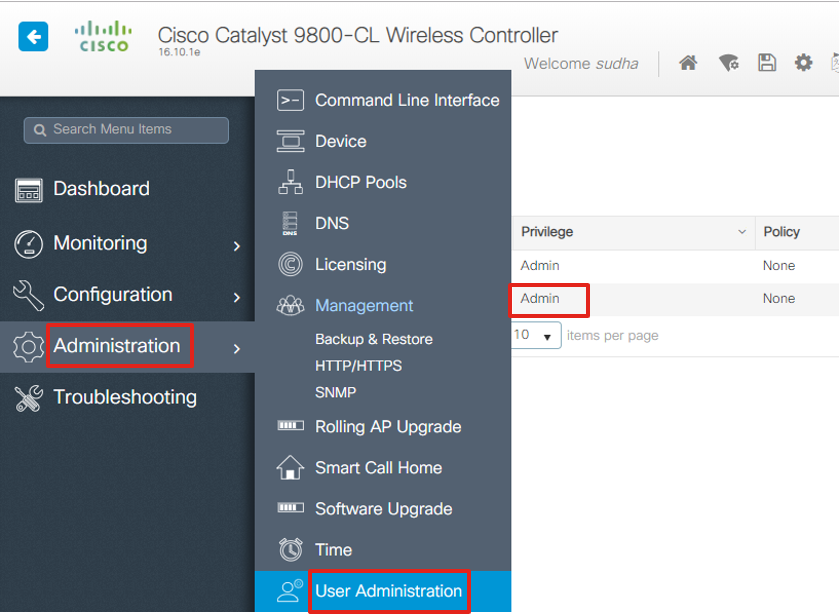
Etapa 2. Capture as credenciais de usuário do privilégio 15 e habilite a senha.
GUI:
Navegue até Administration > User Administration.
CLI:
# show run | inc username # show run | inc enable
Etapa 3. Obtenha as séries de comunidade SNMPv2 e/ou o usuário SNMPv3 conforme aplicável.
GUI:
Para SNMPv2, navegue para Administration > SNMP > Community Strings.
Para SNMPv3, navegue para Administration > SNMP > V3 Users.
CLI:
For SNMPv2 community strings # show run | sec snmp For SNMPv3 user # show user
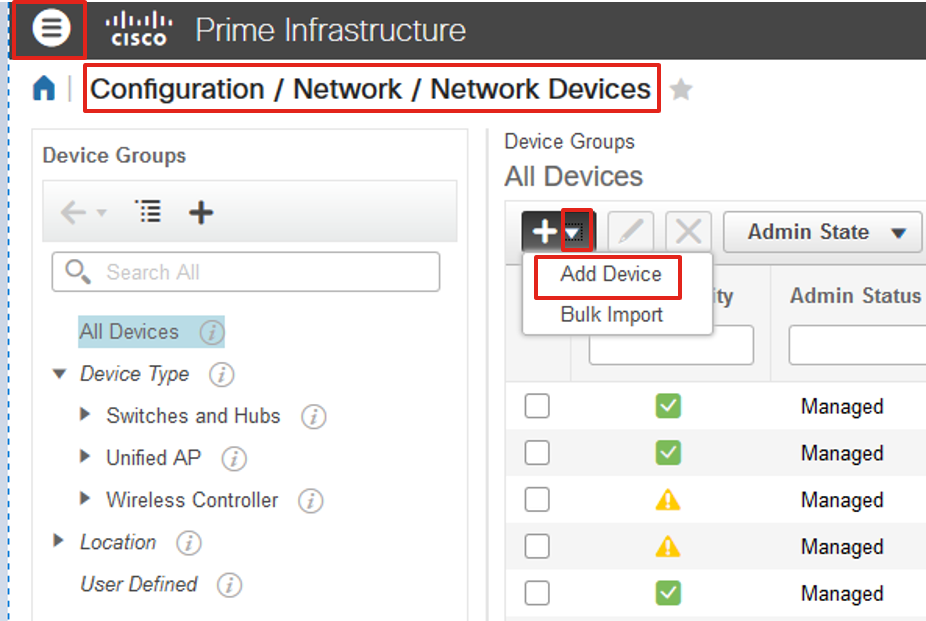
Etapa 4. Na Prime Infrastructure GUI, navegue até Configuration > Network: Network Devices, clique na lista suspensa ao lado + e escolha Add Device.
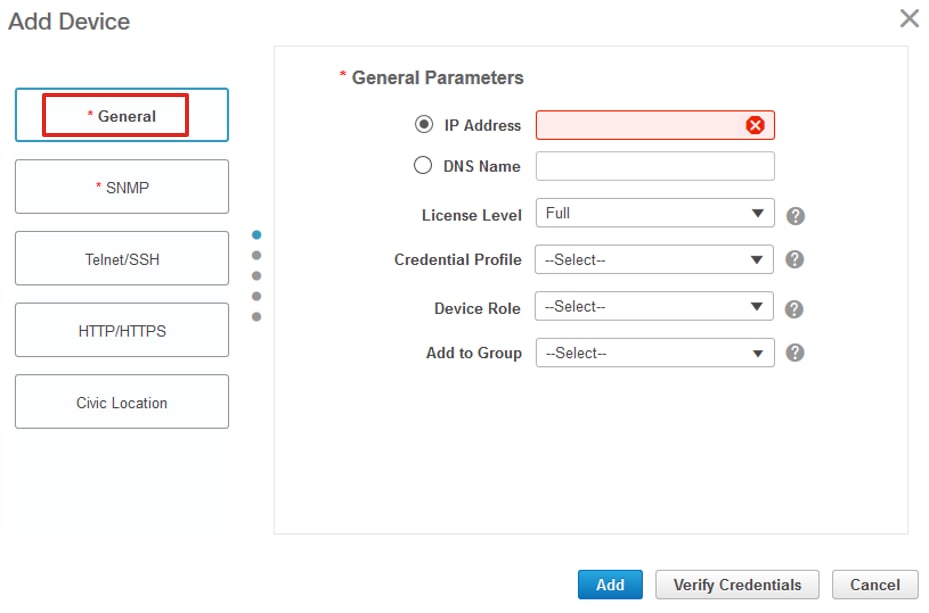
Etapa 5. No Add Device pop-up, insira o endereço ip da interface no 9800 que é usado para estabelecer comunicação com a Prime Infrastructure.
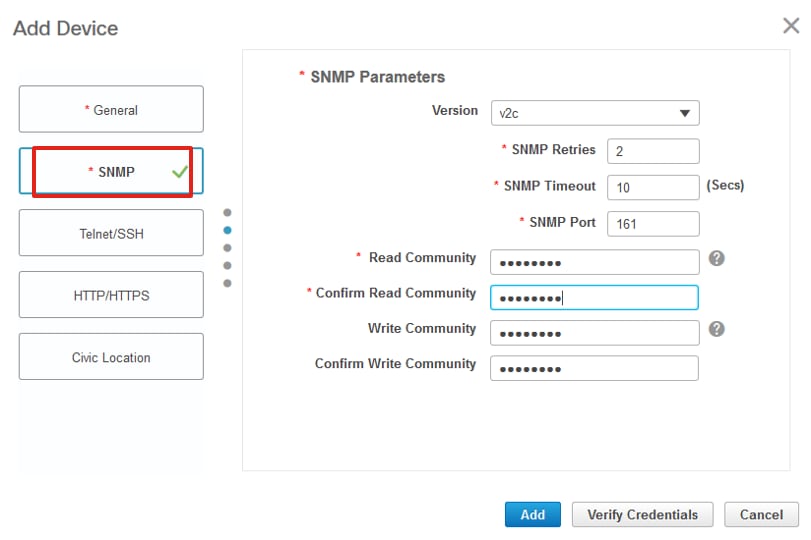
Etapa 6. Navegue até a SNMP guia e forneça SNMPv2 Read-Only and Read-Write Community Strings configurado na WLC C9800.
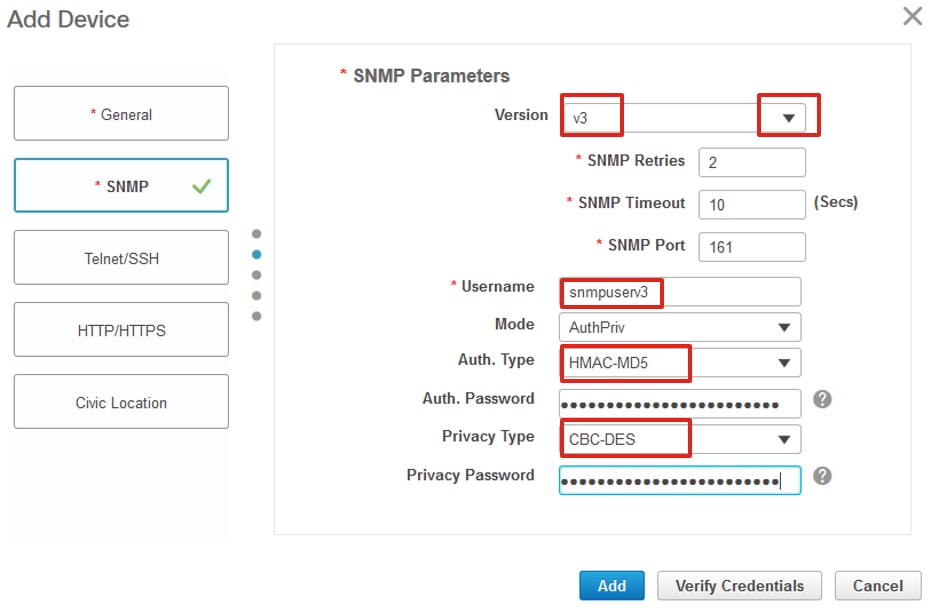
Passo 7. Se estiver usando SNMPv3, na lista suspensa, escolha v3 e forneça o nome de usuário do SNMPv3. No menu Auth-Type suspenso, corresponda ao tipo de autenticação configurado anteriormente e, no menu Privacy Type suspenso, escolha o método de criptografia configurado no C9800 WLC.
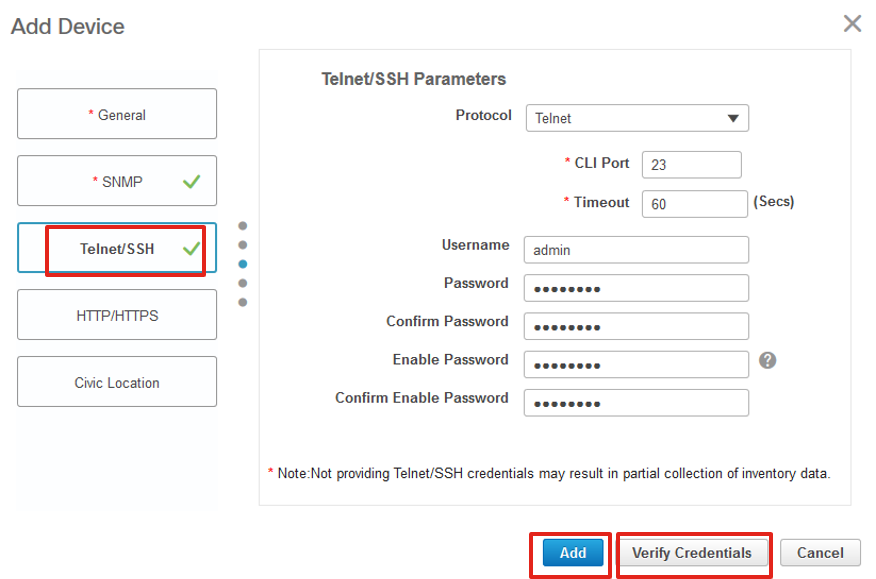
Etapa 8. Navegue até a Telnet/SSH guia de Add Device, forneça o Privilégio 15 Nome de usuário e Senha junto com Ativar senha. Clique em Verify Credentials para garantir que as credenciais de CLI e SNMP funcionem bem. Clique em Add.
Verificar
Verificar o status da telemetria
Etapa 1. Verifique se o Netconf está ativado no C9800.
#show run | inc netconf netconf-yang
Se não estiver presente, insira a seção 'NETCONF configuration on the Cat 9800 WLC'.
Etapa 2. Verifique a conexão de telemetria com Prime do C9800.
#show telemetry internal connection Telemetry connection Address Port Transport State Profile ------------------------------------------------------------------ x.x.x.x 20828 cntp-tcp Active
Observação: x.x.x.x é o endereço ip da Prime Infrastructure e o estado deve ser Ativo. Se o estado não for Ativo, consulte a seção Solução de problemas.
Em 17.9, você deve usar um comando ligeiramente diferente:
9800-17-9-2#show telemetry connection all Telemetry connections Index Peer Address Port VRF Source Address State State Description ----- -------------------------- ----- --- -------------------------- ---------- -------------------- 0 10.48.39.25 25103 0 10.48.39.228 Active Connection up 9800-17-9-2#
Etapa 3. Em Prime Infrastructure, navegue até Inventory > Network Devices > Device Type: Wireless Controller.

Etapa 4. Para exibir os detalhes da conexão de telemetria com a Prime Infrastructure, execute este procedimento:
#show telemetry internal protocol cntp-tcp manager x.x.x.x 20828 Telemetry protocol manager stats: Con str : x.x.x.x:20828:: Sockfd : 79 Protocol : cntp-tcp State : CNDP_STATE_CONNECTED Table id : 0 Wait Mask : Connection Retries : 0 Send Retries : 0 Pending events : 0 Source ip : <9800_IP_ADD> Bytes Sent : 1540271694 Msgs Sent : 1296530 Msgs Received : 0
Etapa 5. Verifique o status da assinatura de telemetria do C9800 e o fato de que eles são exibidos como 'Válidos'.
#show telemetry ietf subscription configured Telemetry subscription brief ID Type State Filter type ----------------------------------------------------- 68060586 Configured Valid transform-na 98468759 Configured Valid tdl-uri 520450489 Configured Valid transform-na 551293206 Configured Valid transform-na 657148953 Configured Valid transform-na 824003685 Configured Valid transform-na 996216912 Configured Valid transform-na 1072751042 Configured Valid tdl-uri 1183166899 Configured Valid transform-na 1516559804 Configured Valid transform-na 1944559252 Configured Valid transform-na 2006694178 Configured Valid transform-na
Etapa 6: As estatísticas de assinatura podem ser exibidas por ID de assinatura ou para todas as assinaturas usando:
#show telemetry internal subscription { all | id } stats Telemetry subscription stats: Subscription ID Connection Info Msgs Sent Msgs Drop Records Sent ------------------------------------------------------------------------------ 865925973 x.x.x.x:20828:: 2 0 2 634673555 x.x.x.x:20828:: 0 0 0 538584704 x.x.x.x:20828:: 0 0 0 1649750869 x.x.x.x:20828:: 1 0 2 750608483 x.x.x.x:20828:: 10 0 10 129958638 x.x.x.x:20828:: 10 0 10 1050262948 x.x.x.x:20828:: 1369 0 1369 209286788 x.x.x.x:20828:: 15 0 15 1040991478 x.x.x.x:20828:: 0 0 0 1775678906 x.x.x.x:20828:: 2888 0 2889 1613608097 x.x.x.x:20828:: 6 0 6 1202853917 x.x.x.x:20828:: 99 0 99 1331436193 x.x.x.x:20828:: 743 0 743 1988797793 x.x.x.x:20828:: 0 0 0 1885346452 x.x.x.x:20828:: 0 0 0 163905892 x.x.x.x:20828:: 1668 0 1668 1252125139 x.x.x.x:20828:: 13764 0 13764 2078345366 x.x.x.x:20828:: 13764 0 13764 239168021 x.x.x.x:20828:: 1668 0 1668 373185515 x.x.x.x:20828:: 9012 0 9012 635732050 x.x.x.x:20828:: 7284 0 7284 1275999538 x.x.x.x:20828:: 1236 0 1236 825464779 x.x.x.x:20828:: 1225711 0 1225780 169050560 x.x.x.x:20828:: 0 0 0 229901535 x.x.x.x:20828:: 372 0 372 592451065 x.x.x.x:20828:: 8 0 8 2130768585 x.x.x.x:20828:: 0 0 0
Troubleshooting
Solução de problemas na infraestrutura Prime
- A primeira coisa a verificar na infraestrutura Prime é o endereço IP e as interfaces. O Prime Infrastructure não suporta dual-home e não ouve a telemetria em sua segunda porta.
- O endereço IP da WLC que você adiciona à Prime Infrastructure deve ser o endereço IP usado como a 'interface de gerenciamento sem fio'. O endereço IP da infraestrutura Prime deve estar acessível a partir dessa interface de gerenciamento sem fio no lado do controlador.
- Se estiver usando a porta de serviço (gig0/0 em dispositivos) para descoberta, a WLC e os APs aparecerão no estado Gerenciado no Inventário, mas a telemetria para a WLC e os Pontos de acesso associados não funcionará.
- Se você vir que o status da telemetria é um 'sucesso' na Prime Infrastructure, mas a contagem de AP for 0, pode ser que a Prime Infrastructure possa alcançar a WLC na porta 830, mas o controlador não possa alcançar a Prime Infrastructure na porta 20830.
Para qualquer problema de SNMP ou de configuração de dispositivo, colete estes registros da Prime Infrastructure:
cd /opt/CSCOlumos/logs/ [root@prime-tdl logs]# ncs-0-0.log Tdl.logs
Para questões de telemetria/coral, a primeira coisa a fazer é verificar o status do Coral:
shell cd /opt/CSCOlumos/coralinstances/coral2/coral/bin ./coral version 1 ./coral status 1 ./coral stats 1
Se tudo estiver bem, colete esses logs na pasta prime coral logs.
Observação: dependendo da versão do Prime Infrastructure e da quantidade de versão do Cisco IOS XE que ele suporta, pode haver várias instâncias do Coral no Prime Infrastructure. Verifique as notas de versões para obter mais detalhes, como: https://www.cisco.com/c/en/us/td/docs/net_mgmt/prime/infrastructure/3-7/release/notes/bk_Cisco_Prime_Infrastructure_3_7_0_Release_Notes.html
Etapa 1.
cd /opt/CSCOlumos/coral/bin/ [root@prime-tdl bin]# ./coral attach 1 Attached to Coral instance 1 [pid=8511] Coral-1#cd /tmp/rp/trace/ Coral-1#ls Collect the “Prime_TDL_collector_R0-”* logs
Coral-1# cd /tmp/rp/trace/ Coral-1# btdecode P* > coralbtlog.txt Coral-1# cat coralbtlog.txt
Esses logs também podem ser encontrados neste diretório:
* Os arquivos de rastreamento decodificados estão disponíveis no caminho/opt/CSCOlumos/coralinstances/coral2/coral/run/1/storage/harddisk
*   ade# cd /opt/CSCOlumos/coralinstances/coral2/coral/run/1/storage/harddisk
* ade# cp coraltrace.txt /localdisk/defaultRepo
Etapa 2. Para ativar o Coral no modo de depuração, o nível de depuração precisa ser definido no debug.conf arquivo.
A partir do contentor:
echo "rp:0:0:tdlcold:-e BINOS_BTRACE_LEVEL=DEBUG;" > /harddisk/debug.conf
Ou no Prime 3.8, o serviço Coral pode ser reiniciado fora do contêiner usando:
"sudo /opt/CSCOlumos/coralinstances/coral2/coral/bin/coral restart 1"
Se a reinicialização não ajudar, eles poderão ser usados para limpar a instância de coral e iniciá-la sem problemas:
sudo /opt/CSCOlumos/coralinstances/coral2/coral/bin/coral stop 1 sudo /opt/CSCOlumos/coralinstances/coral2/coral/bin/coral purge 1 sudo /opt/CSCOlumos/coralinstances/coral2/coral/bin/coral start 1
Reinicie Coral, isso é obrigatório. Você pode deixar a ocorrência de coral se digitar 'Exit' e:
./coral/bin/coral restart 1
Observação: no Prime 3.8, o serviço Coral pode ser reiniciado fora do contêiner usando 'sudo /opt/CSCOlumos/coralinstances/coral2/coral/bin/coral restart 1'
Se precisar decodificar arquivos de log do Coral, você pode decodificá-los dentro do contêiner do Coral com:
btdecode Prime_TDL_collector_*.bin
Observação: depois de habilitar o nível de depuração do Coral, é obrigatório reiniciar o Coral.
Solução de problemas no Catalyst 9800 WLC
Para monitorar a configuração enviada pelo Prime Infra para a WLC C9800, você pode executar um applet EEM.
#config terminal #event manager applet catchall #event cli pattern ".*" sync no skip no #action 1 syslog msg "$_cli_msg"
Excluir toda a assinatura de telemetria da configuração da WLC
Pode haver ocasiões em que você queira desconfigurar todas as assinaturas de telemetria configuradas no WLC. Isso pode ser feito simplesmente com estes comandos:
WLC#term shell WLC#function removeall() { for id in `sh run | grep telemetry | cut -f4 -d' '` do conf t no telemetry ietf subscription $id exit done } WLC#removeall
Para ativar rastreamentos:
# debug netconf-yang level debug
Para verificar:
WLC#show platform software trace level mdt-pubd chassis active R0 | inc Debug pubd Debug WLC#show platform software trace level ndbman chassis active R0 | inc Debug ndbmand Debug
Para exibir as saídas de rastreamento:
show platform software trace message mdt-pubd chassis active R0 show platform software trace message ndbman chassis active R0
Verificar ID de assinatura para informações de AP
Clique em DB Query. Navegue até tohttps://<Prime_IP>/webacs/ncsDiag.do.
Escolha *de ewlcSubscription onde OWNINGENTITYID como '%Controller_IP' e CLASSNAME='UnifiedApp'.
Da WLC:
Verifique se a ID de assinatura está enviando informações e se não há descartes nos contadores cntp.
show tel int sub all stats show telemetry internal protocol cntp-tcp connector counters drop show telemetry internal protocol cntp-tcp connector counters queue show telemetry internal protocol cntp-tcp connector counters rate show telemetry internal protocol cntp-tcp connector counters sub-rate show telemetry internal protocol cntp-tcp connector counters reset
Observação: a WLC 9800 suporta 100 assinaturas de telemetria antes da versão 17.6 e até 128 assinaturas depois da versão 17.6 (como a versão recente do Catalyst Center, pode usar mais de 100 assinaturas.
Migração do PI para o Cisco Catalyst Center
O C9800 não pode ser gerenciado simultaneamente pelo PI e pelo Cisco Catalyst Center. Se houver um plano para mudar para o Catalyst Center como uma solução de gerenciamento de rede, o C9800 precisa ser removido da Prime Infrastructure antes de ser adicionado ao Catalyst Center. Quando o C9800 é removido/excluído do PI 3.5, toda a configuração que foi enviada por push para o C9800 no momento do inventário pelo PI não é revertida e precisa ser manualmente excluída do sistema. Especificamente, os canais de assinatura estabelecidos para a WLC C9800 para publicar dados de telemetria de streaming não são removidos.
Para identificar essa configuração específica:
#show run | sec telemetry
Para remover essa configuração, execute a no forma do comando:
(config) # no telemetry ietf subscription <Subscription-Id> Repeat this CLI to remove each of the subscription identifiers. (config) # no telemetry transform <Transform-Name> Repeat this CLI to remove each of the transform names
Observação: se você gerencia o controlador 9800 com o Catalyst Center e a Prime Infrastructure, a conformidade de inventário do Catalyst Center falha de forma esperada devido ao gerenciamento Prime.
Em versões recentes, o Prime Infrastructure e o Catalyst Center podem usar muitas assinaturas de telemetria para a WLC para que ambos os servidores gerenciem o 9800 simultaneamente. Portanto, você não pode gerenciar o 9800 com o Catalyst Center e a Prime Infrastructure e tem telemetria e estatísticas funcionando. A migração do IP para o Catalyst Center deve, portanto, ocorrer o mais rápido possível, pois o Catalyst Center não pode ter dados de telemetria do 9800 enquanto a Prime Infrastructure estiver gerenciando o controlador 9800.
 Feedback