Economize tempo iniciando seu próximo projeto de TI com o Cisco Business Dashboard e o Network Plug and Play
Objetivo
Inicie uma nova infraestrutura de TI rápida e facilmente usando o Cisco Business Dashboard para verificar e provisionar automaticamente novos dispositivos. O recurso Network Plug & Play (Network PnP) sustenta a implantação automatizada da Cisco. O Cisco Business Dashboard está equipado com PnP de rede.
Software aplicável | Versão
- Painel de negócios da Cisco | 2,2
Para obter uma lista detalhada de clientes e dispositivos suportados, clique aqui.
Que problema o PnP de rede resolve?
O PnP de rede remove grande parte do trabalho de legado envolvido na implantação de nova infraestrutura de TI. Desde o provisionamento até a descoberta de dispositivos, você pode gerenciar sua distribuição de rede a partir de uma interface remota com opções personalizáveis de acesso. Sem o PnP de rede, os técnicos de rede precisariam desempacotar e configurar dispositivos um a um. Agora com o toque zero, você pode provisionar firmware ou atualizar a configuração de inicialização dos dispositivos no seu projeto.
Como funciona o PnP de rede?
Os dispositivos que suportam esse recurso podem se conectar ao servidor PnP de rede. Quando o dispositivo se conecta ao servidor PnP da rede, ele é identificado por uma série de regras e armazenado em uma lista de dispositivos habilitados para PnP. Os dispositivos são provisionados de acordo com a precisão do método usado para corresponder a esse dispositivo. Há quatro maneiras de um dispositivo habilitado para PnP descobrir o endereço no servidor PnP de rede, que é o Cisco Business Dashboard. Os quatro métodos de descoberta são configuração manual, DHCP, DNS e Plug and Play Connect Service.
O PnP pode funcionar sem usar a descoberta de DHCP. No entanto, se você quiser que o dispositivo habilitado para PnP descubra o endereço do servidor PnP via DHCP, o dispositivo deverá se conectar ao servidor DHCP com um flag opcional 60. Esta opção 60 flag contém uma string "ciscopnp" que significa a solicitação do dispositivo para o endereço do servidor PnP de rede. Quando o servidor DHCP recebe o flag opcional 60, ele responde em espécie com uma marca opcional 43 que inclui o endereço completo do servidor PnP de rede. Para saber mais sobre como configurar PnP em um switch, clique aqui.
Ok, estou pronto para começar, o que vem a seguir?
Embora seu primeiro desejo possa ser começar a adicionar dispositivos, clique em Imagens ou Configurações em vez disso. As opções escolhidas dependerão das necessidades da sua rede. Este guia aborda ambos os exemplos.
Passo 1
Faça login na Interface de usuário (UI) do Cisco Business Dashboard Administration.
Passo 2
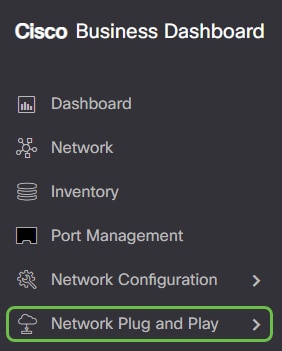
Clique no botão do menu.

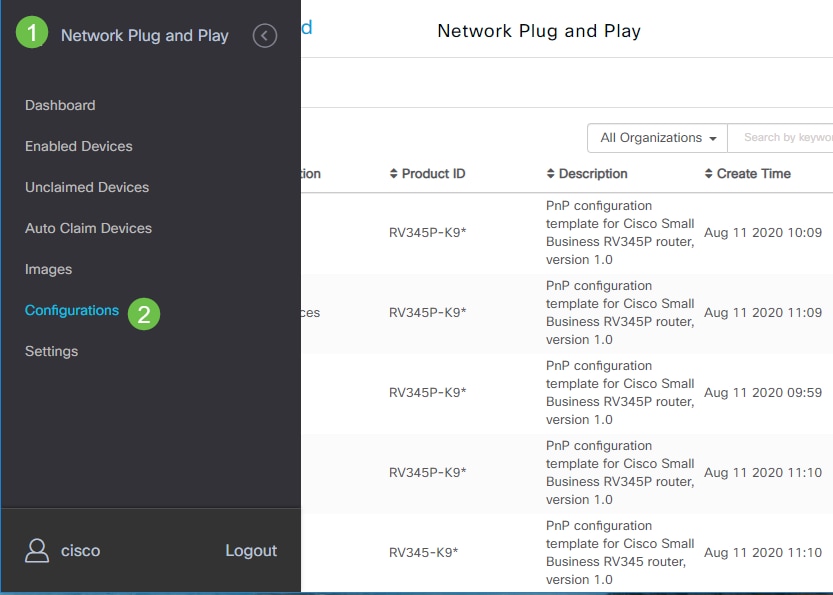
Etapa 3
Clique no botão Network Plug and Play (Plug and Play de rede).
Passo 4
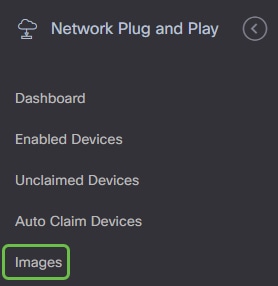
Clique no botão Images (Imagens).
Etapa 5
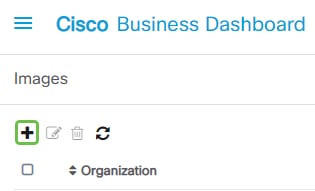
Clique no ícone de mais.
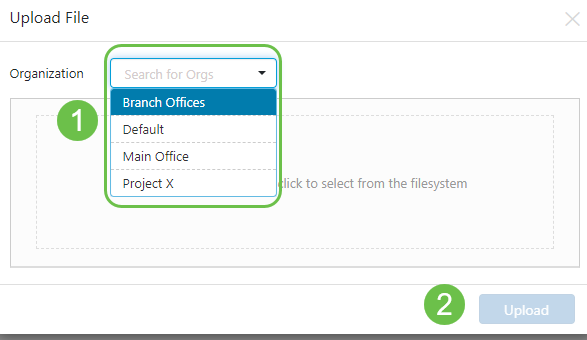
Etapa 6
Se você tiver mais de uma organização, será necessário clicar na seta suspensa para escolher a organização apropriada. Essa imagem será listada apenas para dispositivos nessa organização.
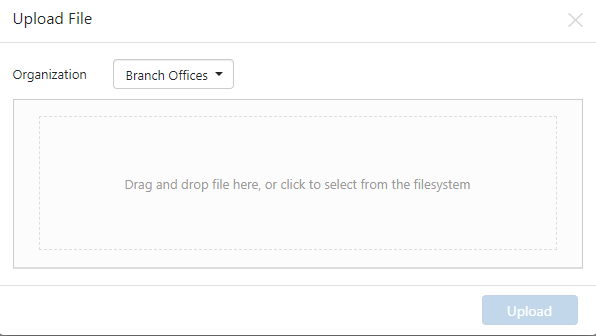
Etapa 7
Neste ponto, o Painel exibirá uma tela solicitando que você arraste e solte um arquivo na caixa ou clique na caixa para abrir uma caixa de diálogo de upload de arquivo no navegador. Selecione o arquivo desejado e clique no botão Upload.
Para saber mais sobre modelos, clique para exibir o artigo Modelos de configuração Plug and Play.
Lembre-se de que o Cisco Business Dashboard aceitará apenas um tipo de arquivo específico. No caso de imagens de firmware, um arquivo Firmware_File.Bin. A função do arquivo de configuração aceita Config_File.XML ou Config_File.TXT.
Passo 8
Repita as etapas para adicionar os arquivos de configuração ou imagem, se necessário. O botão da seção Configurações fica logo abaixo do botão Imagens.
As configurações aplicadas aos dispositivos são para a inicialização e não para a execução das configurações.
Caminhos divergentes, com base nas suas necessidades
Método manual: Selecione esta opção se quiser controlar a configuração e a imagem de cada dispositivo individual.
Método de solicitação automática: Selecione esta opção se quiser provisionar dispositivos com base apenas na ID do produto. Esta é uma opção simples.
Ignore: Selecione esta opção para notificar o PnP de rede de que você lidará com todas as instalações de configuração ou firmware.
O fator decisivo é o quão preciso você precisa controlar as opções de provisionamento, por dispositivo individual ou categoria de dispositivo.
| Método | Provisionamento de precisão | Informações necessárias |
| Manual | Baixa | N/A |
| Reivindicação automática | Médio | PID |
| Ignore | Muito alto* | N/A |
Neste momento, o caminho que você percorre depende de suas necessidades para este projeto. Se você pretende usar o Método de solicitação automática, continue lendo. Como alternativa, você pode ir para a seção Solicitar manualmente ou Ignorar dispositivos.
Usando o método de solicitação automática
Pense na solicitação automática como um recurso baseado em filtro; para que os dispositivos sejam migrados dinamicamente para o seu projeto, você precisará confirmar as IDs de produto (PID) destinadas ao projeto. Em seguida, o PnP de rede verifica o PID correspondente e adiciona à sua lista de dispositivos habilitados para PnP.
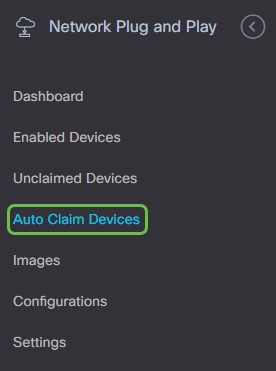
Passo 1
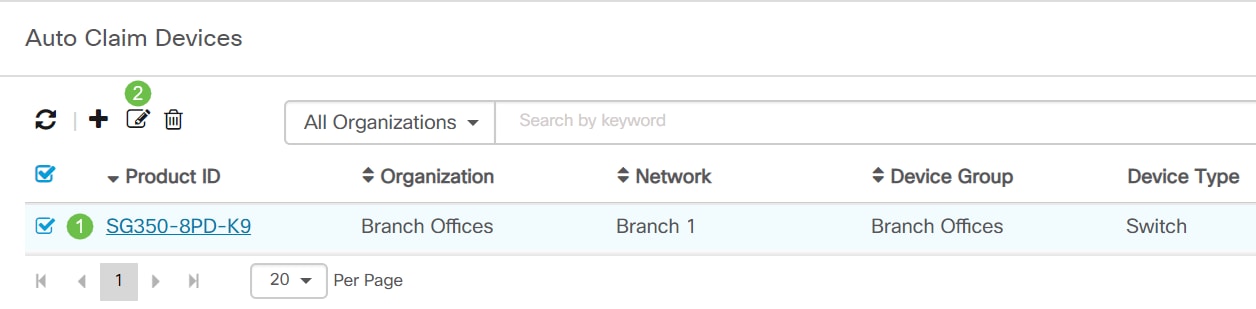
Inicie esse processo clicando em Auto Claim Devices (Dispositivos de solicitação automática).
Passo 2
Clique no ícone de mais.

Etapa 3
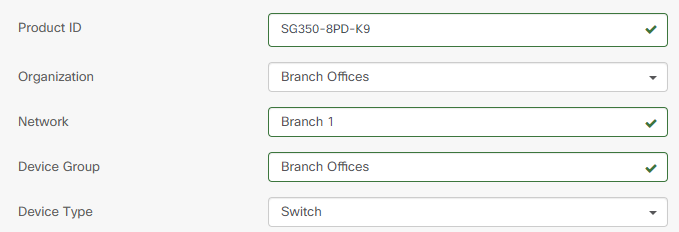
Insira a ID do produto, Organização, Rede, Grupo de dispositivos e o tipo de dispositivo para os dispositivos que você deseja solicitar automaticamente.
Passo 4
Clique em Next.
Etapa 5
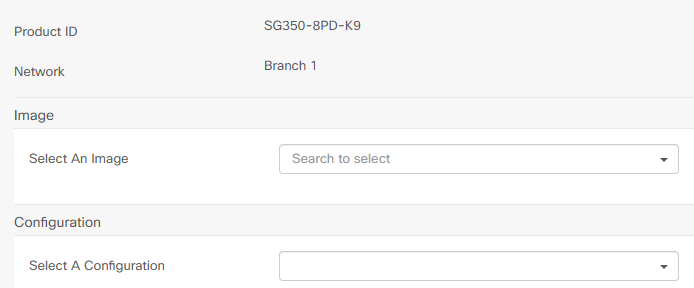
Selecione o firmware e a configuração desejados nas caixas suspensas.
Etapa 6
Clique em Finish.
Quando essa ação for concluída, avançando, o servidor PnP de rede usará a Imagem e a Configuração para provisionar qualquer dispositivo que se conecte à rede e corresponda a essa PID.
Etapa 7
Se preferir editar um dispositivo de Reivindicação automática, clique na caixa de seleção ao lado do dispositivo e, em seguida, no ícone de edição.
Solicitação de reembolso ou ignorando dispositivos manualmente
Os dispositivos que não correspondem ao seu filtro, mas ainda suportam PnP de rede, serão exibidos na seção Dispositivos não reivindicados do PnP de rede somente se for um dispositivo que ainda não está no inventário CBD.
Passo 1
No painel de navegação Network Plug and Play (Plug and Play de rede), clique em Unrecolocados.

Passo 2
Selecione um dispositivo listado e clique em Reivindicação ou Ignorar.
Ignorar dispositivos impede que o servidor PnP da rede provisionamento de dispositivos com configurações ou firmware. Essa opção é para aqueles que desejam atualizar manualmente as configurações e o firmware em cada dispositivo. Quando os dispositivos são adicionados à lista de ignorados, eles não são tocados pela rede PnP.

Etapa 3
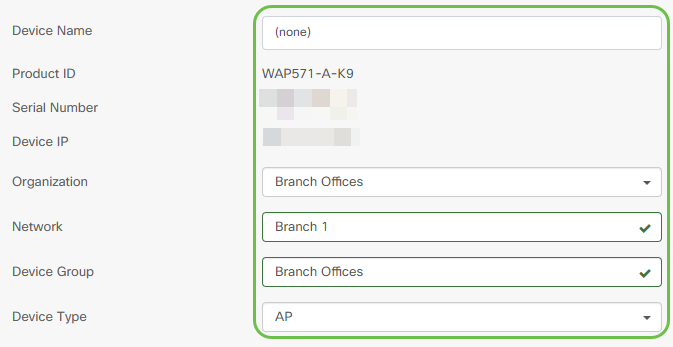
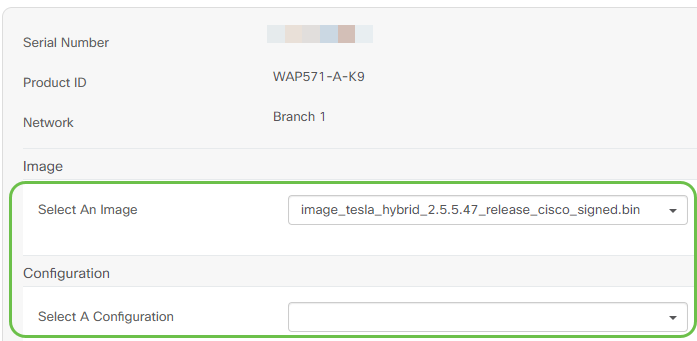
Se você selecionar Reivindicação, preencha as seguintes informações.
Passo 4
Clique em Next.
Etapa 5
Selecione o firmware e a configuração desejados nas caixas suspensas.
Etapa 6
Clique em Next.
Etapa 7
Você verá uma página de resumo para este dispositivo. Clique em Finish.
Pegue um café ou um chá e faça uma pausa, você acabou de ignorar ou reivindicar seus dispositivos selecionados.
Quando seus dispositivos devem fazer check-in novamente para obter atualizações?
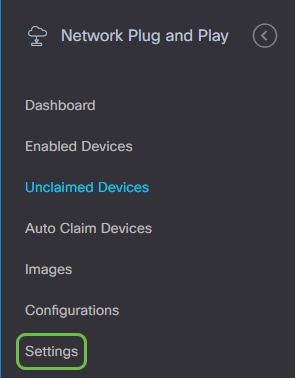
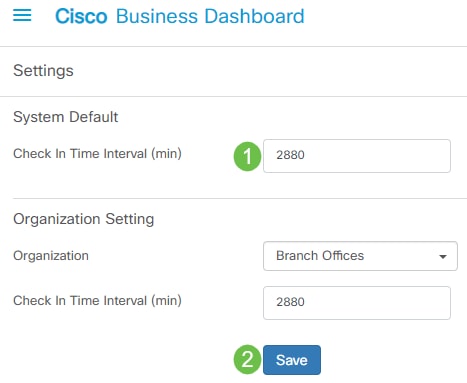
Você pode modificar o período de tempo antes que seus dispositivos façam check-in novamente para obter atualizações. Em Plug and Play, selecione Settings.
Você pode alterar a frequência com que o dispositivo verifica se há atualizações dentro dos limites. 0 não é aceito. 2880 é o tempo máximo. Clique em Salvar depois de inserir um novo intervalo.
Conclusão
Parabéns, agora você está pronto para levar seus próximos projetos do conceito à execução mais rápido do que antes. Para saber mais sobre o Cisco Business Dashboard, consulte a página de suporte CBD.
Se quiser saber mais sobre o Plug and Play, consulte o Network Plug and Play Solution Guide for Cisco Business.
 Feedback
Contate a Cisco
- Abrir um caso de suporte

- (É necessário um Contrato de Serviço da Cisco)